
Anthro Tea & Crumpets Knock Off Apron {Homemade Christmas Gifts}
Our first guest to kick off the Homemade Christmas Gifts week is really going to knock your socks off! And she's one to keep your eye on for sure. I recently discovered her blog and was blown away by her talent! Please welcome Sierra!
***
Hello lovely Scrap Shoppe readers! 🙂 I am Sierra from The Blue Robin Cottage! I am so honored and thrilled Michele invited me to share a homemade Christmas gift with you during her fabulous Homemade Christmas event!


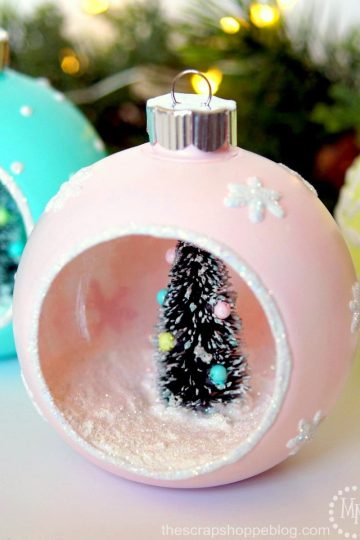
Its safe to say that Santa and I are on a first name basis and he may have let it slip that he's bringing my little gal a play kitchen for Christmas. When I saw this at my very favorite store on earth, I thought it might make the perfect addition to a little kitchen:

Feast your eyes on this adorable mini Anthropologie Tea and Crumpets apron. Instead of buying one, I decided to make my own version!

To make a little apron you'll need some fabric, pins and some scissors.
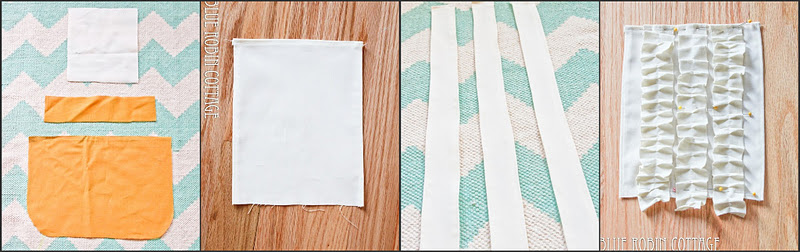
2. Take your top apron piece and hem on both sides as well as the top, leaving the bottom raw edge alone.
3. Cut 3 strips of fabric. Hem the sides of the strips and the top for a clean edge.
4. Ruffle your strips of fabric by pushing the strips through your sewing machine faster than it can sew to create nice pleats.
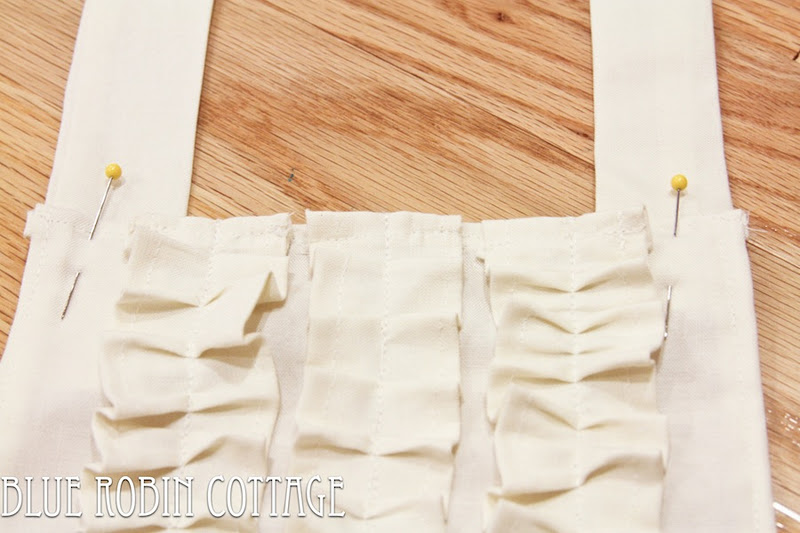
5. Place, pin and sew your ruffles onto your top apron piece.
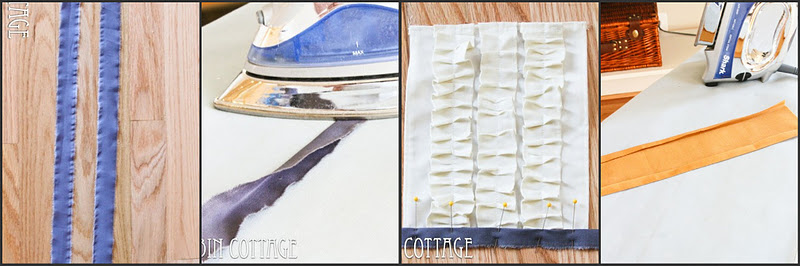
6. To make your pipping, cut 2, 1 inch strips. The strips need to be a little longer than your waist piece. Fold in half and press
7. Pin your pipping piece onto the bottom of your top apron piece.
8. Hem your waist piece- I hemmed mine about a ½ inch on each side.

9. Pin your waist piece to your pipping and sew across the top.
10. Attach your second piece of pipping to the bottom half of the waist strip.
11. Pleat the top of your bottom apron piece.
12. Sew the bottom apron piece onto the waist piece.
13. Cut 2, 3 inch strips of fabric for your neck straps, fold in half and press.
14. Sew down the edge, creating a tube and turn inside out. Press.
15. Pin and sew onto both sides of the top part of the apron.

16. Make your own ruffle or use store bought trim and pin onto the bottom of your apron and sew. Make sure your raw edges match up.
17. Sew a top stitch along the bottom edge to create a nice finished look.
18. For the waist ties, follow the same steps you did on the neck ties but make them longer and as wide as your waist piece. Sew them onto the waist piece and...


You can add a little pocket and embellish it any way you want! 🙂


Thank you so much for having me today! If you have any questions or you'd like to stop by and say hi, come visit me at The Blue Robin Cottage. See you soon!
***
What little girl wouldn't absolutely adore this apron? Thank you so much for sharing this fabulous tutorial, Sierra!
What is the length of the neck piece? You have 3”, that can’t be correct.
hi! How long are the neck and waist ties? You gave the width, but what's a good length for each? Thanks!
Just love this! Thank you for sharing. You are so talented
Hi, I'm in the process of following your instructions. What does the back of your apron look like? I feel like mine is going to look very rugged and raw on the back without any back piece, especially along the waist piece with all the different fabrics. Any suggestions?
A prompt response is appreciated if possible.
Thanks.
Hi Caryn! Sierra was a guest on the blog for this project so I don't actually know how she finished the back. There is a link to her blog at the top of the post. You might try contacting her through there to see how she finished it.
This apron is the cutest! I'm going to make an adult-sized one for my sister for Christmas but was wondering if you could explain the piping section a little further. Thanks!
This is absolutely darling!!! I want one! 🙂
Adorable!
Oh my gosh!! Too cute! I need one! I love the little ruffle top and the Initial pocket!
LOVE it! I want one! 🙂
I LOVE this! You did such a great job. Pinning this 🙂
ahh, that is soo cute!
Adorable apron and I love the color combo! In my younger years I'd be doing this, but now I have no sewing machine, I gave it away to my cleaning lady I had...oh well.
Hugs, FABBY