
This post is sponsored by Expressions Vinyl. As always, all ideas and opinions are my own.

Adhesive vinyl… it is one of my favorite things to use in my home decor. I’m so fickle about decorating and, honestly, I don’t think I’m the best at it. So to have the ability to easily change it out is super appealing. That’s why I love vinyl so much! It looks great when you use it, but you can remove it if you change you mind and redecorate with something new… in vinyl, of course.
Sometimes I also want a little more than just your average colored vinyl. For this particular project, a Floral Window Sign, I wanted completely customized vinyl which I was able to create with Inkjet Printable Vinyl and the Silhouette’s Print and Cut method. If you’re unfamiliar with this technique you are in luck! I have a comprehensive tutorial for you!
Also, be sure to check out the very end of this post for dozens of other vinyl project ideas! You can find the vinyl for all of these projects at Expressions Vinyl.
 I started with this old window purchased from a friend’s antique store. I love the size and shape! It’s different from your typical old window. And I knew it would be perfect sitting on my mantel. It just needed a paint update so I applied a couple of coats of a chalk-type paint and gave it a good waxing.
Next, I needed to create the wording I wanted to go on the window.
 In the Silhouette program on my desktop, I found a satisfactory font – I was looking for one that was not super thin so that my pattern would be maximized.
I arranged the letters to be the size I needed. They don’t need to be lined up in a row, you can always line them up later with transfer paper.
 I had previously altered 6 different floral pieces of clipart to my custom color scheme, navy and yellow. They are simple JPG files, and I opened them one at a time in the Silhouette software. I then copy and pasted them into the page with my text, customized their size to fit within the letters, and arranged them accordingly.
Paste more florals and arrange them within each letter.
 Pink Arrows: To activate the Print and Cut method, click on the Registration Marks icon in the top right of the software window. Select the Style according to which Silhouette machine you are using.
The default Position was a little tight for my large letters so I changed them all to 0.5 which made the works pace a little larger.
Orange Arrows: Arrows 1, 2, and 3 point at the registration marks. Your printable image must lay within these marks as well as within the red border that crosses through them. Keeping out of the gray area is advisable as well.
I moved my text and images together so that they were well within all of the borders. The registration marks will print with your image. Items in red will not print when you send the file to the printer, this includes the HOME text and the red border.
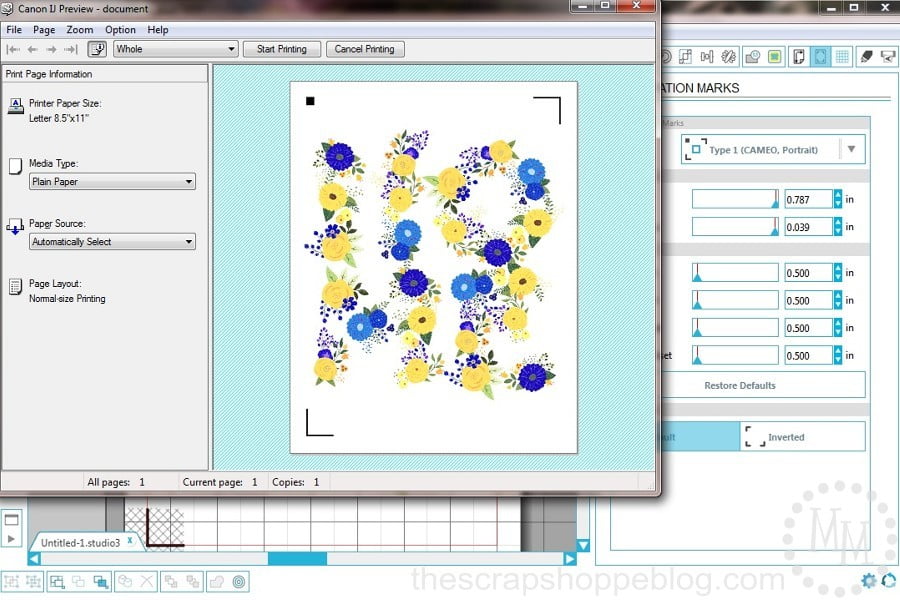 Here is a print preview of the prior screenshot being sent to the printer. You can see it only includes the floral clipart and the registration marks. Print!
 Line the printed vinyl up in the top left corner of your cutting mat, just as it looks in your software. Go to the cut settings and set it up to cut vinyl. Adjust your blade on the machine as needed.
When you tell the software to cut, the Silhouette will “read” each of the 3 registration marks to be sure the cutting is lined up correctly. Then the machine will cut letters in red on the sheet of vinyl. Peel away the negative vinyl to reveal your text with the custom pattern.
 Line up the letters with strips of transfer paper. Apply to surface and rub evenly then remove transfer paper.
Mandatory: Stand back and admire your work!
 I love how the pattern turned out! It almost looks like vintage sheets. And the colors match my living room decor beautifully!
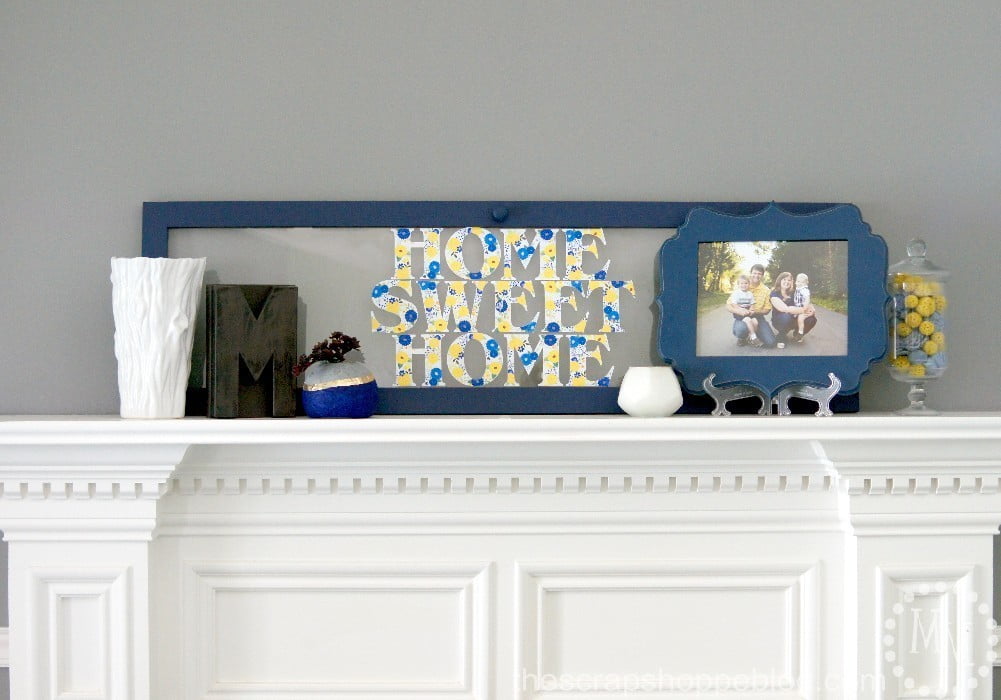 I set the window up on my mantel and arranged a few other decorative pieces around it. It looks fab! And if I ever decide to change up the window, for the holidays for instance, I can remove the vinyl and replace it with, you guessed it, other vinyl!

Melinda
Monday 3rd of August 2015
You printed the vinyl?? I'm in awe! You're one smart cookie! Of course, you already know how fab it looks! Here from HomeMatters.
gail
Thursday 23rd of July 2015
Michele,
That home sweet home window is just too darn cute. It's one of my favorite sentiments, I actually have a plaque on my fireplace hearth.
great job! gail