
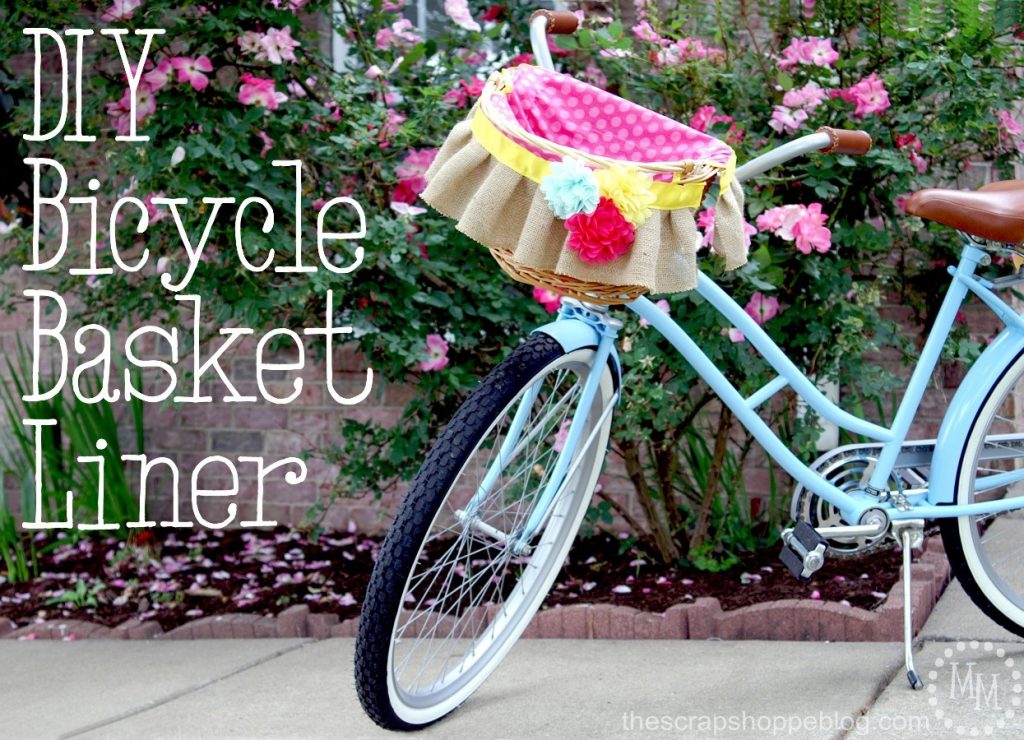
DIY Bicycle Basket Liner
A DIY bicycle basket liner is fun way to dress up your bike and add a touch of femininity.
You guys, this is a project I have wanted to make for ages, a liner for my bicycle basket!
I mean, if you have a cute bike you definitely need a cute bike basket.
And if you have a cute bike basket you must have a cute DIY bicycle basket liner!
Am I right?
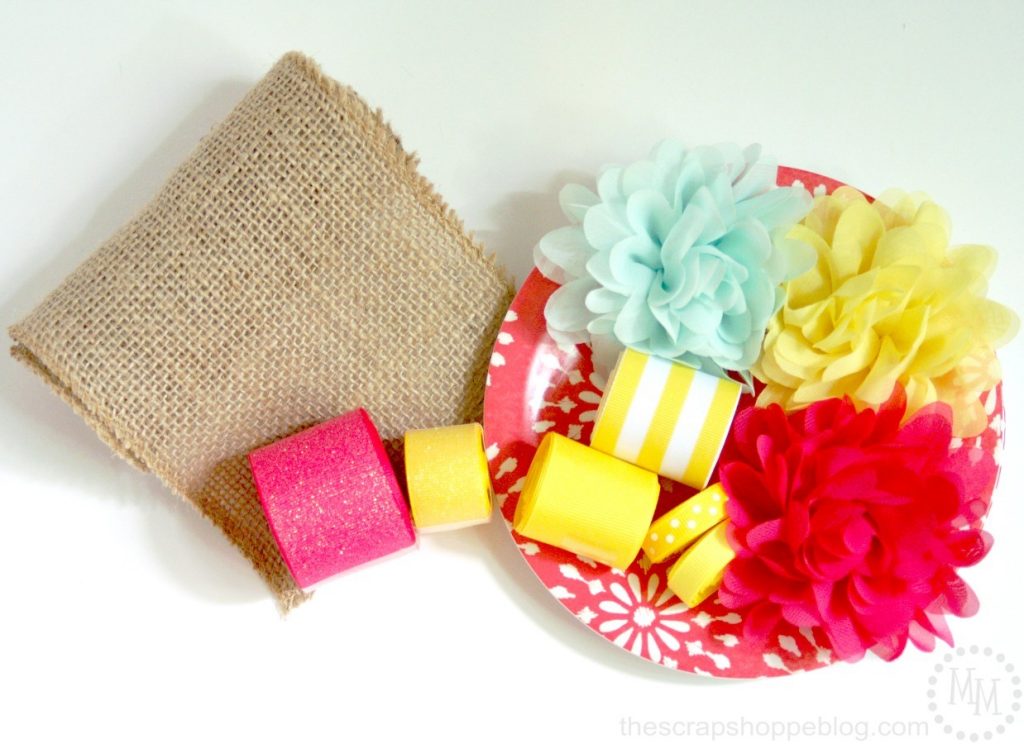
DIY Bicycle Basket Liner Supplies:
These supplies are from The Ribbon Retreat.
You will need ~2 yards of burlap ribbon as well as other assorted ribbons in fun, bright colors with some super cute chiffon flowers.
On top of these supplies you will also need ~½ yard of fabric.
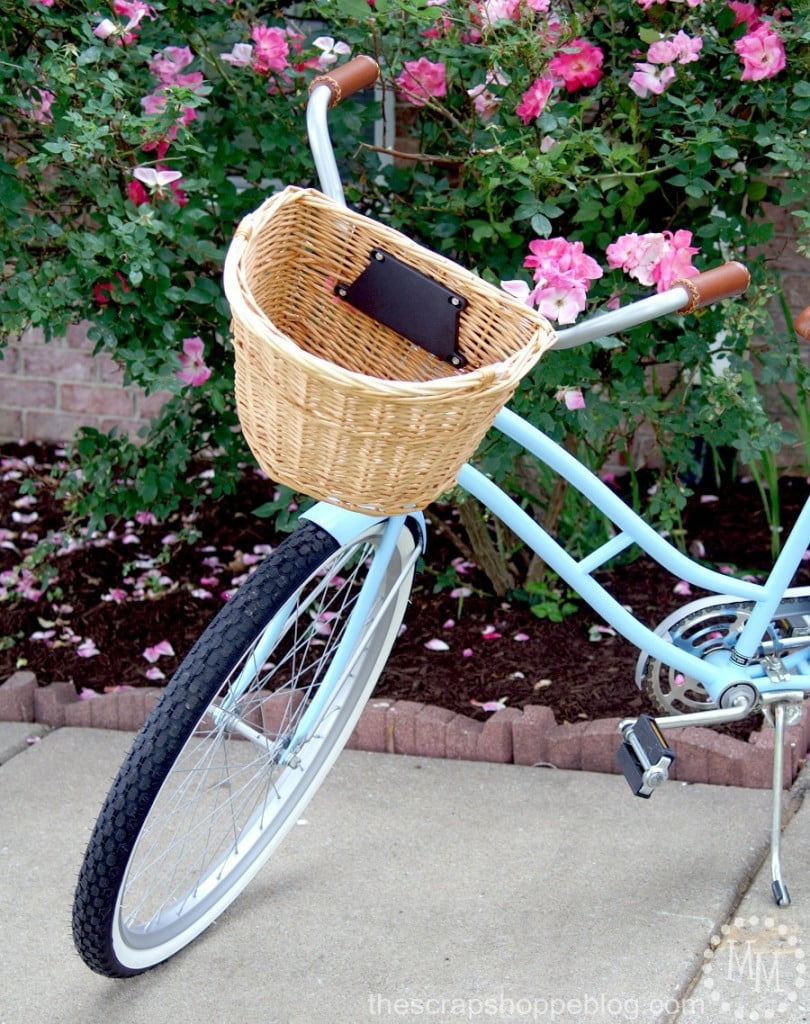
Several years ago my husband made over this vintage Western Flyer Galaxy bicycle for me.
I still love it!
Shortly after the makeover my mom purchased this cute bicycle basket to add to the bike.
I have wanted a cute DIY bicycle basket liner for it ever since!
A couple of years ago I taught myself to sew, so I decided it was high time to make the basket liner myself!
Bicycle baskets come in all shapes and sizes so the odds of finding a liner is slim unless it already comes with one.
You would need to make something yourself.
That being said, my basket liner may not fit your basket so exact measurements are not going to help you.
But I can give you the general idea of how this was made so that you can find the measurements to create your own!

Sewing DIY Bicycle Basket Liner:
My basket has a flat back and a rounded front.
It is also tapered, wider at top than the bottom. It also has a basket handle which will need to be accounted for for draping the liner over the basket.
Cut your fabric into 3 pieces:
1) the flat back,
2) the rounded front, and
3) the base. Allow for a ½" seam allowance when cutting the fabric as well as making the back and front a couple of inches taller than measured to allow it to drape over the edge of the basket.
Stitch together the flat side of the "base" to the bottom of the "back" with the right sides of the fabric facing each other.
To attach the "front," line up the top corner of the front to the top corner of the "back," again with the right sides of the fabric facing each other.
Stitch together the sides of the of the front and back.
Continue to stitch the bottom of the "front" to the rounded part of the "base" then back up the other side of the front and back.
Fold the top edge of the fabric over twice to create a ½" hem.
Stitch over the hem.
Determine where the basket handles need to cut.
Mine are between 3 and 5 inches in from the back of the basket to the front.
Cut out a rectangle in the fabric.
I used some the thin ribbon to create a bias look of sorts and stitched it straight onto my cut edges, folding over and ironing down the edges of the ribbon first to avoid fraying.

To create ruffles in the burlap, tuck and pin one side of the burlap then stitch over the tucks to create the ruffles.
I created 3 ruffles: 1 long one for the center of the basket and two short ones that will fit behind the holes cut for the handles of the basket but not wrap around to the back of the basket.
Also allow the length of the ruffles to extend longer than the length of the fabric by about an inch so the sides will meet when the liner is spread over the edge of the basket.
Stitch the ruffles to the back of the liner.
Cover where the burlap meets the fabric with 1" wide ribbon and stitch around the edges.
For the ends, fold ribbon over and iron flat to prevent edges from fraying.

Drape liner over basket to determine where to add the chiffon flowers.
Glue them in place with a fabric glue.

I just love how my DIY bicycle basket liner turned out!
I'm just going to go ahead and say it... my bike just became the cutest in the neighborhood!
And this is one project that is finally 100% complete.

>> See where I party! <<

Your basket liner came out so cute. I will be featuring this tonight at my Swing into Spring party that opens at 8pm EST. Please stop by and pick up an I've Been Featured button. Thanks. http://diybydesign.blogspot.com
I just put a plain basket on my bike...which is not ok for a crafty girl...and I was just thinking it needed some flowers or something. Love the burlap. It's a great piece.
This is probably one of the cutest things ever. And it makes that bike even cuter than it already is. I featured this on our create link inspire round up. Thanks for linking up!
Michele,
Love this bicycle basket liner. I hope you stop by Thursday Favorite Things on my blog since you have been featured.
Hugs,
Bev
Super cute! Now I want to get a basket & make one for my daughter's bike. She has a bike just like this.
Love your basket liner. I have a basket on my bike and it needs updating.
Great tutorial,
Bev
The bike and the basket just couldn't be any cuter!
Your bicycle basket liner is adorable! We'll be featuring this at tomorrow's Snickerdoodle Party. Hope to see you there!
Oh my, your bike basket liner is so adorable. Thank you for sharing your delightful basket liner at the Snickerdoodle Create~Bake~Make link party!
This is just so adorable! And to think, just this past Saturday I saw burlap at a yard sale and wondered if I should buy it! LOVE it!
🙂 gwinggal
Your bicycle basket liner is so cute! It looks so cheerful and pretty. You are very clever to be able to make it in the correct size/shape to fit the basket. I don't think I could do that. Great job!
So pretty and colourful! Thanks for sharing with us at #overthemoon. I've pinned and shared.
Super cute!
I am forever looking for ways to dress up my bike, this is all kinds of incredible!
The basket liner is adorable!
That is the cutest thing, wish Id had something like that when I was riding.
Thanks for sharing on Friday Features this week, stop by for Wordless Wednesday as well.
Have a great weekend!
Karren
How adorable this basket is! Good job!
LOVE it- how cute did that turn out!! Thank you so much for linking up at Snickerdoodle Sunday!
Sarah (Sadie Seasongoods)
Such an adorable basket! Thanks for sharing your crafty goodness on the Monday Funday Party! XO
This is super cute & I love the step by step tutorial. I have an old bike (well loved) and have had the hardest time finding a basket. Never even thought of making a liner to spice up a plain basket...awesome! Great post! Coming over from "Turn It Up Tuesday".
Sooo cute! I haven't ridden a bike in years, but maybe I could do something similar for my daughter's bike! I'd love for you to stop by the Submarine Sunday Link Party to share this crafty creation! I hope to see you there!
Navy Wifey Peters @ The Submarine Sunday Link Party
now I want a bike just to put a cute basket on it!