
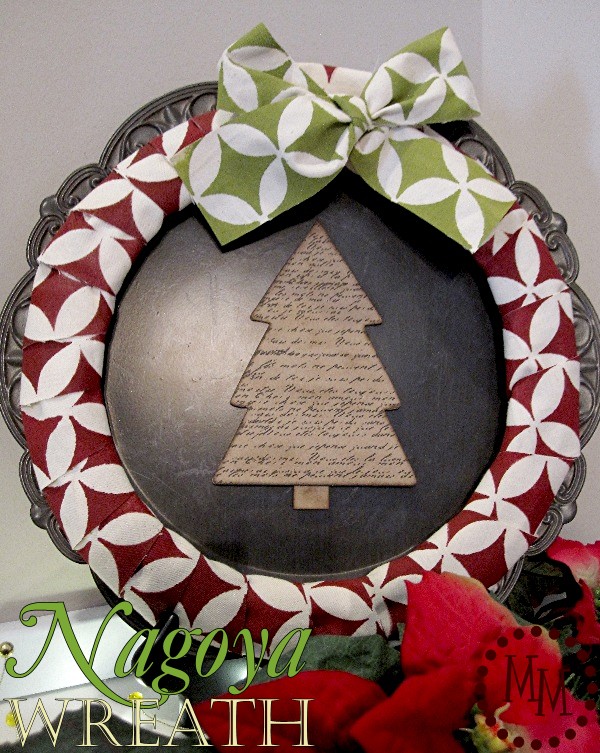
Nagoya Wreath
Not only did Cutting Edge Stencils let me host a giveaway for one of their great stencils last week, they also allowed me to select one to play with! I chose the Nagoya stencil.
Thus, I've named this project the
Nagoya Wreath!
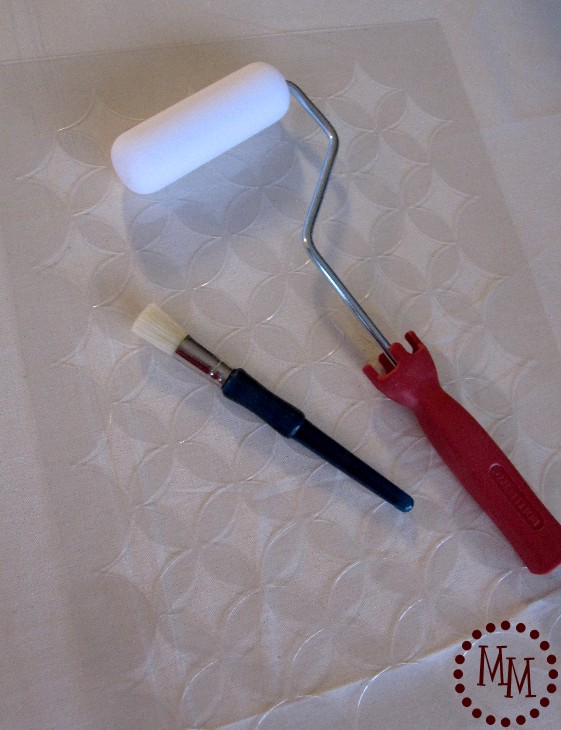
Along with the stencil, I was also sent one of the foam rollers and stencil brushes.
Painting is not a craft I feel like I am particularly good at so I watched a few of the tutorial videos until I felt comfortable attacking the stencil.
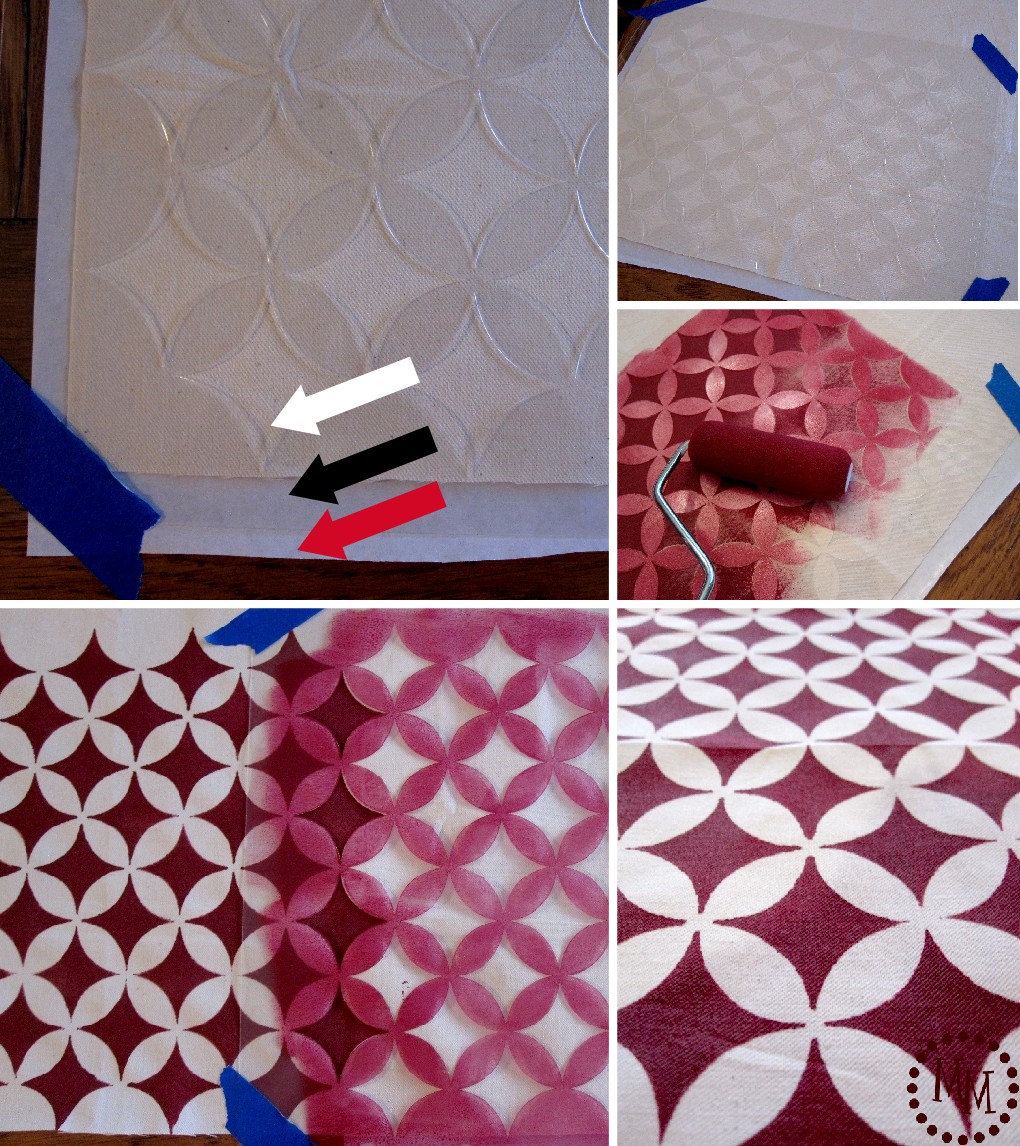
I decided to use my stencil on fabric.
Imagine! My very own custom fabric!! 🙂
I placed some freezer paper under my fabric to protect my work surface from the paint. You can see my layers of materials in the first photo above (red arrow -> freezer paper, white arrow -> fabric, black arrow -> stencil). I used blue painter's tape to keep everything still. Then I loaded my foam roller with acrylic paint I had mixed with fabric medium.
Once I had finished one portion of the stencil I was able to easily lift it up and reposition it to continue painting.

Included in my box of goodies was a small bird stencil. Since I was curious about using the stencil brush, I decided to try it on this little stencil. Look at how clean those lines are! Loving this brush...
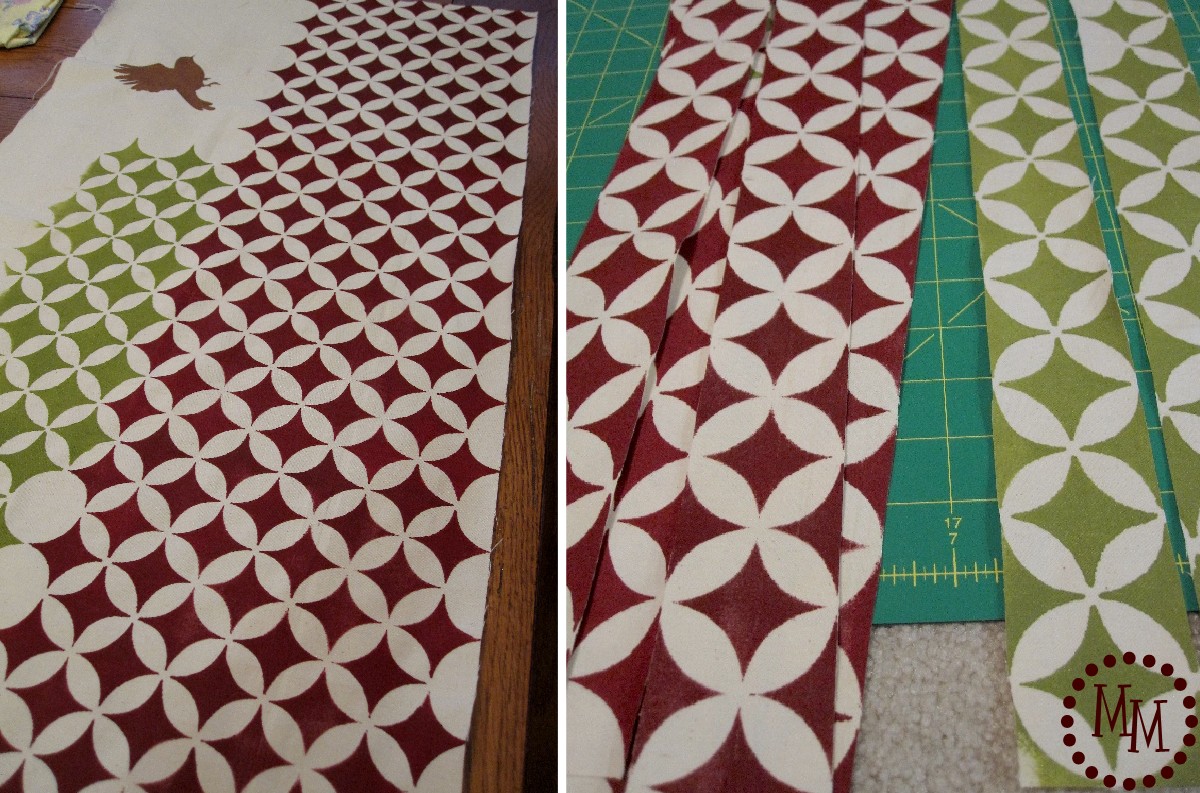
After painting my fabric, I cut it into strips.
And because I'm a wreath hound...
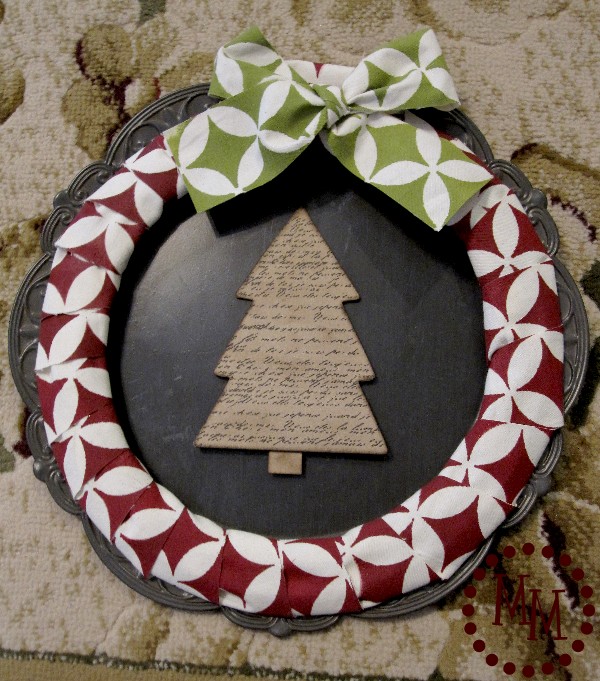
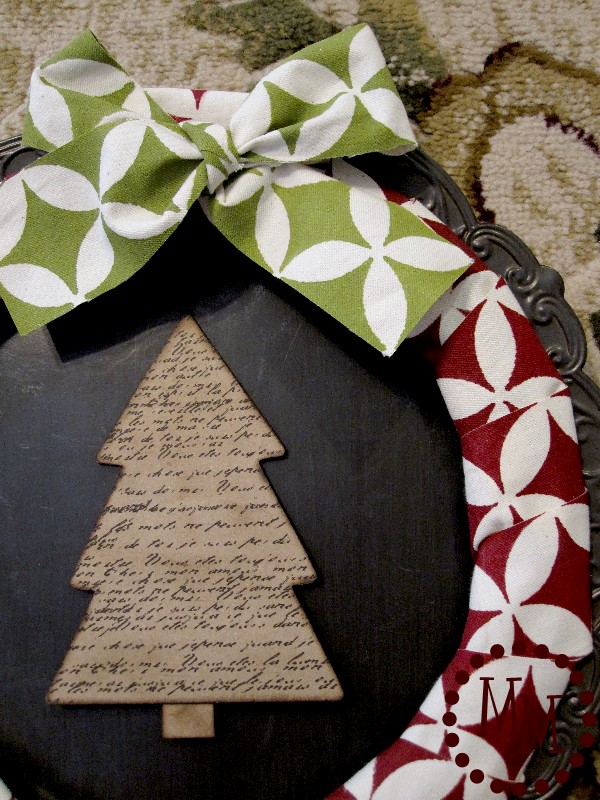
I used it to make this fun Christmas wreath!
Actually these are the colors of my living room so I can keep the wreath up all year long and just change out the image in the center of the charger with the seasons and holidays.
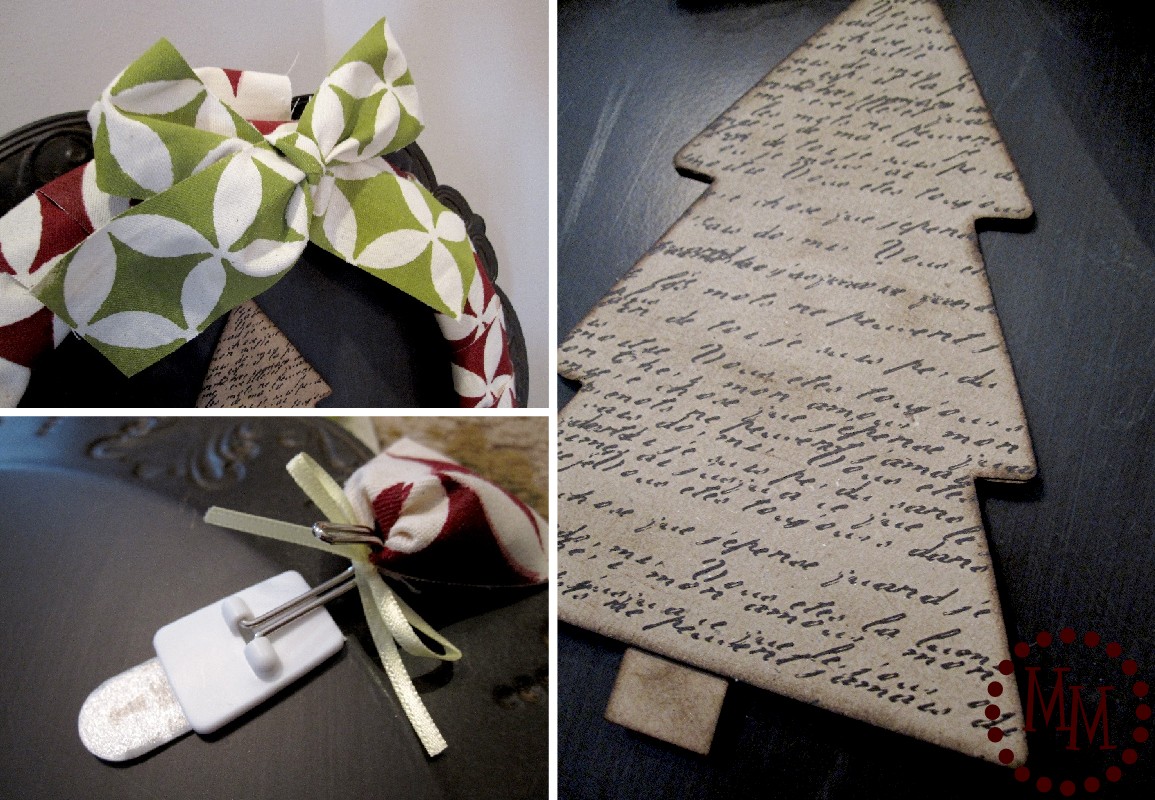
The bow is pinned to the wreath with a straight pin, so it can actually be removed if I want to decorate the wreath with something else.
To attach the wreath to the charger, I put a 3M Command Hook upside down on the back of the charger and used ribbon to tie on the wreath.
For the center of the charger, I took a piece of Christmas tree chipboard ($1 section at Michael's) and covered it with some Canvas Corp paper. I used a square punch to make the tree trunk. I inked everything with brown distress ink and attached it to the charger with some Glue Dots.
I love how this project turned out!
And I love the idea of making my own custom fabric with this stencil.
Am I ready to tackle a wall project? Maybe.
But I think I'll play around with painting more fabric for now!!
disclosure: Cutting Edge Stencils provided me with this stencil but all opinions are 100% my own.
ps. There is something I used in this project that is a hint at what tomorrow's giveaway will involve. Any guesses? 🙂
Just wanted to let you know I featured this as part of my link party wrap up! Please feel free to grab a button if you like, and thanks for making the BFF Open House such fun!
Oh Michele, everything about this is just stunning! I really need to try their stencils because I've loved every project I've seen using them. Wonderfully creative idea and thanks for sharing at this week's BFF Open House!
SOOOOOOOOOOO PRETTY!!! Love that wreath! Would you please share this with my readers for Fun Stuff Fridays linky party? http://www.toysinthedryer.com/2011/12/fun-stuff-fridays-3.html
This is AMAZING, and so pretty! 🙂 Would love for you to link up to Find Your Craft Friday over on my blog... Have a great Friday!
Emily @ BabyBerry
http://weinzapfelbabyberry.blogspot.com/
I am in love with this. I love it!! I'd love for you to link up to my Christmas Carnival.
http://blissfulanddomestic.blogspot.com/2011/11/homemade-in-december-link-carnival.html
I'm very very impressed. I'm super nervous about stencilling on a wall or paper, and fabric terrifies me. You did such a nice job!:)
This is adorable! I love it and its a new, unexpected way to use the stencils! I'm a new follower! I hope you'll follow me back!
how clever! I'd love you to add it to what we wore and made party over at http://raegunwear.blogspot.com
Pretty! I love the tree in the center.
Lovely!
When you get a chance - love for you to link up to my "Made by ME" linky party: http://www.jaqsstudio.com/2011/12/made-by-me-9-linky-party-and-features.html
I love stencilling! I haven't really thought about making my own fabric...Genius! Love the wreath too!
Kim
http://www.todayismysome-day.blogspot.com
I love the stenciled fabric and the kind of vintage feel of this wreath! Would love it if you would stop by and share this at my linky party going on right now 🙂 http://everything-underthemoon.blogspot.com/2011/12/bedazzle-me-monday-11.html
Have a great week!!
So beautiful! I love the stenciled fabric pattern!
Michaela @ coveredinmodpodge.blogspot.com
Michele--your wreath is beautiful! I've never stenciled a pattern on fabric... very nice!!!
great job girl!
gail
Your wreath is gorgeous! Love the stencil pattern.
What a clever, pretty wreath. Was the fabric stiff, or did the fabric medium make it softer? Love this.
I love it Michele! Very clever of you to put it on a charger. NEVER would I have thought to do that!
Oh my gosh! I love the way this turned out Michele!! I seriously thought it was a fabric print on my blog feed and not a stencil print! I love the design and the colors! Plus, I'm obsessed with the bow at the top! So cute!
Wow!! I love your wreath!! The stenciled fabric is gorgeous and I love that you backed it with a charger. That is so clever!!
ok - so I'm guessing either a 3M or a Canvas Corp giveaway - both of which would be awesome! 😉
This is lovely! I have always wanted to try one of those stencils on a wall (I even have the wall picked out) but i am SO SO nervous! I think you did a great job on the fabric! I love the stencil you picked and the colors. And Im guessing the giveaway for tomorrow is ... a stencil? 🙂