
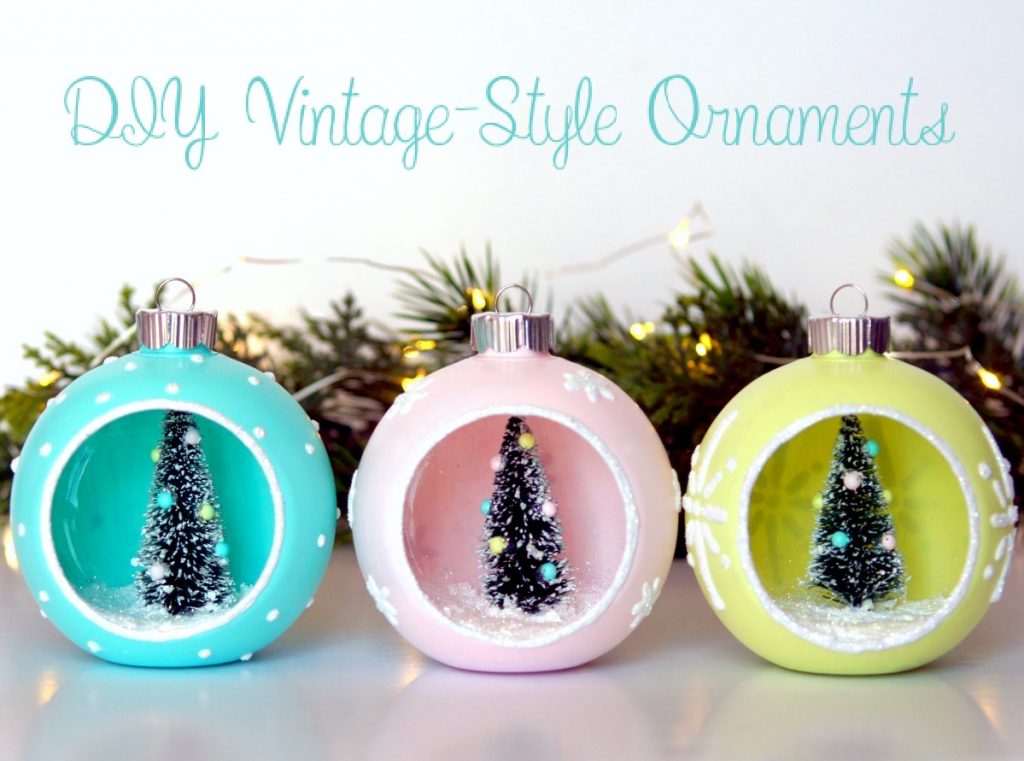
DIY Vintage-Style Ornaments
If you love the look of vintage Christmas ornaments but can't find any around, try making them yourself such as these DIY Vintage-Style Ornaments!
This is a sponsored post for DecoArt for whom I am a Core Blogger. As always, all ideas and opinions are 100% my own.
This post contains affiliate links.
I recently scored some adorable Christmas decorations at Hobby Lobby in colors that aren't in my normal Christmas color pallet.
The new decor has a vintage flair so there are lots of cool, pastel colors.
So I decided to make some of my own decorations to go along with them!
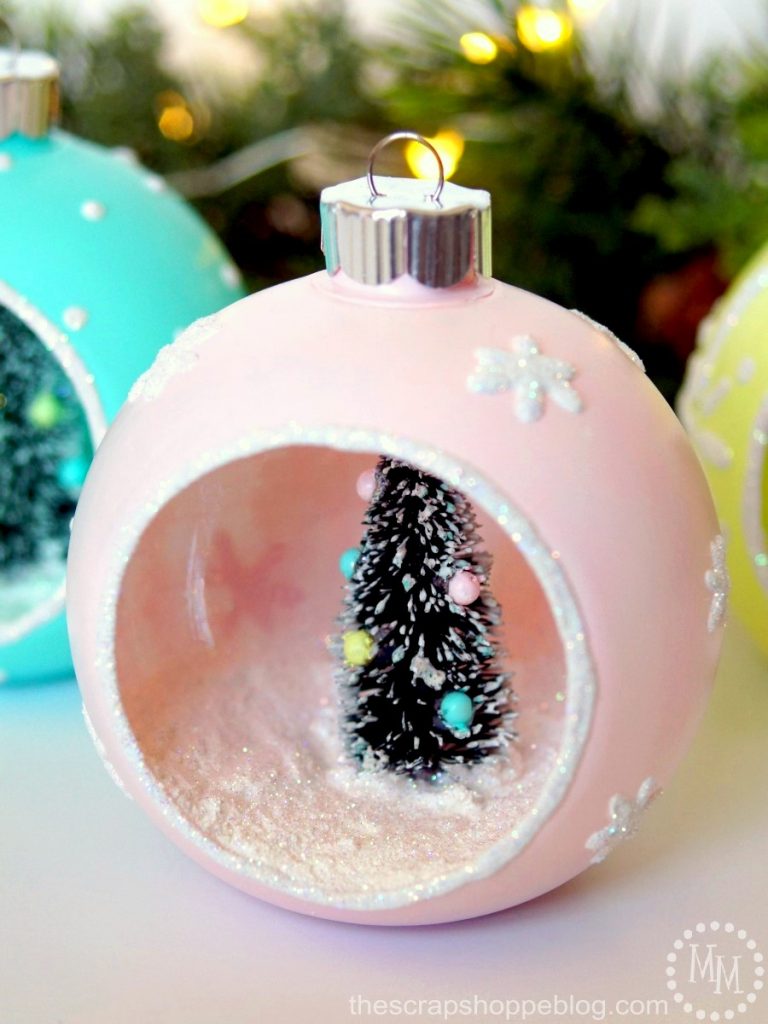
These DIY vintage-style ornaments are made from plain clear plastic ornaments.
All it took was the right colored paint, some fun snow-texture effect, and, of course, glitter.
Because everything is better with glitter, right?
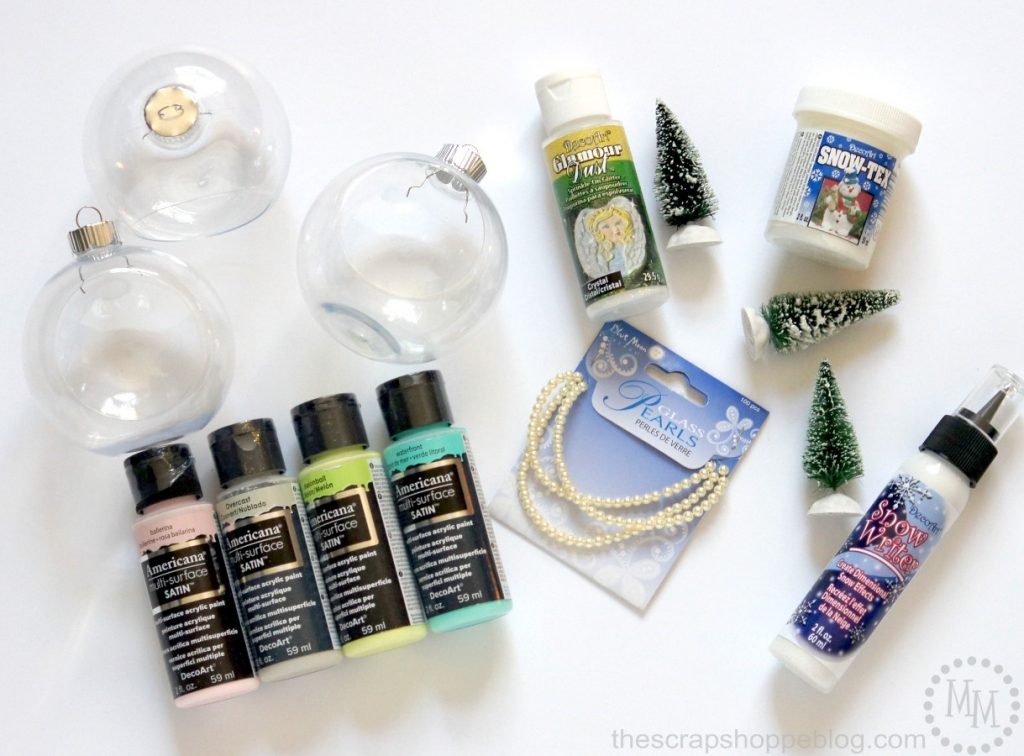
DIY Vintage-Style Ornaments: Supplies
Clear plastic ornaments, open in the front
Americana Multi-Surface Satin in Ballerina, Melonball, and Waterfront
Pearl beads
DecorArt Glamour Dust in Crystal
You can shop all supplies needed for this craft project here.
I put together a quick video to show how these ornaments come together.
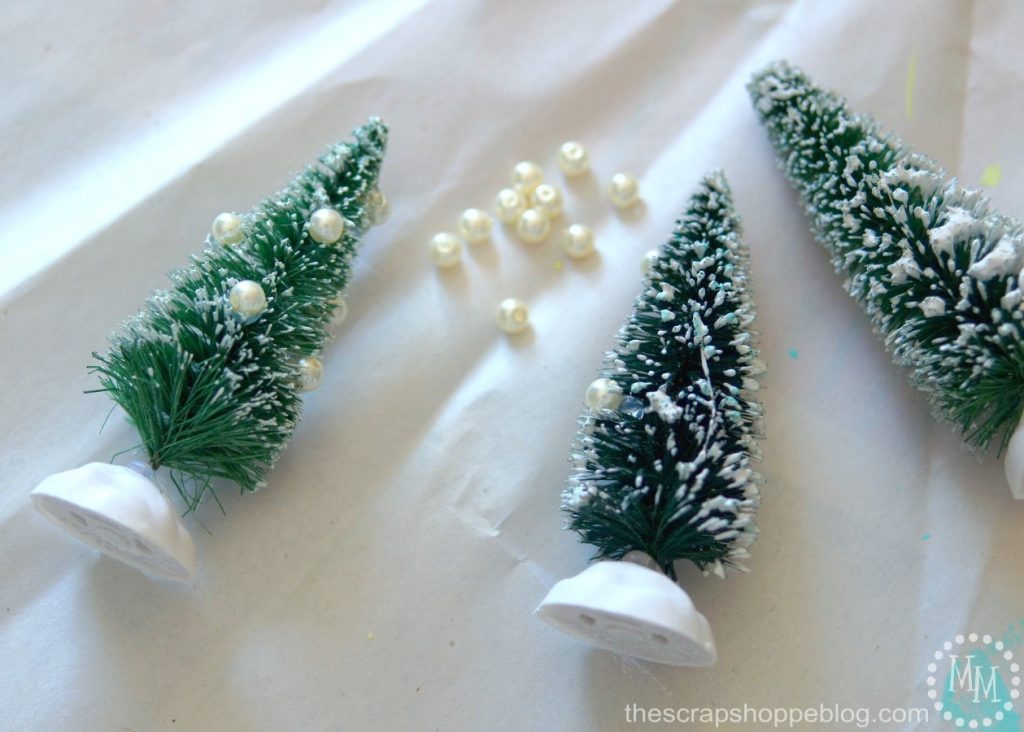
DIY Vintage-Style Ornaments: Pearl Ornaments
These small, plain bottle brush trees came as a set and cost barely more than a dollar.
A great price, and they can easily be dressed up.
Hot glue pearls to trees, pressing between branches so they don't stick out too much.
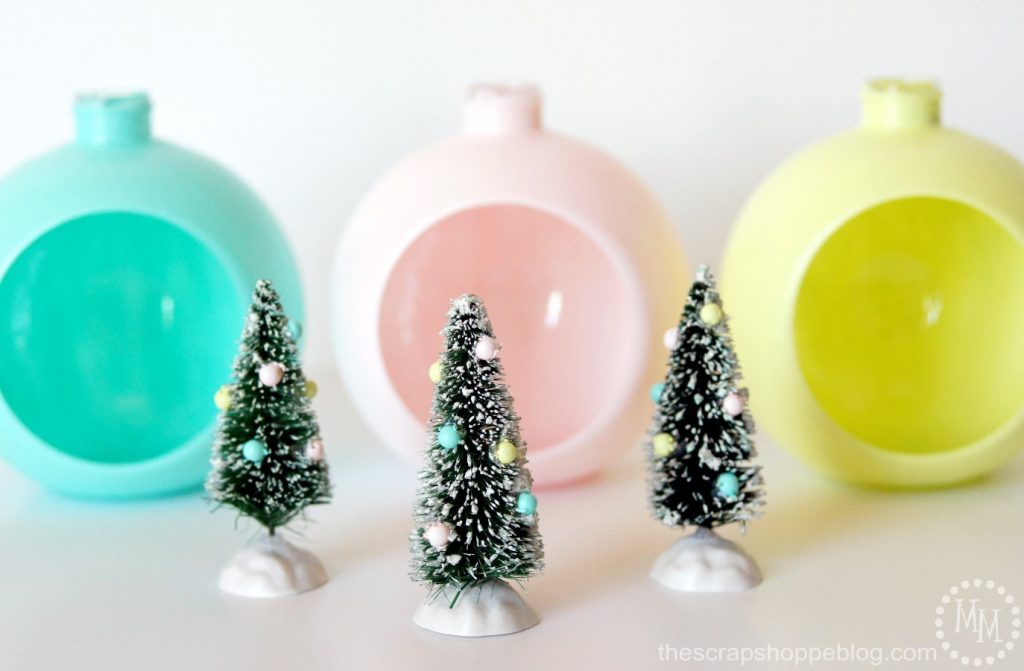
DIY Vintage-Style Ornaments: Paint
Paint ornaments and pearls with the Multi-Surface paint.
It will take about 4 coats on the plastic ornaments and just a couple on the pearls.

DIY Vintage-Style Ornaments: Snow-Tex
Hot glue trees inside ornaments.
Use a palette knife or a plastic knife to apply Snow-Tex to base of tree and around the bottom of the ornament.
While still wet, sprinkle Glamour Dust over snow and press lightly so it sticks.
Shake ornament to remove excess glitter.

DIY Vintage-Style Ornaments: Snow Writer
Use the Snow Writer to outline the opening on the ornaments.
Sprinkle with Glamour Dust while still wet.
Draw designs on the outside of the ornaments, styles you might find on vintage ornaments.
Draw a little bit at a time and sprinkle with Glamour Dust before the snow has a chance to dry.
When the snow is 100% dry, go back and brush off excess glitter.

These ornaments are going to be the perfect addition to my new "vintage" Christmas decor!
I may need to make more...
The cool pastels and glittery white snow are shear vintage perfection!
And, for the record, if you haven't played with DecoArt's Snow-Tex before, it's a Christmastime MUST HAVE.
Add the look of snow to pretty much anything!
So have you or will you make these DIY Vintage-Style Ornaments this year?

>> See where I party! <<
This post was originally shared November, 2016.
these clear plastic vintage style ornaments are adorable but did you paint both the inside and outside or just the inside? The instructions aren't clear and I only have a few open faced ornaments to try it on. Thanks
Just the outside.
These vintage-style ornaments are so creative and nostalgic! I can’t wait to try making some myself.
these are so cute ...such a great and fun way to make a special ornament that looks like it is truely from the old days of the fine ornaments..wow great job ..thank you ....
Thank you for this tutorial, the ornaments are sooo cute!
Thank you, Nina!
I have had quite a time of it making these because the crafting supplies have arrived damaged. The Decoart Snow Writer is too thick and is full of bubbles. Do you have any advice on how much to dilute it. It is so thick that it won"t come out of the nozzle. Thank you!
Oh no! I am so sorry your supplies arrived that way! The Snow Writer is water-based so you could definitely try adding small amounts of water at a time and giving it a good stir to thin it out.
Thanks so much for the prompt reply! I will definitely try that. Other than the technical difficulties I am thrilled with the way these have turned out!
Cathy
How many ornaments can one bottle of paint cover?
I don't know the exact number, but several. At least 10?
What other color would you recommend instead of the ballerina that is close in color? I can’t find it anywhere to purchase in time fir when I need it.
They do not have any other pinks that are quite as pale as Ballernina, but you can always mix another pink with white to get the lighter shade. Here is a color chart of their multi-surface paints so you can see them all side-by-side. https://decoart.com/multi-surface/
What size glass beads did you use for the ornaments on the trees? It looks like there are a few choices at the craft store.
They are ~4mm.
I’m looking forward to this being our Christmas parent gift. I have looked at small bottle brush trees and was wondering what size you used. I’m gathering my supplies and want to make sure I get the correct size trees.
Good question! These are 2" bottle brush trees.
Hi,
I see a fourth color that you have there “overcast” and it’s in the picture but you didn’t mention it on the supply list? What did you use that for? I’m so excited about doing this for an upcoming craft night.
I believe at the time I was taking the supplies photo I was going to do a 4th ornament in the Overcast gray color, but ultimately just used the other 3 paint colors. I think the gray would be a fun addition to the other three! Enjoy your craft night!
I cant find glamour dust anywhere, what else could be used instead?
Any fine white glitter will work!
Loved this idea.
Made these using dollar tree items.
Thank you
How did u paint on tiny pearl bead without messy? I tried them but they were messy. Please how did u do that?
You glue them to the trees then paint the beads.
It toke me a trial run of just painting the beads to figure it out.
Sorry for the late response, Meg! Yes, glue them to the trees first. It is MUCH easier than trying to handle them since them are so tiny.
You can buy the supplies at Hobby Lobby
Where did you buy the trees? I realy like the base on them, haven't seen any like them before.
They are fun and different aren't they? I believe they came from either Joann's or Hobby Lobby.
How did you get the clear circle so perfect on the front?
Hi Crhisti! The ornaments are actually open in the front. I just traced around the opening with the Snow Writer. I went back and included a link to the ornaments so you can see them.
Is there any reason you didn't use spray paint for plastic? I find that using a brush leaves those dreadful brush strokes. And, spray painting is so much faster and might not need as many coats to cover.
Nothing in particular, but I do like the matte look the acrylic gives the ornaments, and I tend to over spray with spray paint and get drip lines (I'm not a patient spray painter). 😉
Thanks for the answer Michele. I am painting some and will try spraying as well and I will see how it goes. I have a piece of string tied to a tree limb and that is how I spray. Of course I have to wait for a clear day - no rain! I am also waiting on some supplies I ordered to complete this project but I must say they are adorable and will make great gifts for 2019 Xmas.
By-the-way, Merry Christmas.
Lisa
Hi
I did painted each day to dry up but it is horrible dreadful stroke after first day and second and third day, but still awful stroke brush. I thought you mentioned multi-surface "satin" but you mentioned "matt" paint. Something do with paint brush? Is there special brush to make smooth not stroke.? I am not very good painter. Please help.
Thank you
Margaret
Hi Margaret! I used the Multi-Surface Satin paint, but it gives overall a more matte look than the satin in the name suggests. By the 3rd or 4th coat the brush marks should not be as apparent as the first couple of layers. A sponge brush might give you more success if you're not happy with the paintbrush.
I really like these colors - something fun and different from traditional red and green! Thanks for sharing these at Merry Monday. I'm going to include them in my Party Features next week!
Love these vintage colours Michele. Thanks for sharing at Create, Bake, Grow & Gather this week. I'm delighted to be featuring this DIY project at tonight's party and pinning too.
Hugs,
Kerryanne
I really love these, they are so cute!
Tania
Great tutorial! Love how beautiful and different they are. Thanks for sharing
These ornaments turned out perfect. So vintage!
Those are so cute! I love the vintage flair of them! Here from Made By You Monday!
So cute! I love the trees and the pearls. I think vintage Christmas anything is so cute!
I know this was from a couple of years ago, but these are no less cute! Someone commented on needing a heating tool for the snow writer. Can someone elaborate on this? Also I easily found everything on Amazon but the paint is much cheaper on their site!
Hi Lisa! You should not need a heating tool unless you just need to speed up the drying process.
You said you were able to buy these ornaments already cut out?
Yes, they already had the cutouts.
What size, height, are the open faced ornaments?
I did not measure them, but they are approximately 4" tall.
Will the paint you used, work for glass ornaments?
It will work on glass. Just be sure to allow each coat to dry completely before adding another.
p.s. I just noticed you got them from Hobby Lobby. But any info on the eggs I truly would appreciate it
I really need to know where I can get these ornaments. I haven't seen them at Joann's or Michaels. Many years ago I found plastic Easter eggs about 3"w 5"h. They were so beautiful when they were done. I will be happy to get my hands on the Christmas ornaments and if anyone knows about the plastic Easter eggs I would love to hear from you. Thank you
These are the adorable little things I've seen..will try for sure..thx foe sharing 😀
I'm not sure why I never saw this before now, but I love, love, LOVE these SO much! All the heart eyes! 🙂
Just made these and they are adorable. I found everything online as Christmas items are not in stores yet 😉 I found using a stiff paint brush to put the snow on the inside of the ornament worked well and allowed me to 'place' the snow right where I wanted it. Every year I make an ornament for my family - A tradition for the last 20 years. This ornament will be my gift for 2017!
how did you paint the ornaments the outside or inside, what type of brush did you use?
I loved them where I saw them. Went to Joanne to get all the things I needed and started out doing them . What I didn't know was I needed a heating tool. I wish I was told before leaving the store. Never used a snow writer before.
These are so cute! My daughter loves to decorate with pink, so these are perfect! Thanks for the great idea!
Made these and they turned out ADORABLE! I had a hard time finding the open front ornaments, though. Joan's acted as if I were crazy when I asked if they had them. ?? Hobby Lobby--nope. Amazon-nope. Finally found them on eBay.
Oh no! I'm sorry you had such a hard time finding them. But yay for getting your hands on some! 🙂
I had the same issue but I finally found them at AC Moore
I'm glad you were able to find some, Laura!
I got mine at Jo-Ann this year (in CT).
These are adorable! Love the vintage vibe and they put a smile on my face.
Love this idea! Looks really cute!
I love these! They really do look like the old style vintage ornaments that we all grew up with. The bottle brush trees look so cute inside. Did you find those at Joann's too??
Thank you! And, yes, the bottle brush trees came as a set of 3 from Joann's. 🙂
These are amazing! I love the colors you used and I'm definitely going to need to try the snowtex!
I just love these! I need to make them. I saw some of those clear ornaments on sale at Micheal's.
very sweet!
Pinned this! I LOVE these ornaments so much and I have an affinity for all things Christmas and vintage.
So cute!
I really like this idea your ornaments look wonderful.
This is so sweet. I love this. 🙂
This is soooo cute!!!!