
Homemade Christmas Decor - The Scrap Shoppe
Welcome to week 2 of a Homemade Christmas
with the Scrap Shoppe!Link up your projects at the end of this post.
with the Scrap Shoppe!Link up your projects at the end of this post.
This week we have some fabulous bloggers lined up to show off some fun
Homemade Christmas decor!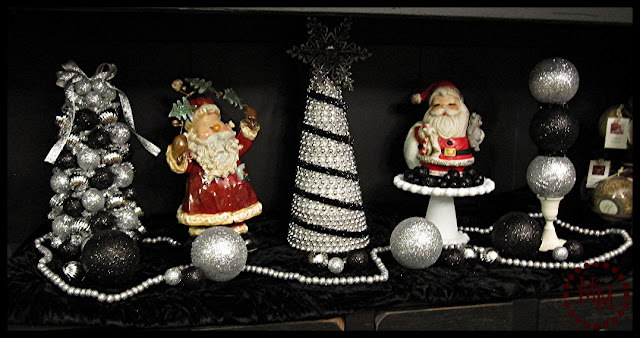


Homemade Christmas decor!

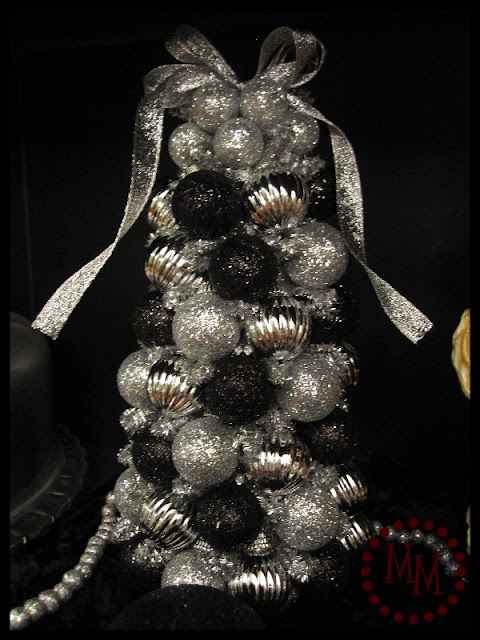
Today I want to share a set of Christmas trees made almost entirely of holiday ornaments.
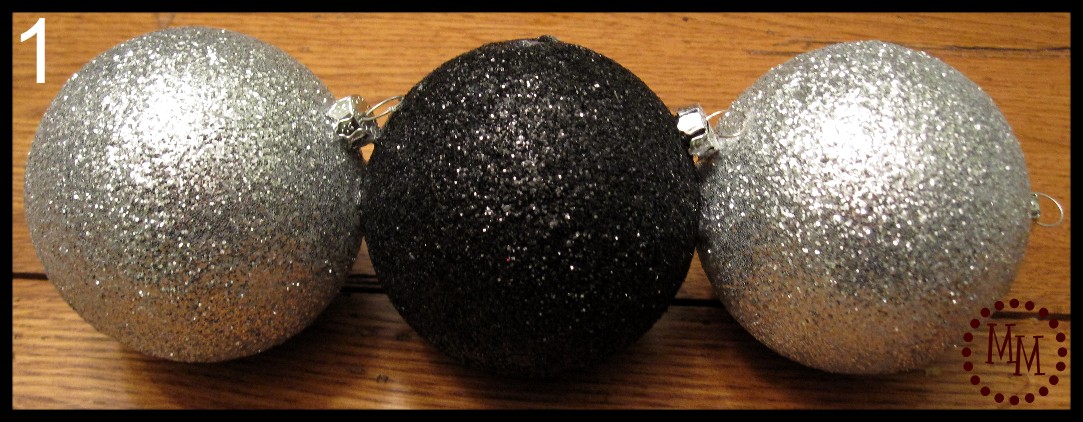
I have a black and white theme in my kitchen so black, white, silver are the colors I used.
You could easily switch this up to match your own decor!

Tree #1
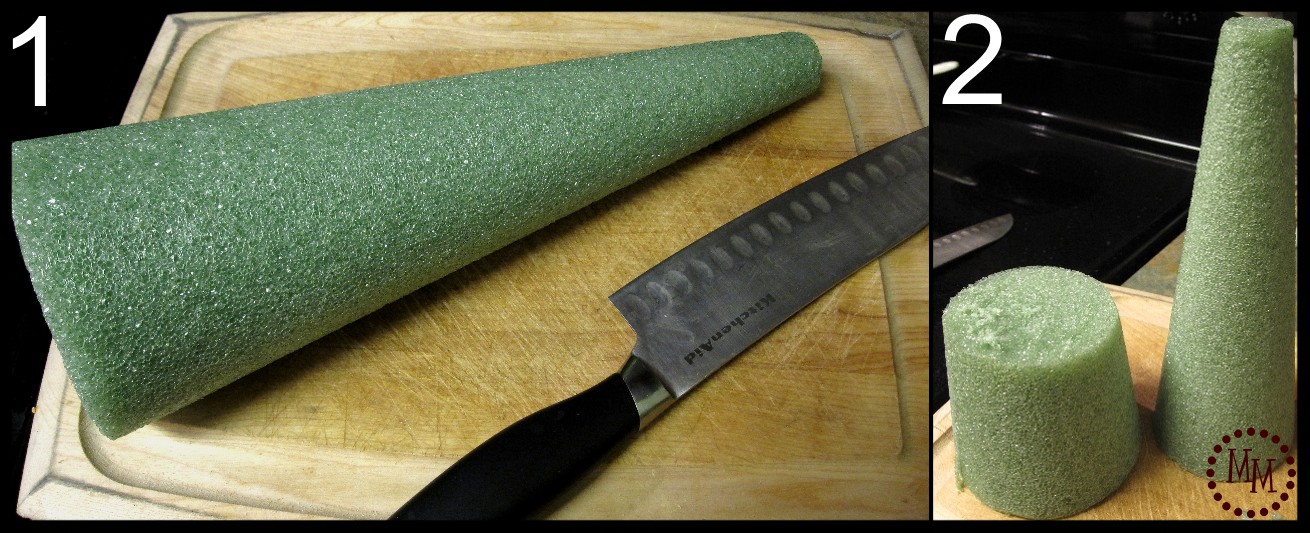
1. Start with a foam cone.
2. Trim it down to size as needed. I trimmed mine to fit in my hutch nook.

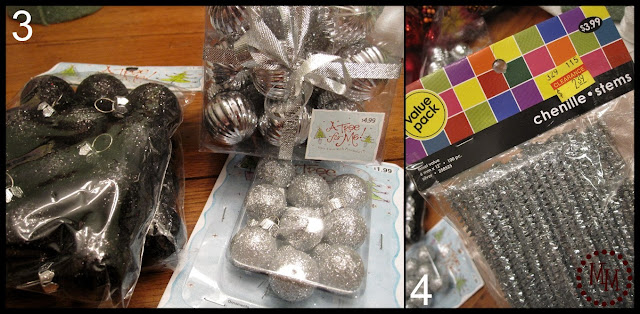
3. Stock up on miniature ornaments (I bought mine half off at Hobby Lobby).
4. Chenille stems come in handy to fill in gaps between the ornaments on the tree.
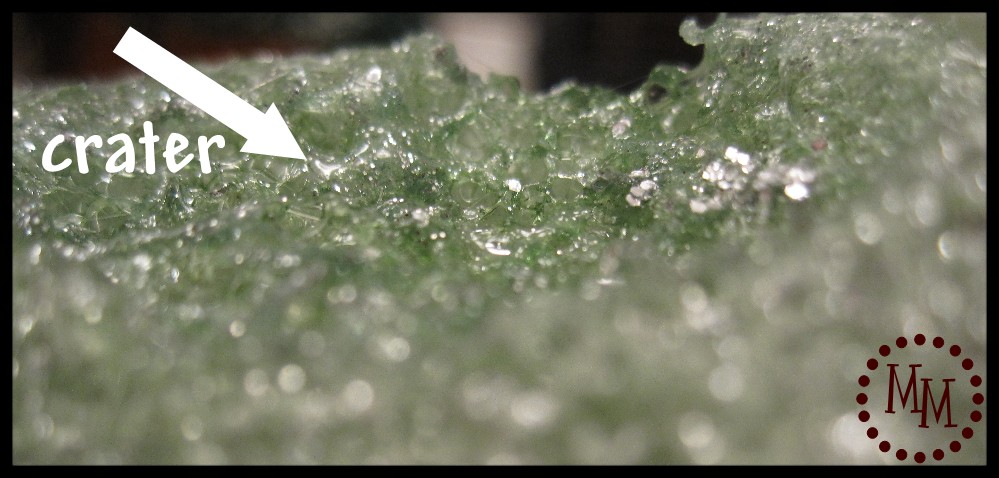
Note: My adhesive (Beacon's 3-in-1) literally ate a crater in the styrofoam.
Which leads me to step number 5...
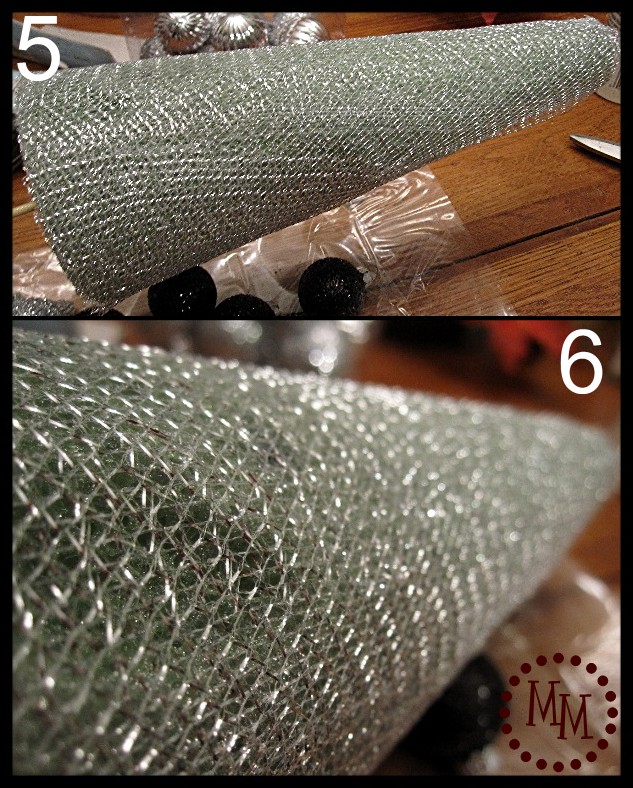
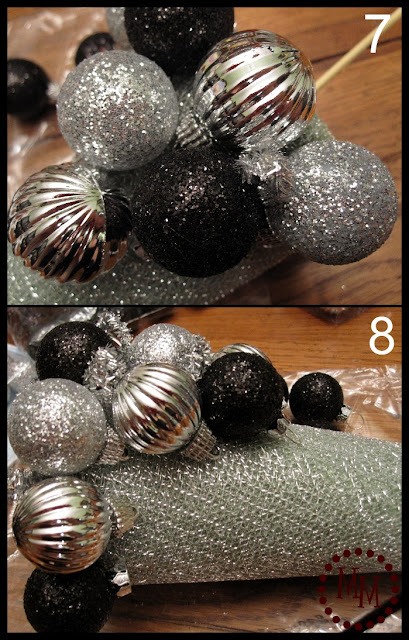
5-6. I wrapped the cone in some silver mesh so the adhesive would have something to grab on to (and not make craters in my styrofoam!).

7-8. Start adding your ornaments one row at a time, being sure to rotate your colors and style of ornament.

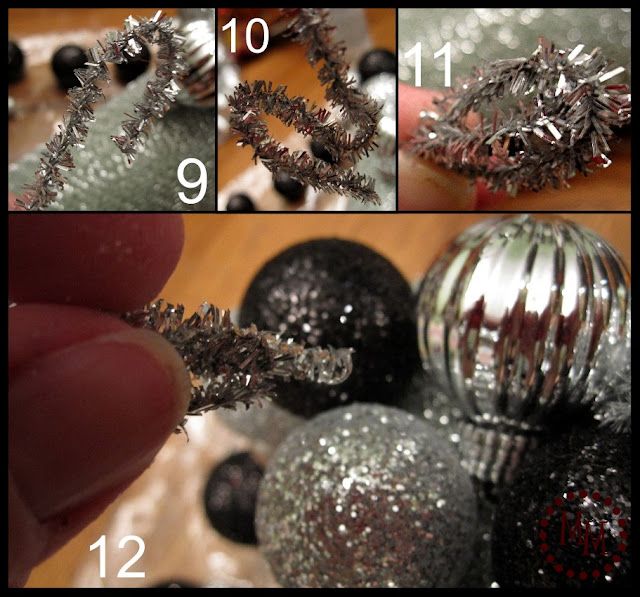
9. Take one of the chenille stems and twist it into a hook.
10. Bend the bottom of the hook back up.
11. Wrap it over the top of the first hook to make an identical second hook on top of the original hook.
12. Trim the stem at the bottom of the hooks and adhere to the tree between the cracks in the ornaments.
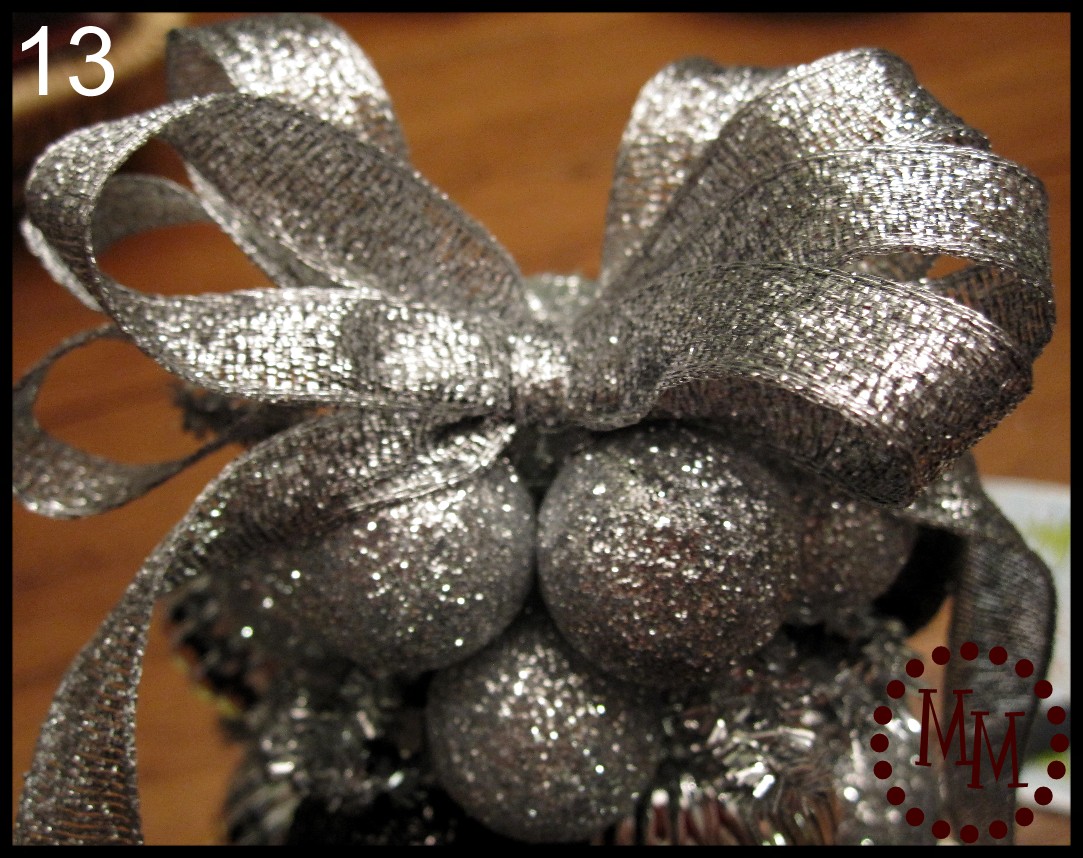
13. Top with a bow!

I have some fun vintage-looking candlesticks that I thought would look cute under some of my trees. I was even more excited when I discovered they unscrew to give me various pieces! I took the very bottom of one of the candlesticks and used it as the base of Tree #1.
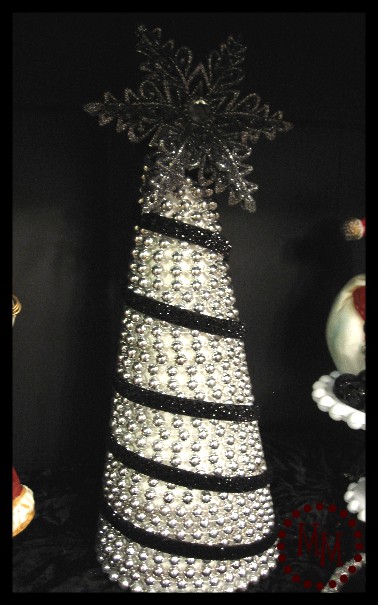
Tree #2
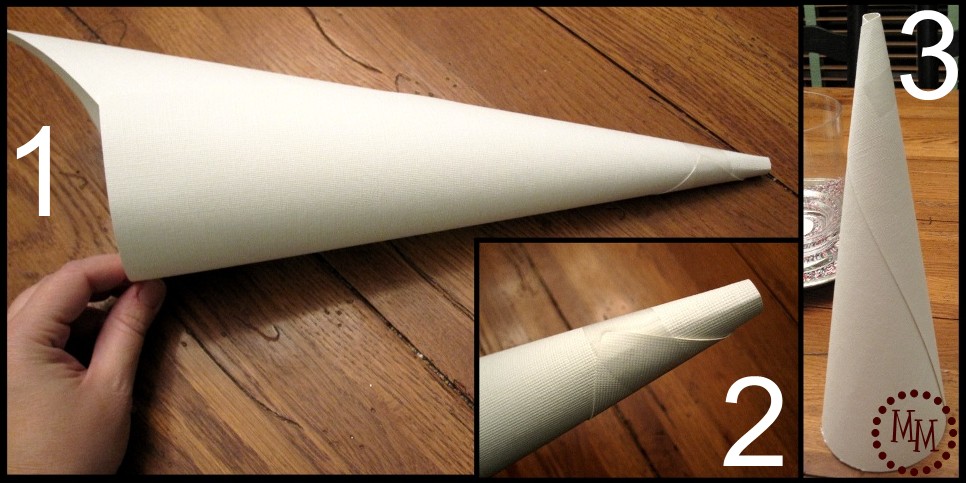
1. Take a piece of white cardstock and roll it into a cone.
2. Tape the top of the cone to make it keep its shape.
3. Trim off the excess off of the bottom so the cone will sit flat.
(Not shown, I also sprayed the cardstock with some silver glitter spray.)
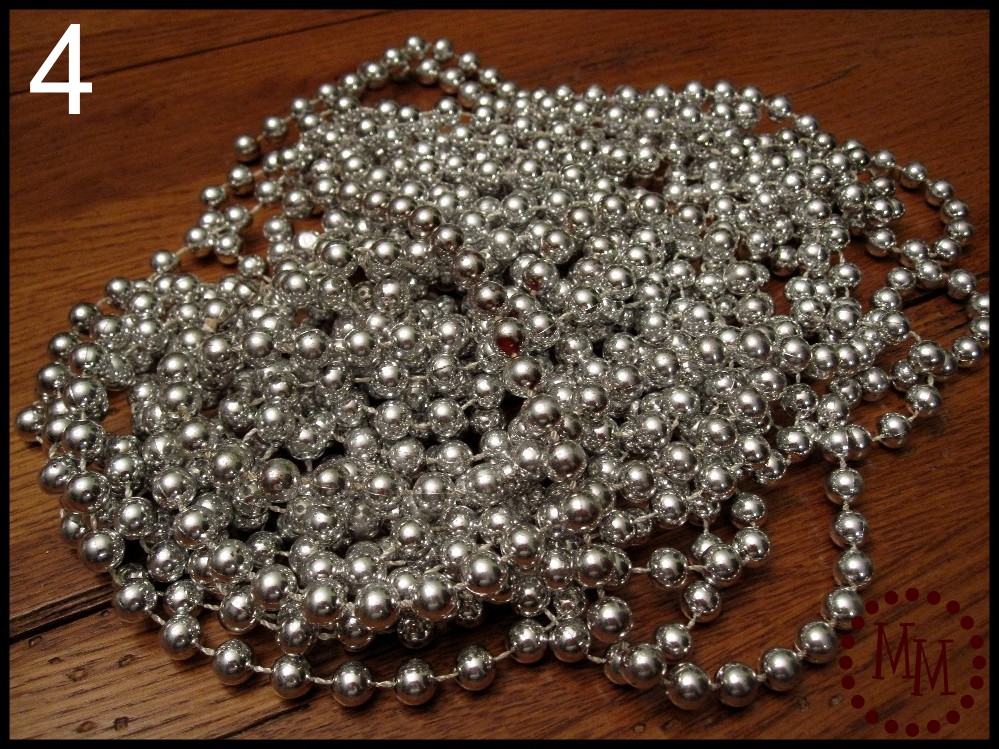
4. Get some bead garland (I had mine on hand already).
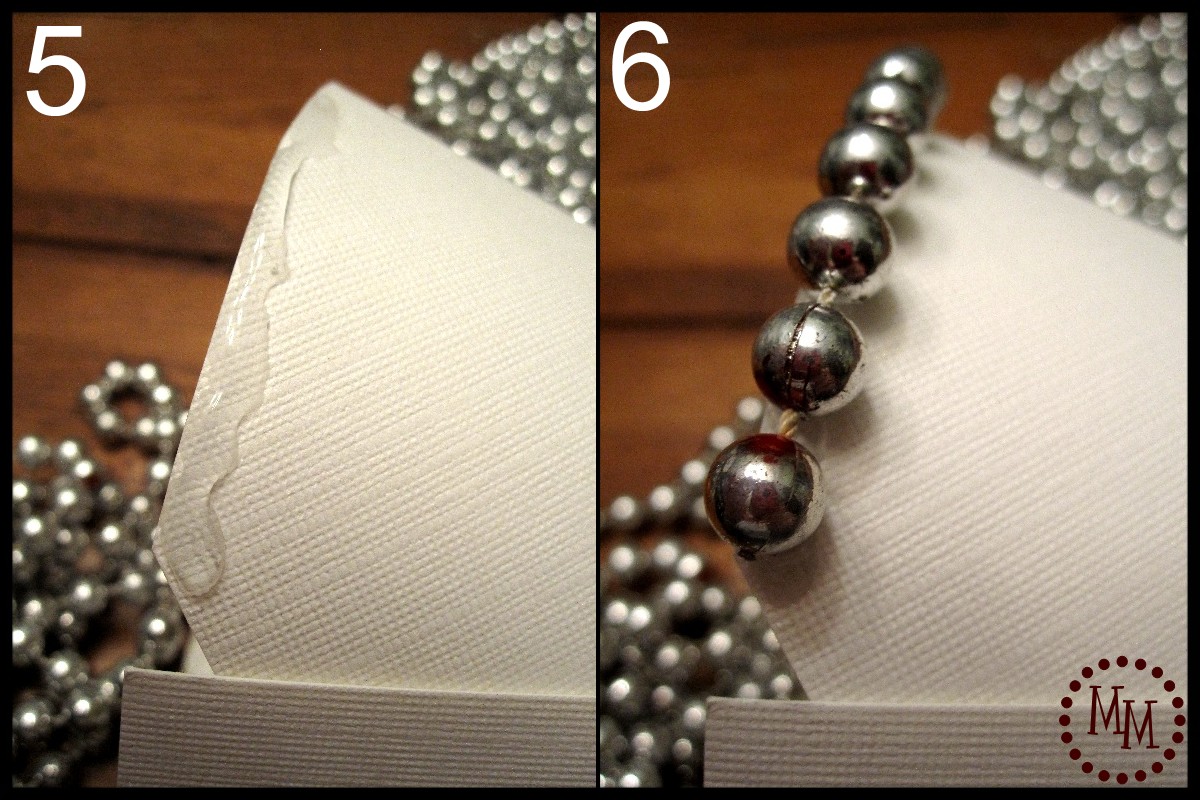
5. Put a line of adhesive along the bottom of the cone.
6. Add the garland and let dry.
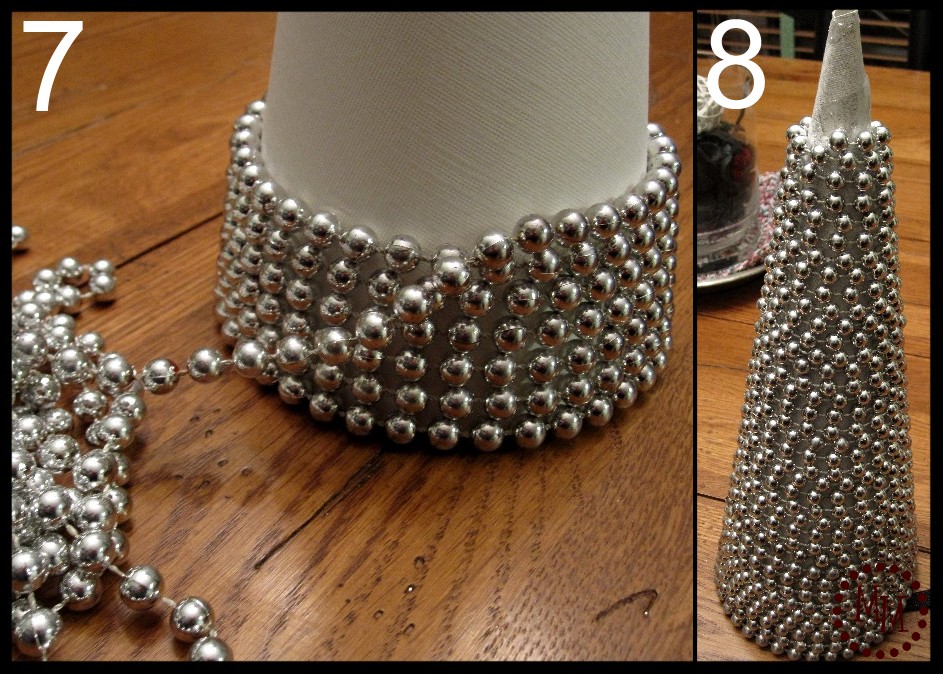
7. Begin wrapping the garland around the cone.
8. Wrap the garland to the top of the cone then adhere the end of the garland to the top of the cone.
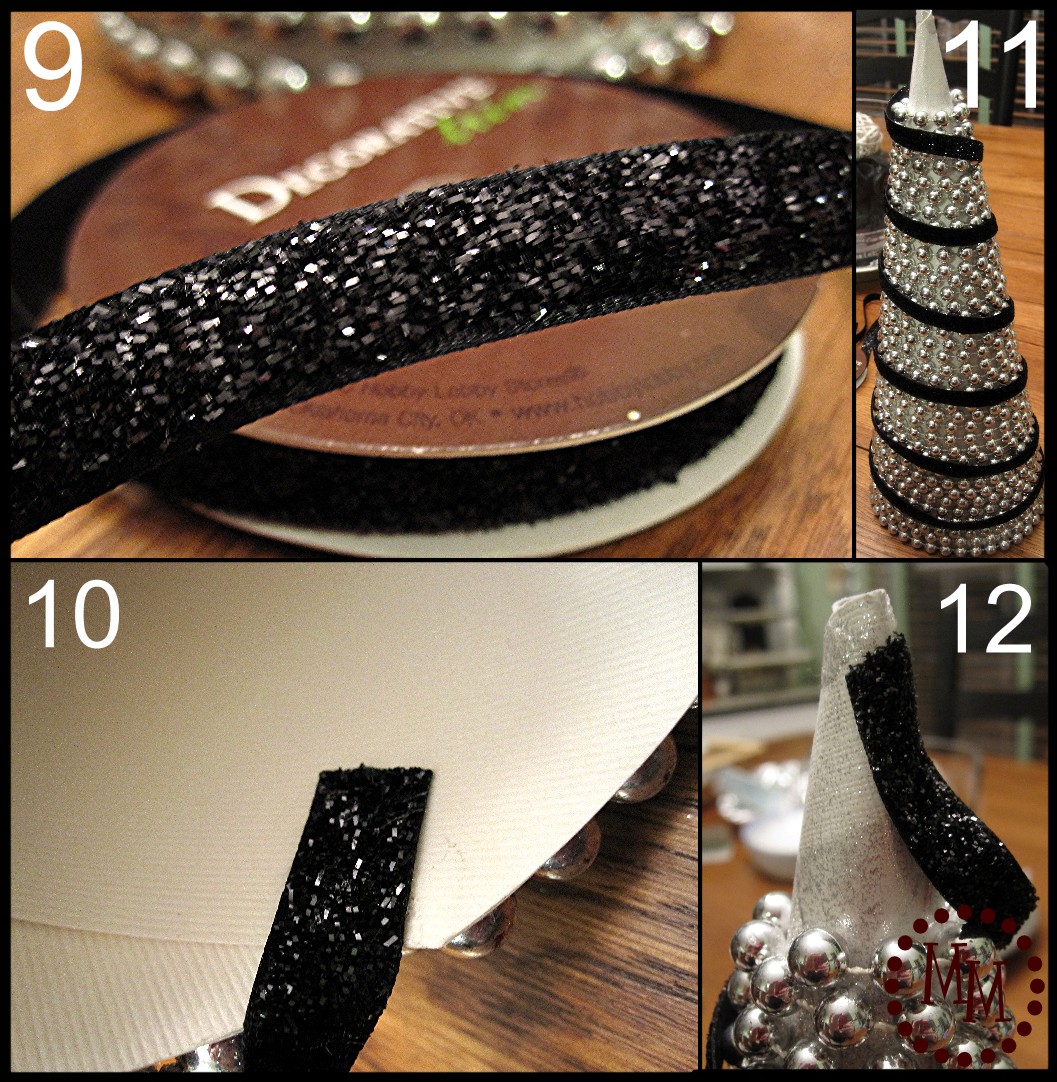
9. Find some decorative ribbon.
10. Adhere the end of the ribbon to the bottom inside of the cone.
11. Drape the ribbon around the cone in a decorative manner.
12. Adhere the end of the ribbon to the back side of the top of the cone.
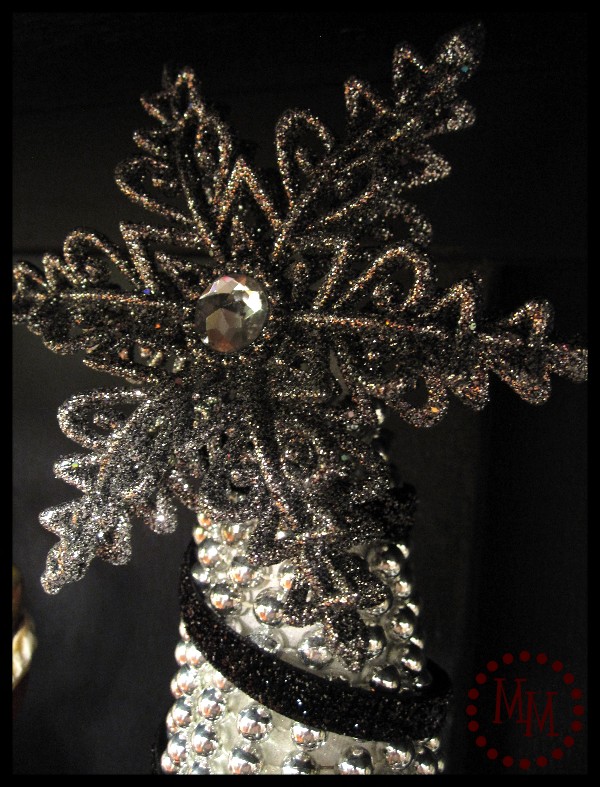
Add a tree topper of choice. I used this snowflake ornament I found for half off at Hobby Lobby. I attached it by layering several pop dots at the top of my tree and sticking the snowflake to it.
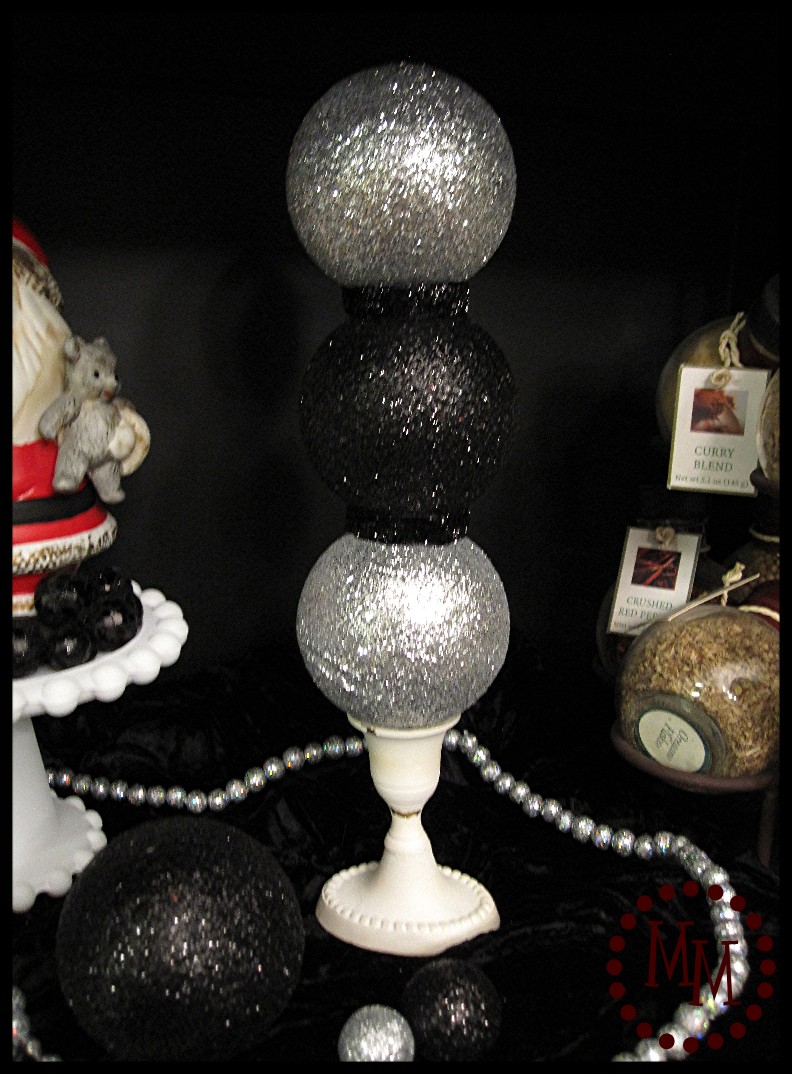
Tree #3
This is by far the easiest of the 3 trees!
1. Take 3 regular-sized ornaments and adhere them one on top of the other.

2-3. Take some of the decorative ribbon from Tree #2 and wrap it around where where the ornaments are glued together.
I set the tree in one of my candlesticks.
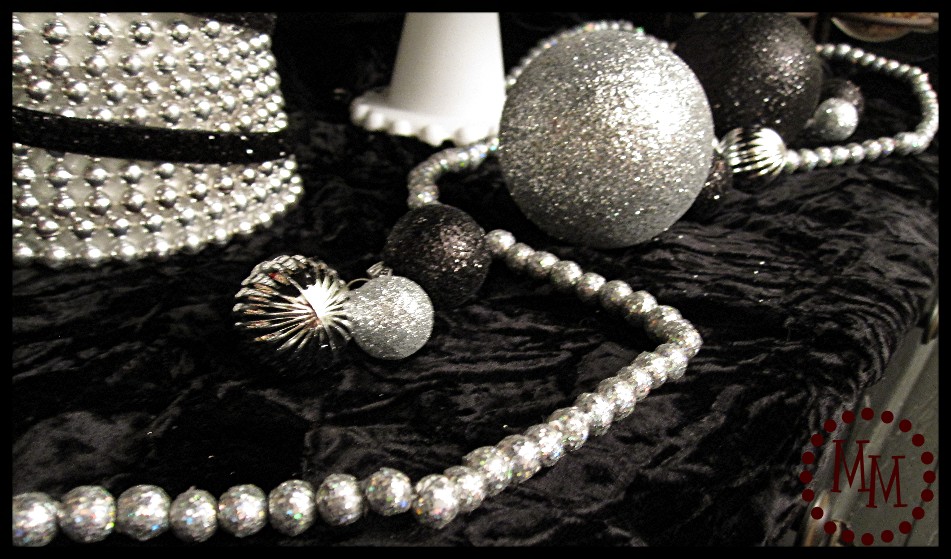
I set my trees up on some crushed black velvet that I had in my stash and scattered around extra ornaments.
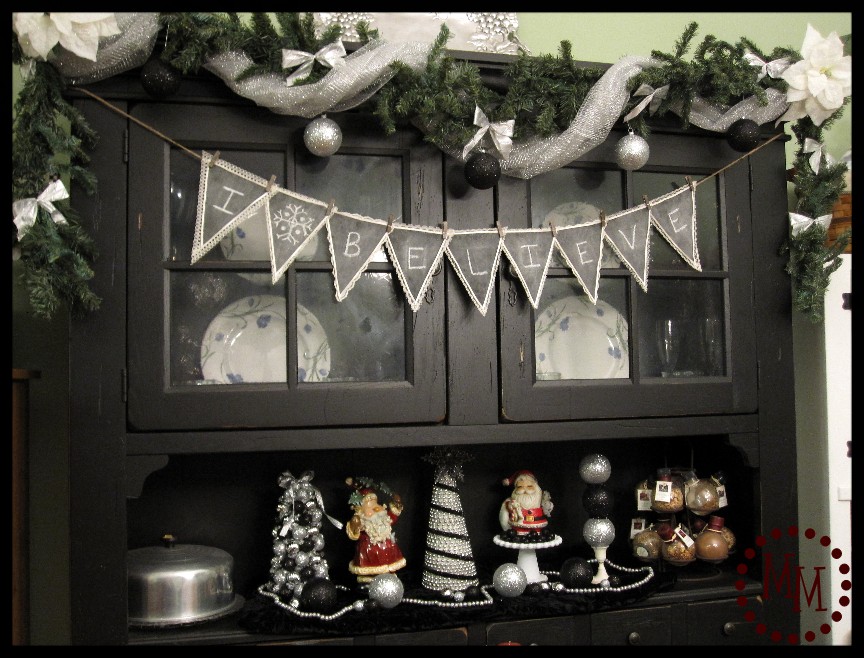
I also added some of the larger ornaments the garland on top of my hutch to tie everything together.
- - - - - - -
We all want to see what you're making, too, so be sure to link your homemade Christmas decor to the party below!
The link party will be open until December 19th then I will pick some from the list to show off!
Please link only homemade Christmas decor ideas!

Great idea using mesh on the styrofoam, I have used chickenwire. The only paint I have found that satisfactorily covers styrofoam is Designmasters floral paint. It is acetone based and a fine mist, generally used on fabrics, florals, glass, just about anything. Some craftstores carry it, Michael's here in the Chicagoland does. This is what florists use on everything from live plants to everything else.
Great post, and you have a new follower...thanks, Sandi
I love your trees! I used the same technique (cardstock cone) and tinsel to make a couple of trees for my dining room as well. Thanks.
Just dropping by to let you know that I linked to this post in a round up today from the Home & Garden channel at Craft Gossip. 🙂 This will appear in the main Craft Gossip RSS feed, on the main home page and can be found directly here
http://homeandgarden.craftgossip.com/25-christmas-tree-crafts/
If you would like a "featured by" button, you can grab one here!
http://homeandgarden.craftgossip.com/grab-a-craft-gossip-button/
So pretty! I LOVE the black and white - great tip about the glue...my spray paint ate my styrofoam!
Love the beaded Tree!
Newest follow on GFC, Check us out at
http://closertolucy.blogspot.com/
Love these projects, especially the colors. So different. Your hutch looks great. I am a new follower and have joined the linky party this week. I just added your button to my blog. So nice to meet you. I'm looking forward to exploring the other blogs.
Love the arrangements! And the tutorial!
You should come link this up to my weekly Thursday Making It With Allie Link Party! I think it would make a Fabulous addition!
AllieMakes.Blogspot.com
What a beautiful blog! I linked up my It's a Wonderful Life pillow.
Jodi
What a fun project..love all the glitter! TFS
Your trees are fun! Great tip on adding the mesh.
Love all three trees! All very pretty and glittery which makes for a pretty arrangement!
Gorgeous! The color and sparkles are so elegant!
I love all the decor you made. It's so beautiful! Thanks for sharing your ideas and for hosting a linky 🙂
They're all so creative, but #2 is absolutely my favorite!
You did a fabulous job! They are so pretty!
I love these trees! Gorgeous!
Those are gorgeous!! Thanks!
Your hutch looks beautiful. Love the black/silver combo.
Great ideas! I like your blog, too!
I love all this stuff and I only decorate in black & silver so this is all awesome!!
Come link up at Giggles, Glitz & Glam!
http://gigglesglitzandglam.blogspot.com/2010/12/glam-party-5.html
I love the sparkling decor you created. It looks magical.
I love, love, LOVE the black and silver ornaments that are everywhere this year! These ideas were all so cute!
Your trees are lovely and look so good on your display.
What great trees!! I appreciate the tip about the mesh. That will come in handy with an ornament idea I have!!
Super cute display and I love it with your chalkboard pennant!! 🙂
Lovin' the ornament tree! I love the black, white, and silver combo. My dining room (before it turned into my office) was black and white and I decorated with the same colors. It always looks so classy and chic! 🙂 I"m so excited for this week's posts!
Hello! I came over from the linky party at It's So Very Cheri. I just wanted to stop by and say "thank you" for the great tutorial. My favorite tree is the one covered in Christmas ornaments!
wow absolutely loving this. I just might have to make this. Thanks for sharing I am your newest follower!
xo
Your trees are gorgeous, Michele!! I LOVE those vintage candlesticks!! They are perfect. I think that first tree is my favorite.
These are so pretty! And great tip on preventing the styro-meltdown. You'd think that stuff would be more durable!
Michele I emailed you my post for tomorrow. Thanks Jen