
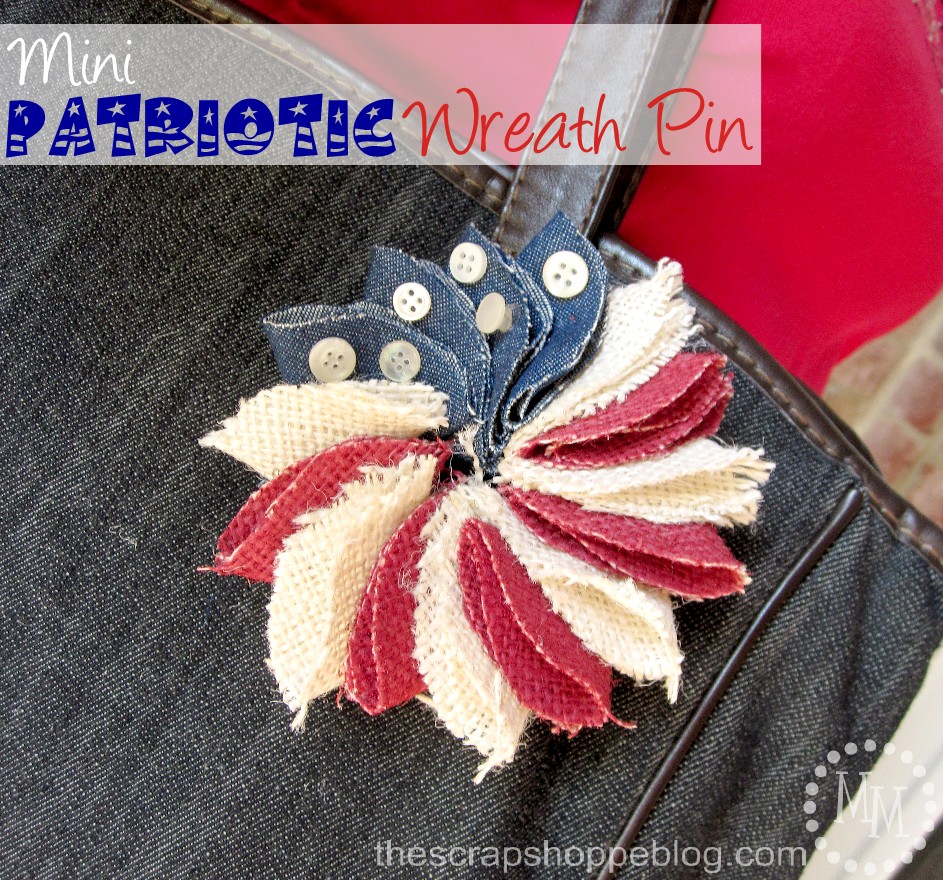
Mini Patriotic Wreath Pin
This mini patriotic wreath pin is a great accent for summertime holidays!
My crafts lately seem to revolve around red, white, & blue.
I love decorating my house for these patriotic holidays!
Especially since you can use them all summer long, from Memorial Day to Labor Day.
Today's project is my mini patriotic wreath pin which can be worn on your person or attached to a tote bag as a fun patriotic decoration.
It's also super easy to make, so you're going to love this tutorial!

You might think this project looks similar to my ruffled patriotic wreath for the front door, and you might be right.
I thought it would be fun to make something similar in a smaller version for me to carry around with me!

Supplies for Mini Patriotic Wreath Pin
I went with the same materials as my previous wreath:
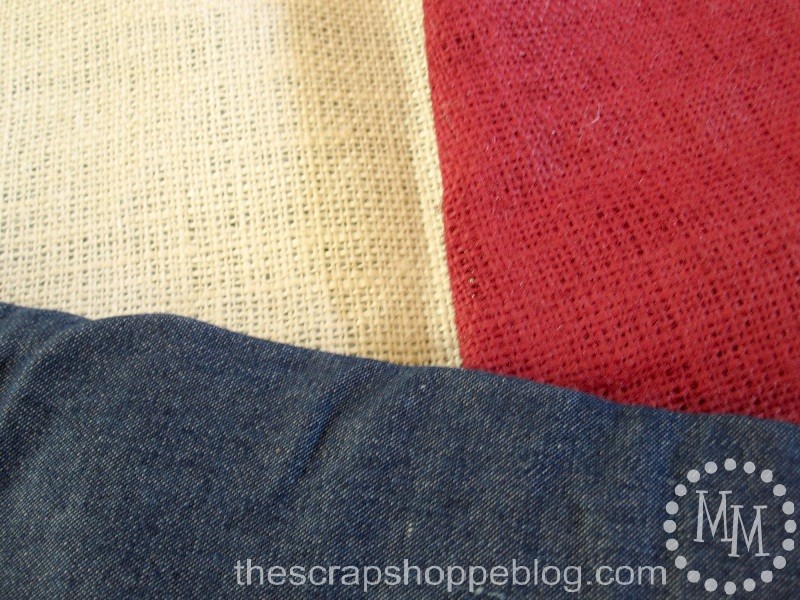
Cream burlap, red burlap, and denim.
Incidentally, did you know you can spray paint burlap??
I did not have any red burlap on hand so I did what any inventive crafter would do, and made my own!
I'm always looking for burlap in the fabric remnants at the craft store.
You never know when you might need it!
So I took some of the cream burlap and spray painted it red.
And it worked like a charm!
Because of the large weave in the burlap fibers, the fabric was still very pliable, even with a coat of spray paint.
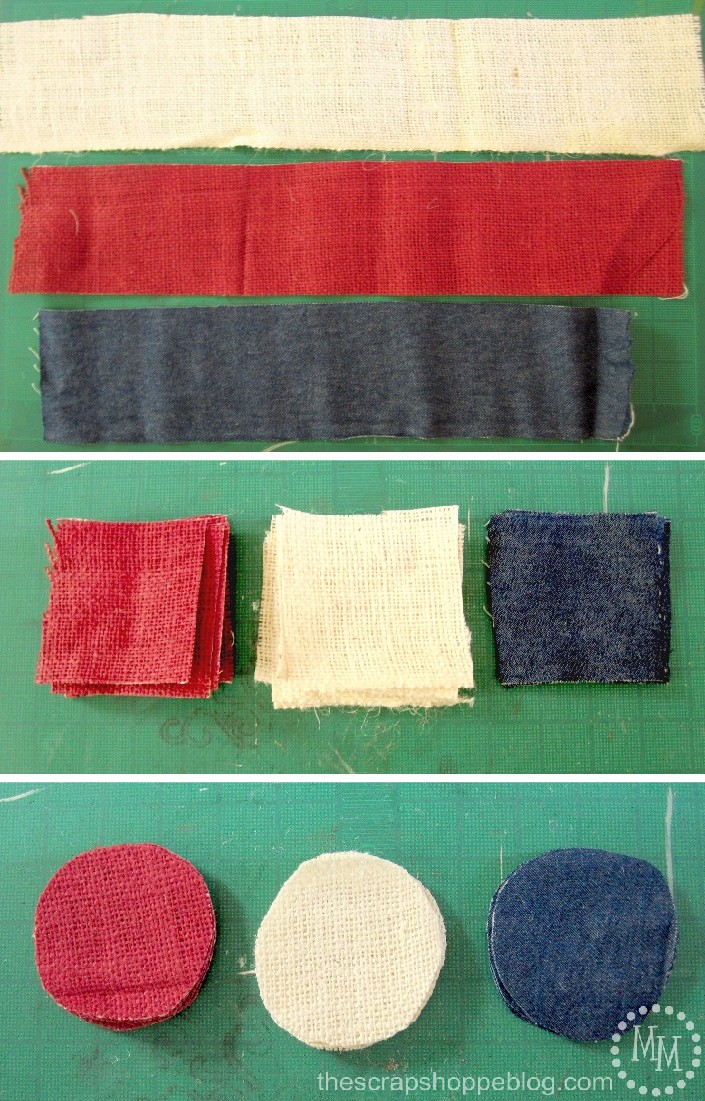
Cut 2.5" wide strips of the fabrics.
Then cut the strips into squares.
Cut each square into a circle approximately 2 inches in diameter.
You will need 6 cream, 5 red, and 4 blue circles.
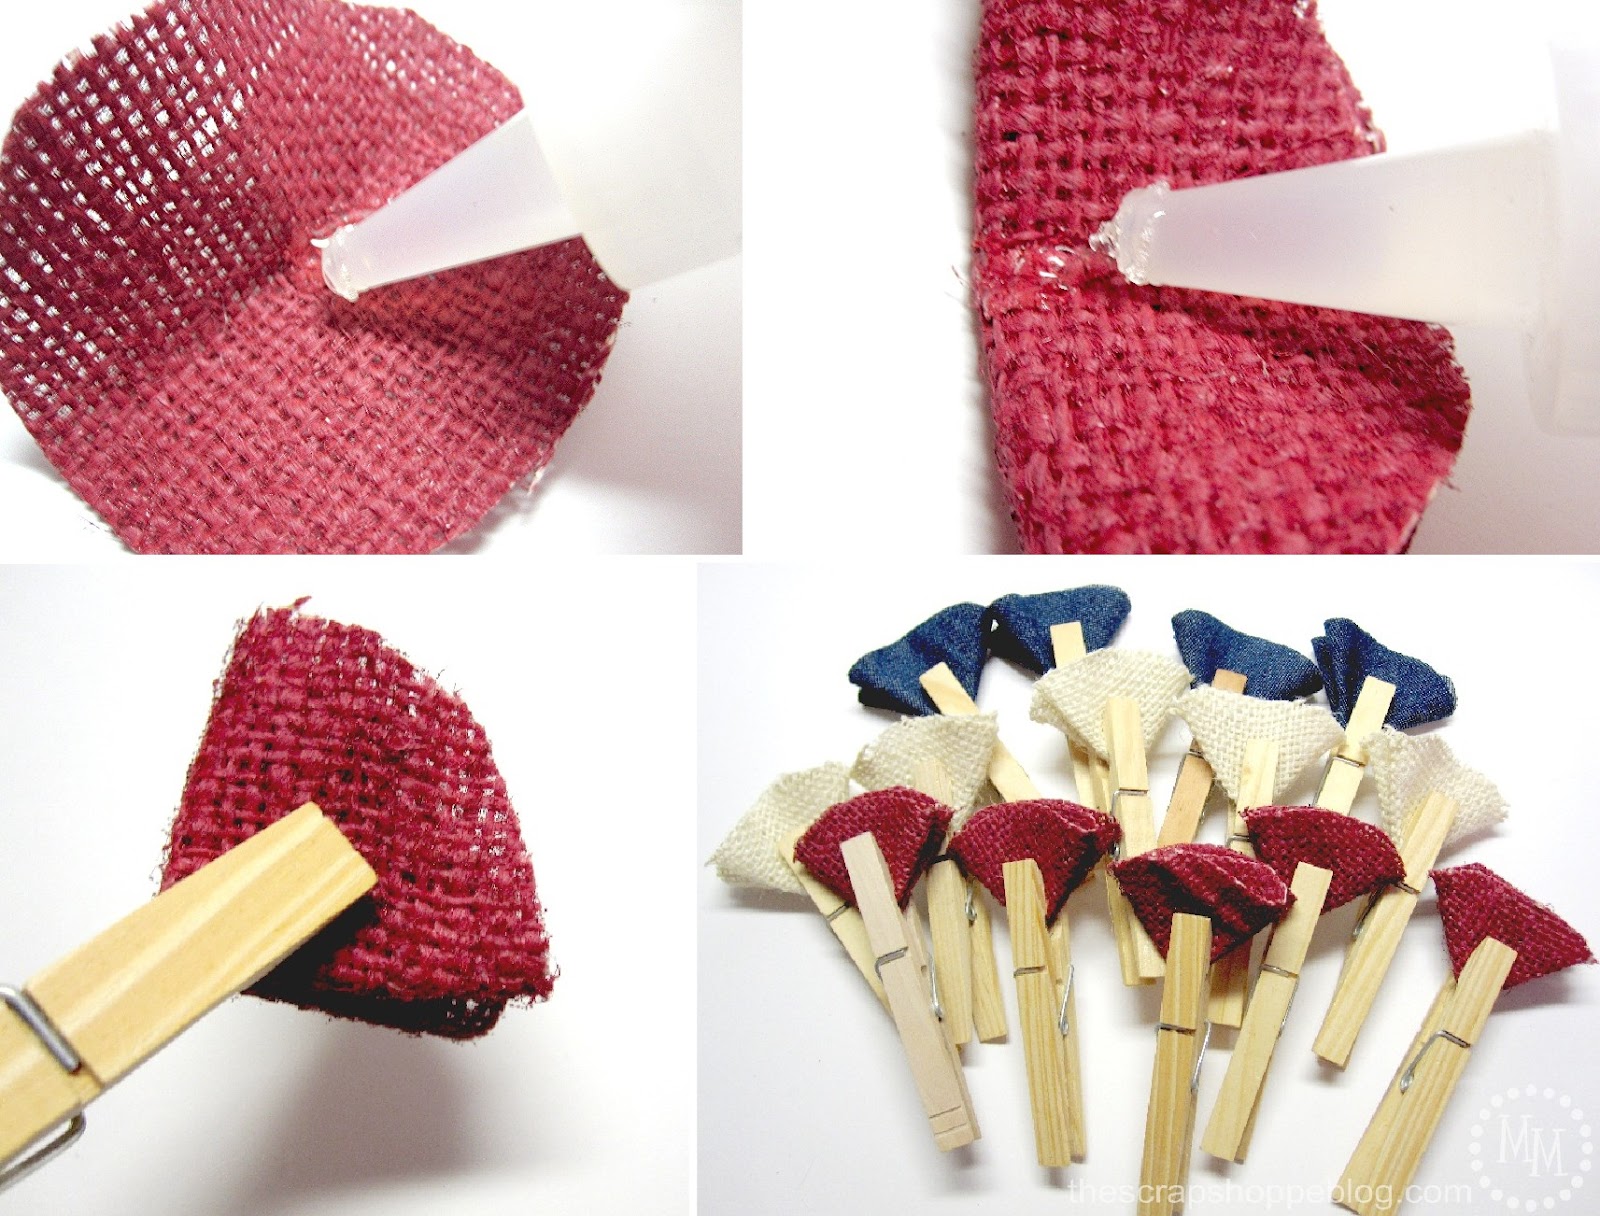
Place a drop of glue (I use Beacon's Fabri-Tac (affiliate link) which is perfect for working with fabrics) in the center of one of the circles of fabric.
Fold the circle in half then place another drop of glue on the center edge of the half circle.
Fold the fabric in half again and hold it closed with a clothespin until the glue has a chance to dry.
Repeat with all of the circles of fabric.
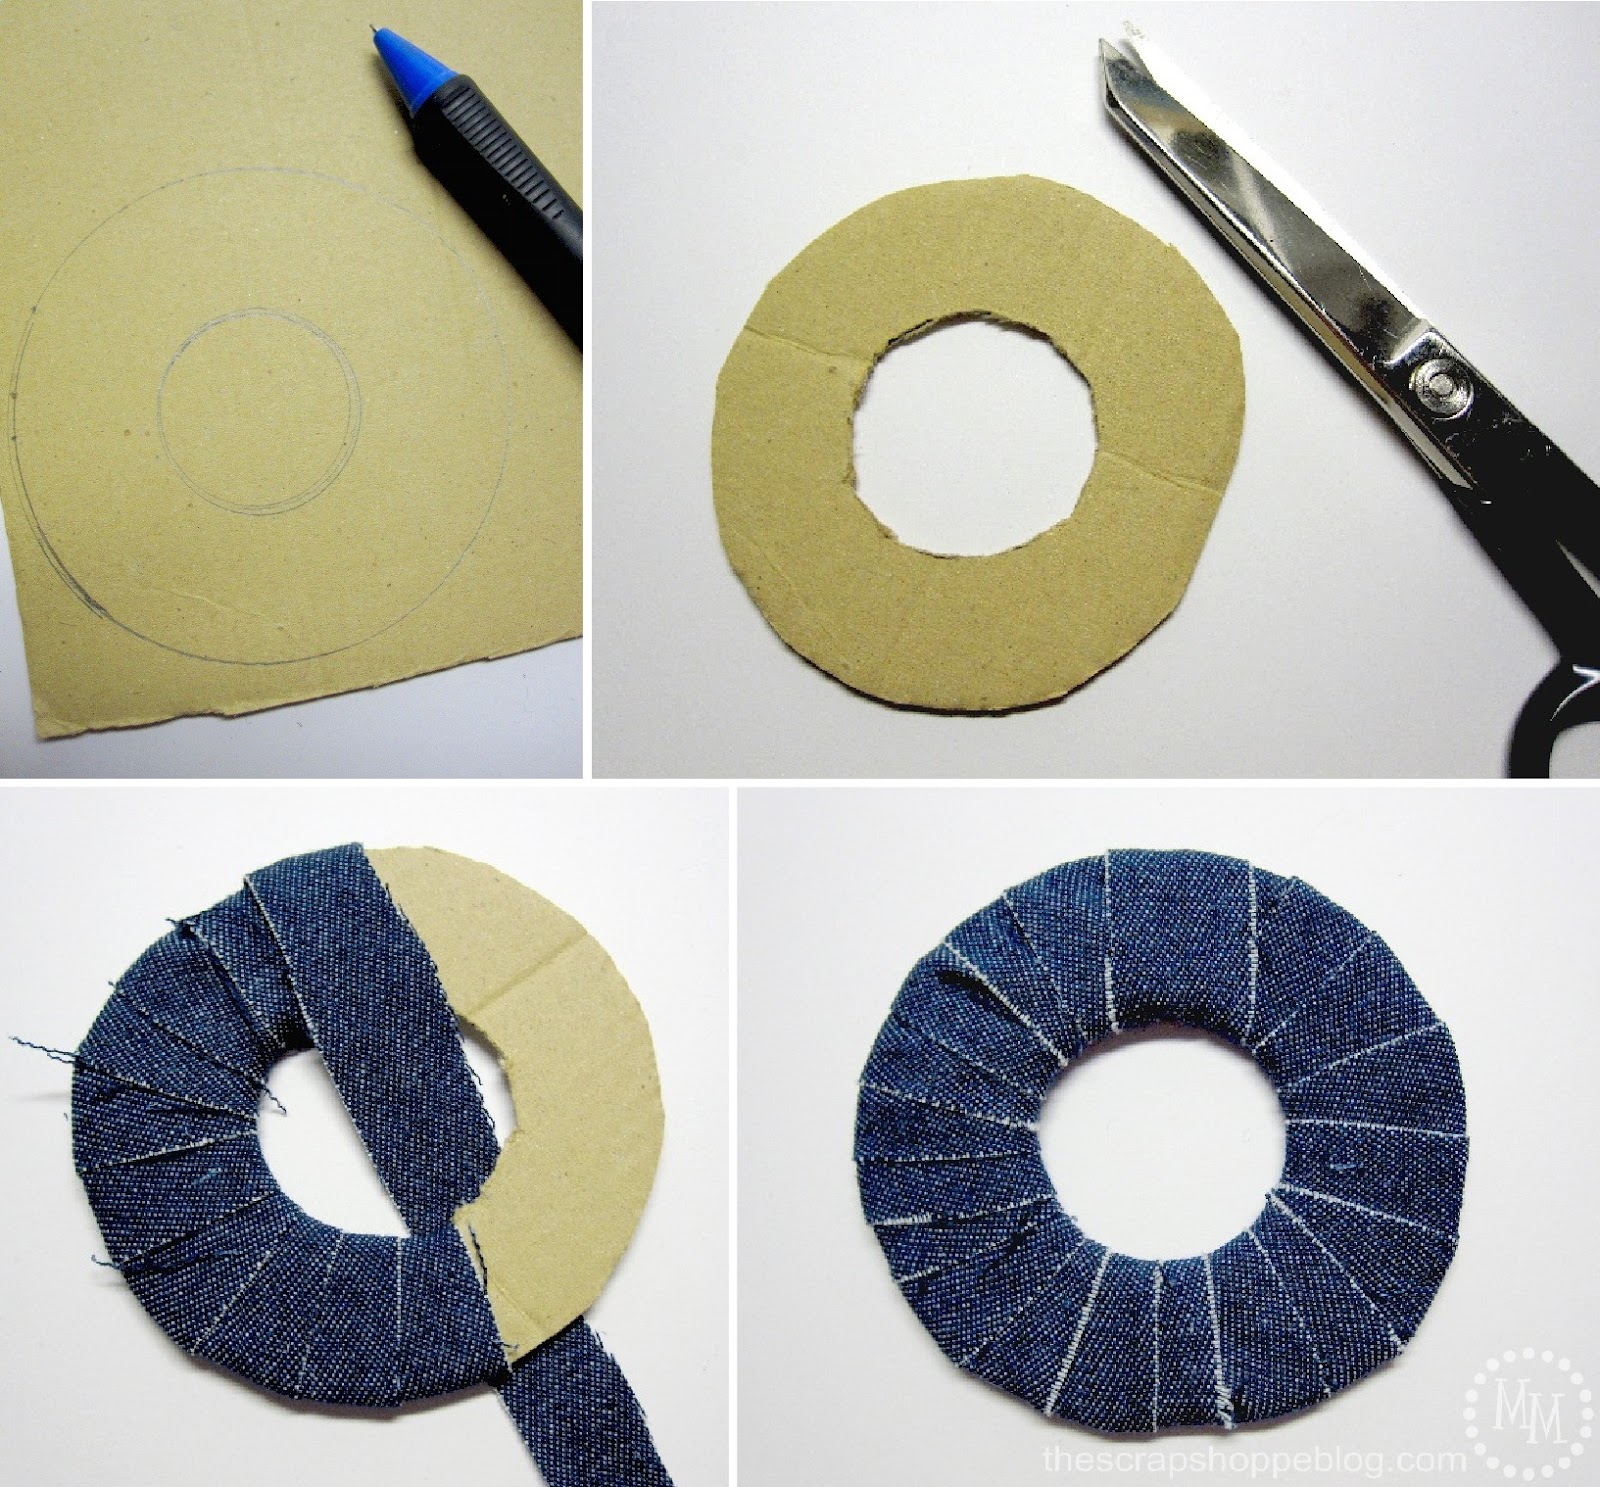
To be sure that the backing of the mini wreath holds up to the weight of the burlap it needs to be made of something a little more substantial than felt which I would normally use for a small pin.
So I grabbed some scrap cardboard and traced out a large circle 3" in diameter and then a smaller circle inside the larger one 1.5" in diameter.
Cut out both circles.
To make it more aesthetically pleasing, I wrapped the cardboard with thin strips of the denim.
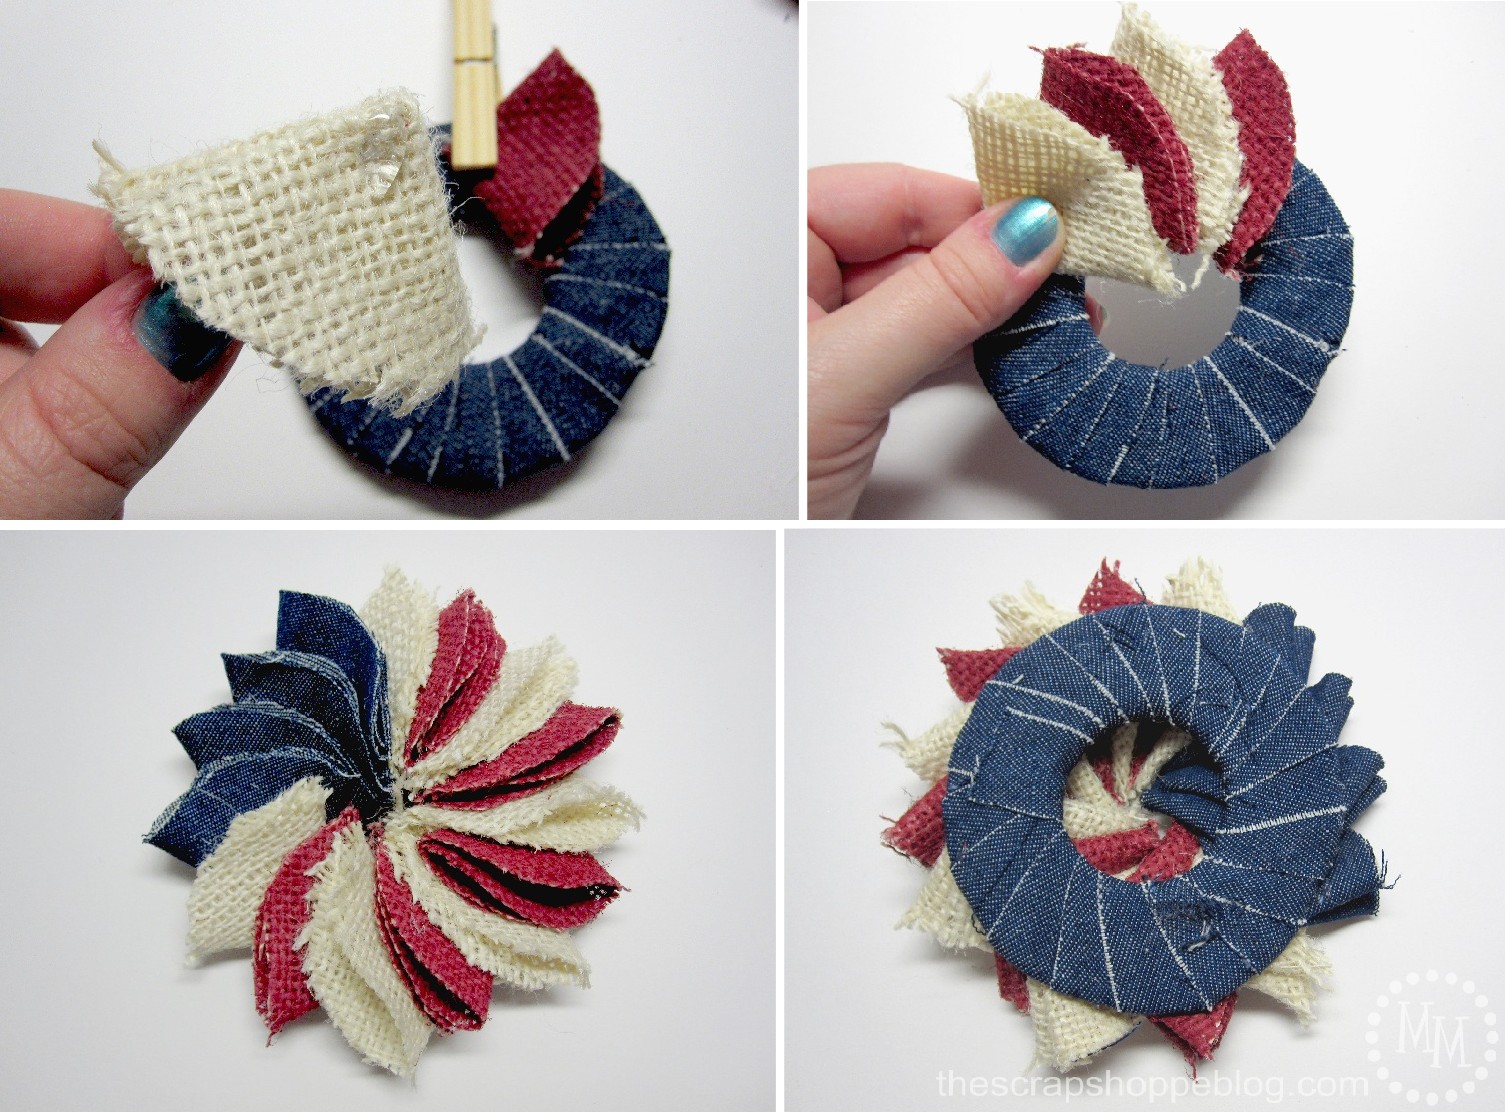
Remove the clothespins from the folded circles of fabric and start gluing them to the denim ring.
Start with the red and white pieces overlapping them slightly.
Add in the denim pieces and you should now have filled the entire space.
If you have any gaps just cut more circles of fabrics of the color that you need.

We're going for a flag look, and you can't have a U.S. flag without some "stars!"
I glued on a few small white buttons to the denim.
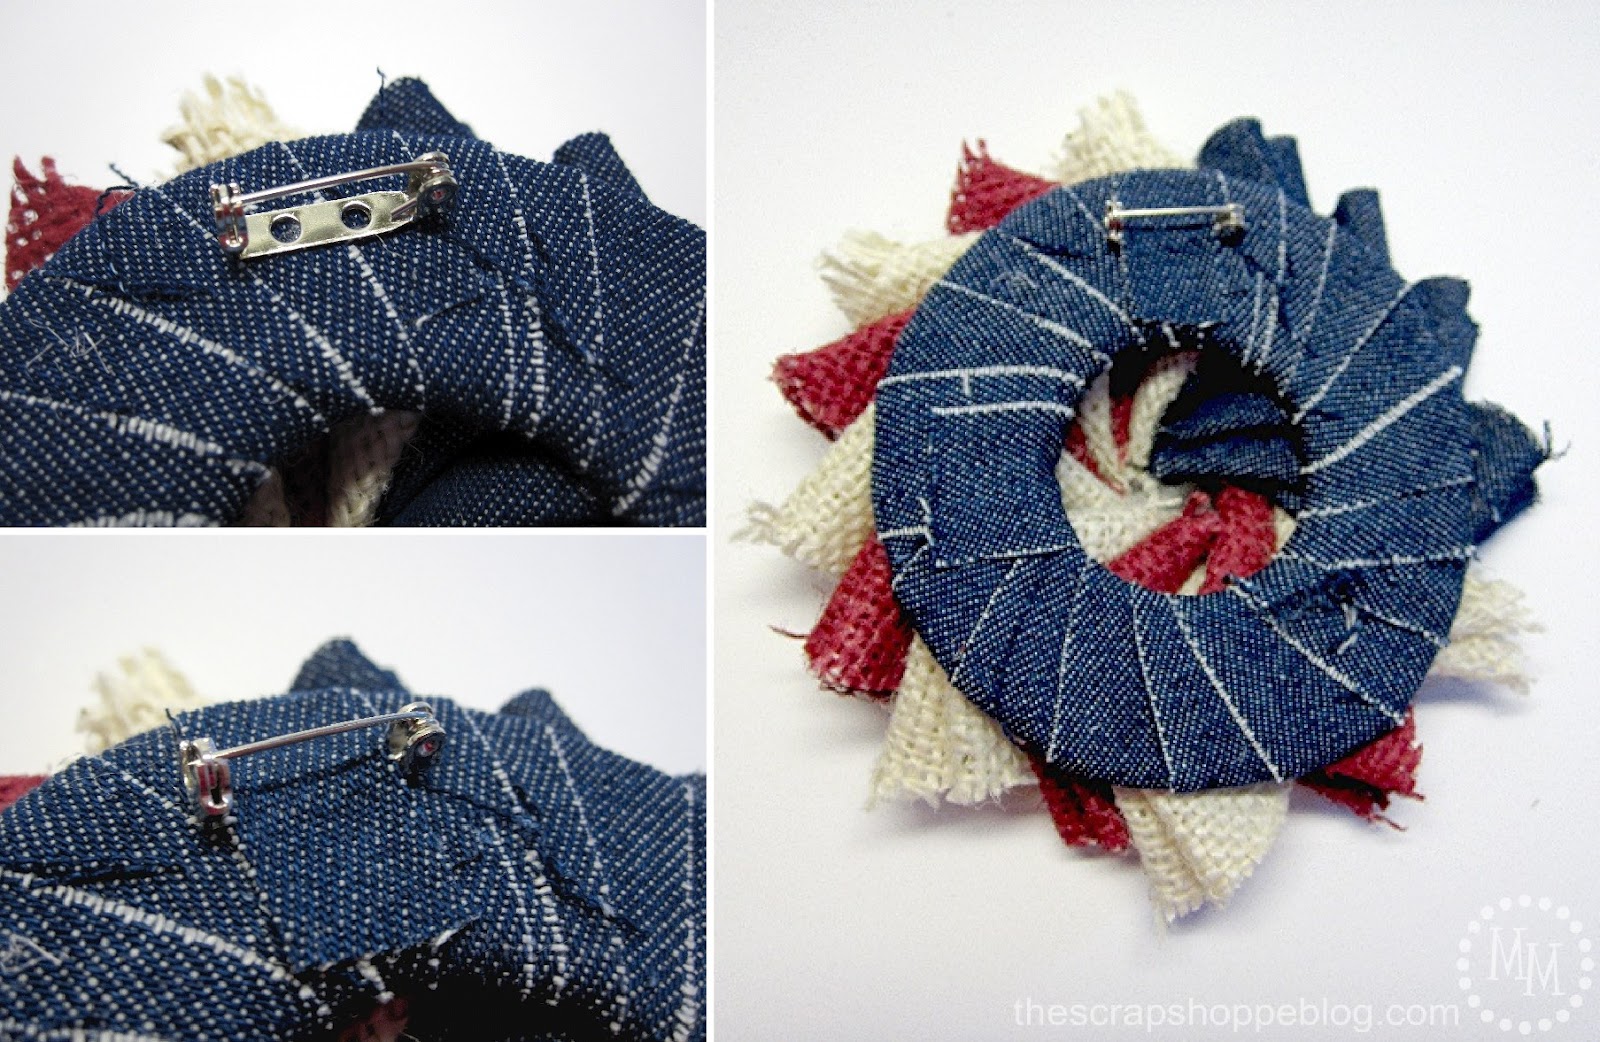
Glue a pin to the top center of the back of the wreath.
Cover the pin with a piece of scrap denim to help it blend in.
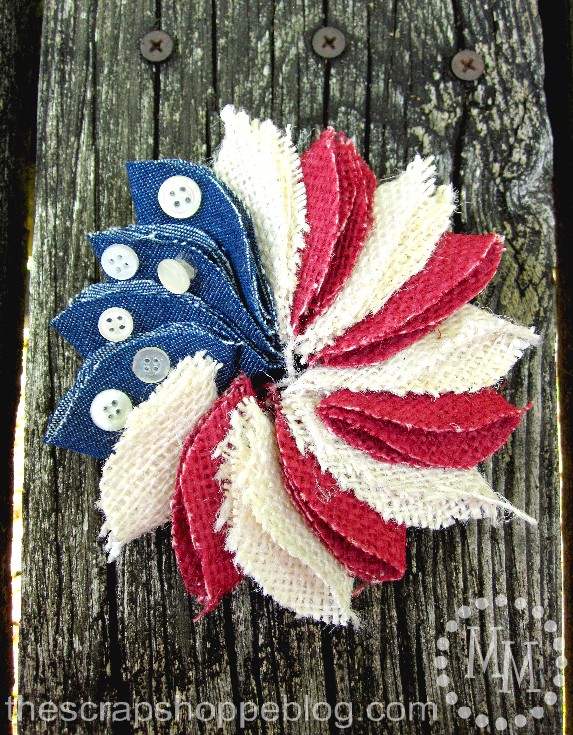
I think the mini patriotic wreath pin turned out super fun!
I love the mixture of the burlap with the denim.
It feels very rustic!
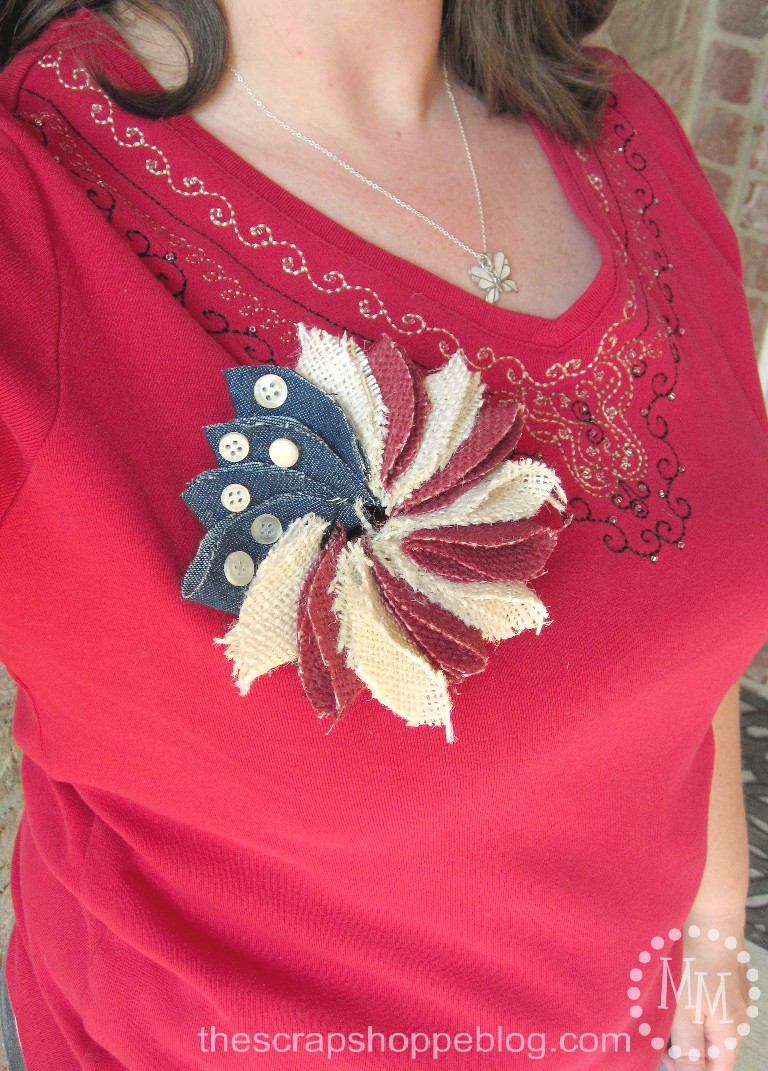
You could totally sport it as a brooch.
Or not...
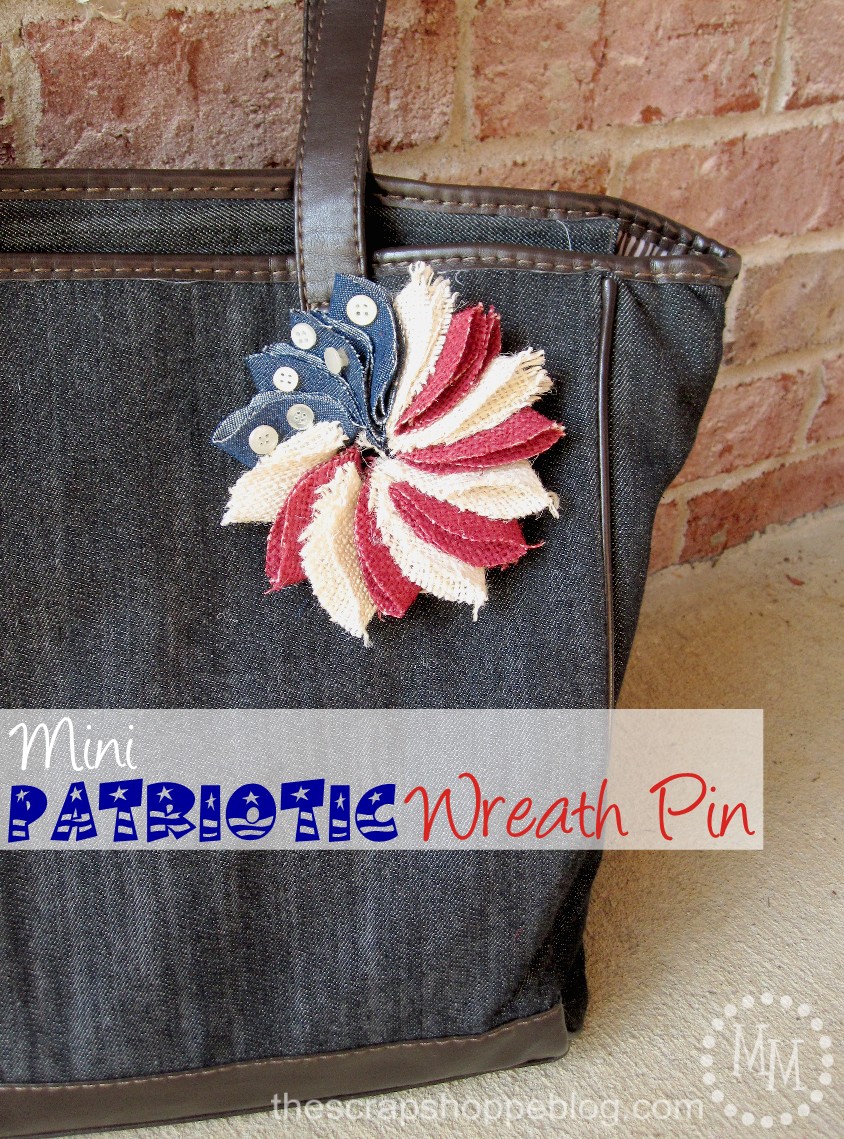
I think I'll keep on my denim tote I carry to work.
I love the extra festive look it gives my bag!
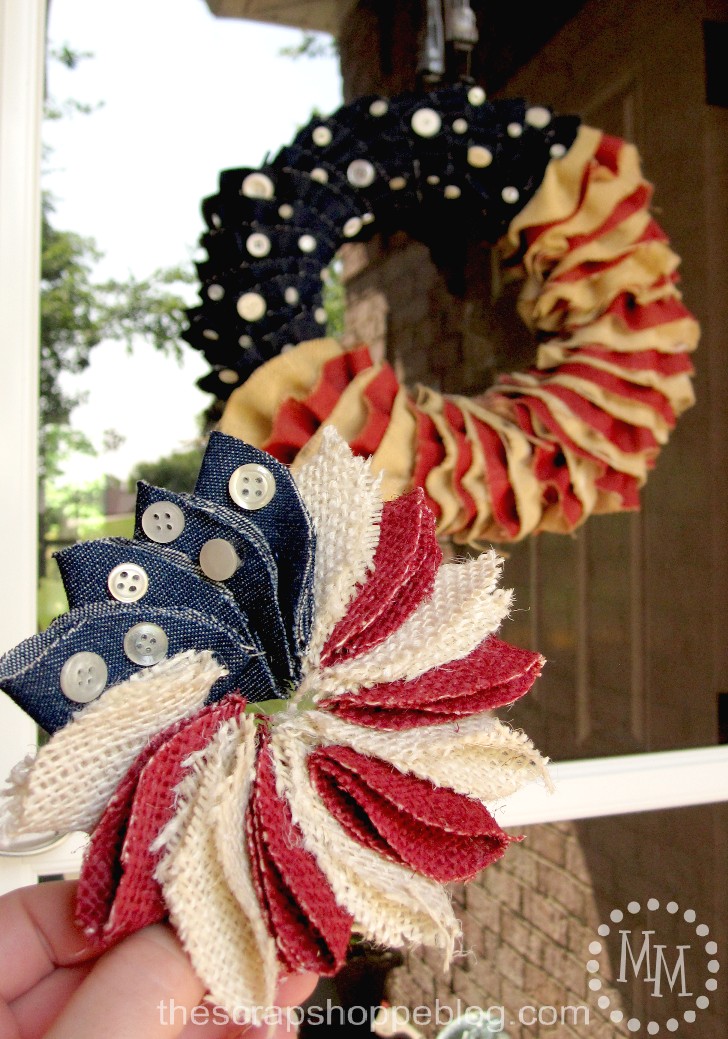
I think it makes for a decent mini version of my ruffled patriotic wreath!
What do you think?
Would you were this on your person or on your bag?

>> See where I party! <<
This post was originally shared June, 2012.


I made a denim wreath and some of your buttons to pin on it. Turned out really cute! Now every 4th or Labor Day I have friends asking me to make them one. Thanks for the idea!!
I will teach my quilt friendship group this idea next July! Thank you for sharing, it's darling.How about one for Christmas!
This is so cute. I can see making a bunch of these for the ladies living at the local nursing home. I think they would love that. I actually linked to your DIY in my article, "Unique and Affordable Ways to Celebrate July 4th." You can see it here: http://www.goedekers.com/blog/unique-affordable-ways-celebrate-july-4th/
I loved this tutorial! I made it out of glittered felt and used silver brads instead of buttons big enough to turn into a pony tail wreath. It slips right over your pony tail or braid and then with a hair clip instead of a pin you clip it in place. Super fun and quick project. Thanks for sharing.
I hope you don't mind but I mentioned your blog and wreath tutorial with a link to your site when I posted my pony tail wreath tutorial on my blog today. You can check it out at craftingisatalent.com if you are interested. Thanks again for such awesome inspiration.
That is so cute! I actually think I am going to make some for my daughters for hair bows for the 4th of July this week. So creative.
So so cute!! So cute and creative! Come link up to centerpiece Wednesday linky party and share your post with us. http://thestylesisters.blogspot.com/2013/06/4th-of-july-decorations-and-centerpiece.html
Karin
Oh my goodness! That is so stinking cute!! I would put it on an alligator clip and use it for my daughter's hair.
So cute...I love it and pinned it!
Have a great holiday weekend!
Susan
Love the pin...... I gotta make one or two! Thanks for sharing..
absolutely stunning!!! Thanks for the tutorial!!!
Absolutely super and thanks for the tutorial!
Lovely pin!
I love this Pin!!!
The buttons are a great detail! 🙂
I would love for you to share this at my Flaunt It Friday Link Party. Make sure you enter for the great giveaway too! 🙂 http://www.blissfulbucketlist.com/2012/06/flaunt-it-friday-2.html
Sarah@
http://www.blissfulbucketlist.com
This is so dang cute! I love all things red, white and blue. I'd love for you to share this at my link party. http://adventuresofadiymom.blogspot.com/2012/06/terrific-tuesdays-20.html
Rachel
Michele...this is one of my favorite's EVER! Of course I am a sucker for patriotic anything. So cute.
Oh my gosh!! This is so stinking cute!!! I hope you wont mind if a ton of us totally copy it!!! I LOVE IT!
You're adorable! I think that this is such a fun fresh take on the accessory pin and I am such a sucker for anything patriotic...Thanks for sharing it with me. Love your guts!
xoxo, T.
Thanks for linking to TAke-A-Look Tuesday - you were featured today!!
--Mandy, http://www.SugarBeeCrafts.com
So cute and rustic! You could even make a bunch to string together and call it a banner or bunting! great job! http://www.craftbaby.com
beatiful!!!!!!!!!
beatiful!
hugs
Maria Filomena,
de Portugal
This is so cute! If I only had the time. 🙂
It would be awesome on a larger scale, too!
Thanks!
Kelly
Looks lovely, I bet it could be adapted to all sorts of occasions.
x cinti
Really great! Love this post, please link it up with me Wednesday on Wow Us Wednesday.
So cute and easy to make. I am hosting book club next week and like to make small gifts to give the members. This is what I will make this time! Thanks for the idea. Karen
I love this! I want to try to make one. If it turns out half way decent I'll have to send you a picture. 🙂 I would love for you to share on my linky party!
http://www.igottatrythat.com/p/blog-hop-linky-colde.html
Thanks,
Marcie @ http://www.IGottaTryThat.com
Visiting from Sugar Bee - love the tutorial pics!
This is such a cool pin. I'd love for you to link up at http://www.doodlesandstitches.com/2012/06/fabulous-friday-link-party-6.html. Thanks for the inspiration.
very cute idea! Love it! 🙂
absewlutelychrissycouture.blogspot.com
How clever, and, to quote Kellie, "festive." I love it. 🙂
it's so festive!!! i've got to get some red white & blue going on for me & the kids. can't believe the 4th is 2 weeks away!
thanks for the idea!
xo
kellie
This is adorable!! Great tutorial...so nice and thorough. And in total envy of your beautiful wreath {which I think I may have already pinned at some point?!}. Would be delighted for you to link up with us at Mop It Up Mondays: http://www.ishouldbemoppingthefloor.com/2012/06/mop-it-up-mondays-21-with-give-away.html
{HUGS},
kristi
This is so cute! I love it on the denim purse and love your wreath in the background even more =)
Visiting from Flamingo Toes!
SUPER CUTE! Crossing my fingers you'll share at my party! Saturdays at Seven!
XO, Aimee
This is rad, I wanna make it!! I hope you will link up with me here:
http://www.thegingerbreadblog.com/2012/06/sweet-saturday-link-party-v43.html
So CUTE!! Crossing my fingers you'll share at my party! Saturdays at Seven! XO, Aimee
This is just beautiful!
I love how you adapated your fabulous wreath idea to a pin and how versatile it is. Just perfect. And thanks for the great tutorial.
love this great work
Cute! Thanks for posting this tutorial! I will absolutely have to make this.
What a perfect little addition to every outfit. I'd love to have you come link up at my Tutorial Tuesday http://www.ourthriftyideas.com/2012/06/tutorial-tuesday-10.html
will definitely be giving this a try! I'm visiting from the TT&J party
That is so cute, and your directions were terrific! I think I'll make some of these with my daughter. They'd be fun gifts for her friends!
....love the pin...:)
Very cute! I'd wear this on my shirt or on my bag. It also would look cute on a wreath.
Love it!
Oh that's darling, LOVE!
I'm back to let you know I decided to feature it in this week's A Crafty Soiree. It'll be up at midnight EST. Come by and check out your feature when you get a chance. Thanks for sharing.
Love, love, love, love, LOVE!!! So doggone CUTE! Pinning immediately 😉
<3 Christina at I Gotta Create!
http://igottacreate.blogspot.com
Wildly Original Linky Party is open
This is super darling Michele!! I love the little buttons and it's so great that you can use it as a brooch to wear or as a little pop of fun on a bag!
I love this! I might just have to make one of these and put on my jean jacket that I never wear and actually wear it!