
DIY Decoupaged Crate
Dress up a boring wooden crate with pretty patterned scrapbook paper to make this DIY decoupaged crate! It's such a great way to organize your home.
This post contain affiliate links.
You may or may not be aware, but I am a former scrapbooker.
I don't have a lot of time for that hobby anymore, but don't tell my growing scrapbook paper collection that! I am completely addicted to those 12x12 sheets.
One of the reasons I love scrapbook paper so very much is that it is so versatile. You can do just about anything with it! Except wear it... maybe.
The point I'm trying to make: Scrapbook paper is not just for scrapbooking.
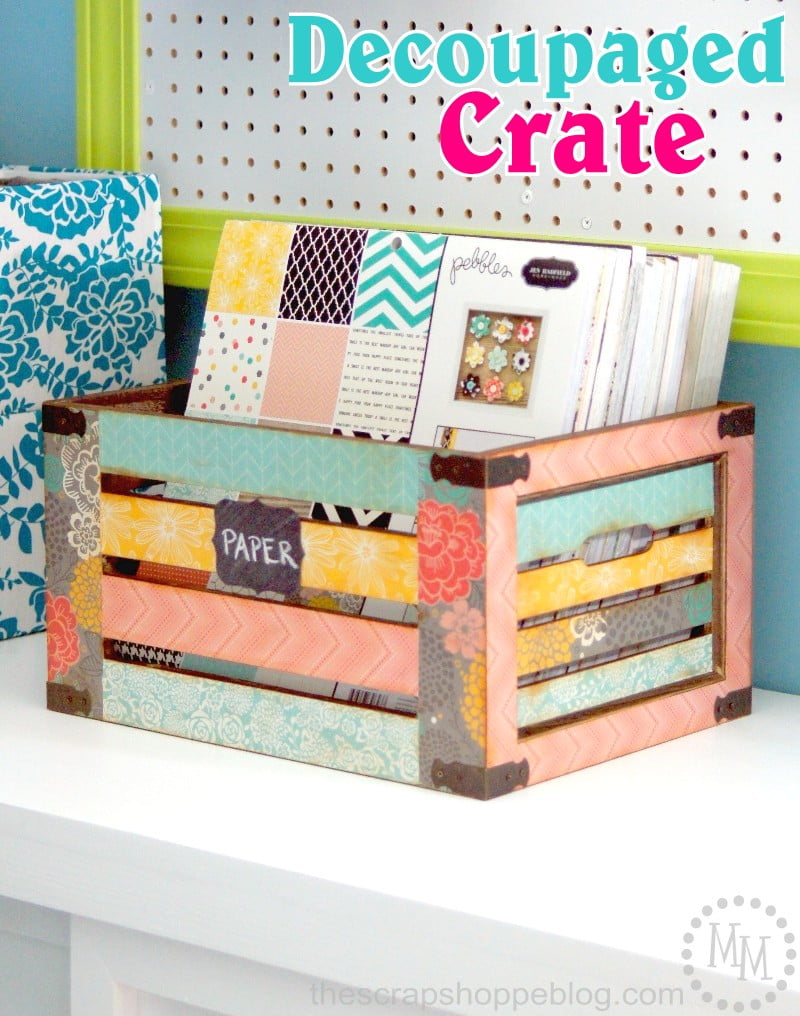
It's also an easy way to give just about anything a fun and colorful makeover. Like this decoupaged crate! Which now happens to be organizing a big stash of my own scrapbook paper collection.
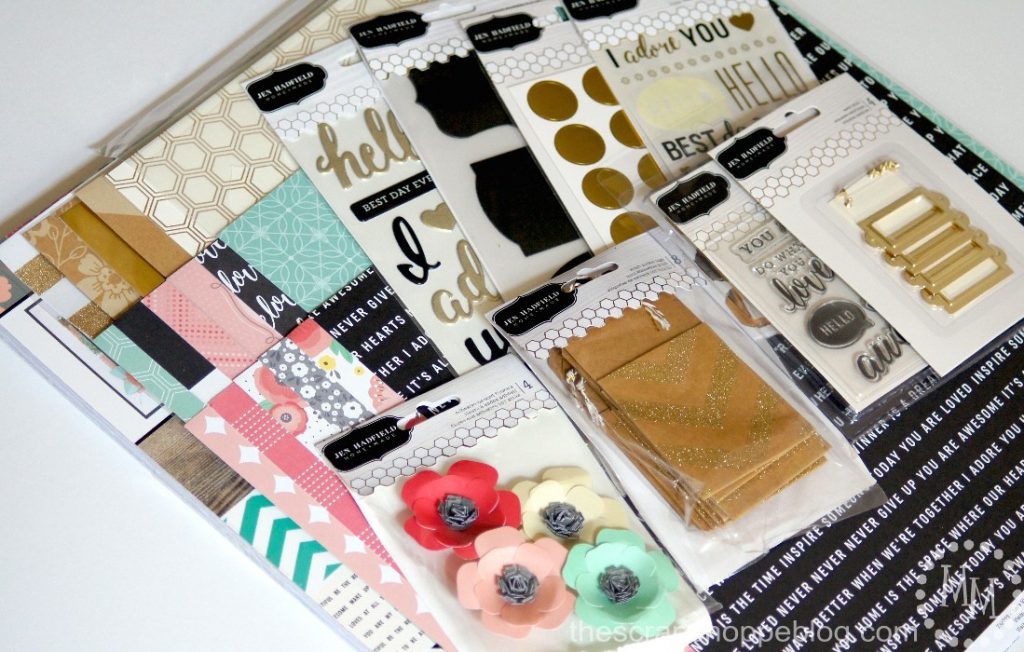
I recently had an opportunity to play with the new The Hand+Made collection from Jen Hadfield and Pebbles Inc.
It is full of fun bright colors and a lot of gold accents.
I have LOTS of big plans to use more of these supplies, but they'll have to wait until after the holidays.
From the Home+Made collection you will need the following for this project:
Supplies
12x12 Paper Pad
Chalkboard Label
Other supplies needed
wooden crate
decoupage
sponge brush

You can find inexpensive crates just about anywhere these days.
This one is from a local home decor store.
What drew me to it was that it was already stained and the extra hardware it contained.
Before we decoupage the crate we need to remove all of the hardware.

Cut the scrapbook paper according to the slats and size of the crate.
Apply decoupage to the crate with sponge brush, applying one sheet of paper at a time. Press firmly for good adhesion and smooth to remove any bubbles. Any excess decoupage that happens to seep out from under the paper will dry clear.
After adding the paper, realign the hardware to find the holes for the screws. Use a paper piercer or some other sharp instrument to poke holes in the paper to mark their positions.
Because the crate gives the entire project a rustic feel, I inked the paper with distress ink to match accordingly.
Apply a layer of decoupage on top of the paper once the ink is dry. Once the decoupage is dry, reinstall the hardware.

I added a chalkboard label to the front of the crate.
Don't forget that on new chalkboard surfaces you need to "cure" them by rubbing them all over with chalk then wiping it off. Then you can write whatever you wish on them.
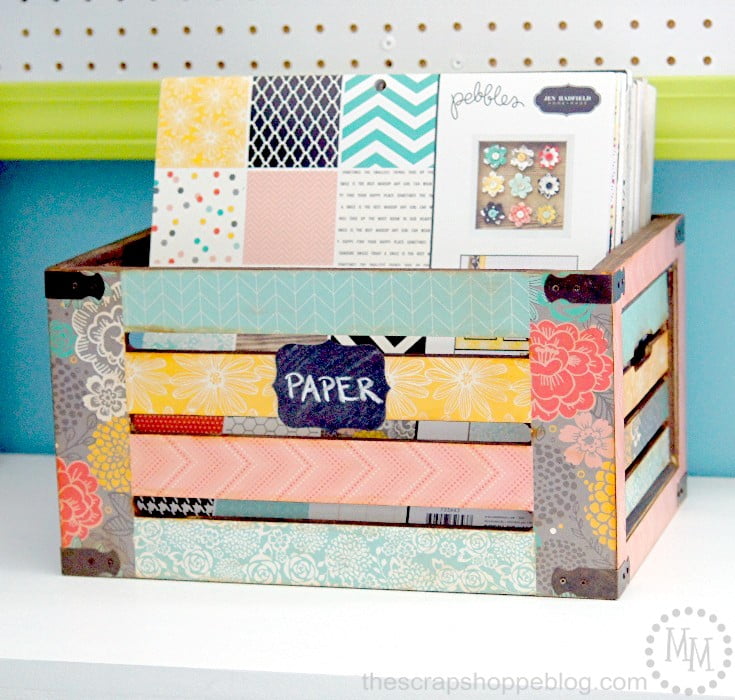
This wooden crate happens to be the perfect size to fit several of my 12x12 paper pads!
It's a great organizational addition to my craft area. And the colors and patterns really brighten up the space!
Isn't it amazing wall a little paper and glue can do?? Will you try this DIY decoupaged crate craft?

>> See where I party! <<
This post was originally shared September, 2015.


This is lovely, what a great use for your paper collection
Love this. Thanks for sharing at To Grandma's House We Go DIY, Crafts, Recipes and More Wednesday Link Party! Pinned it to Pinterest! Hope to have you join the party next week!
What a beautiful way to store craft supplies. Thanks for sharing at #HomeMattersParty
Una idea estupenda. Decoración muy propia para el fin a conseguir: almacenaje de papeles y abalorios scraps. Felicidades por todo. Saludos y feliz semana!!!
Decoupaging is so fun. Love how fun and colorful this crate is! Thanks for sharing with SYC.
hugs,
Jann
Such a gorgeous crate! The scrapbook paper you used is beautiful!! Pinning!!!
Totally cute! Pinned! Thanks for sharing at the To Grandma's House We Go DIY, Crafts, Recipes and More Link Party. Hope to see you again this week!
This looks great. I would never place one of those ugly plain crates on an open shelf, but with this fix it looks wonderful. Thank you for the inspiration.
I love your project Michelle - you always share such fabulous work!
Congrats - you're one of our Featured Guests at Inspire Me Monday at Create With Joy - thanks for sharing!
It looks great! I love the combination of all of the patterns you chose:) Thanks for linking up at the Home Matters Link Party! We hope to see you again next week:) #HomeMattersParty
I love how you did this, you gave it a totally different look and feel. So pretty. I have a small scrapbook paper addiction too so I understand!
Wow. Love the colors. It is amazing how much life decoupage papers brought to a plain brown crate.. Nice job.
Great project! I'd be honored if you visited my blog and linked up to my new linky party, Support Your Fellow Crafters! http://superstinkyboys.blogspot.com/2017/03/support-your-fellow-crafter-linky-party_20.html
You did an amazing job, it turned out great! Thanks for sharing his at the DI & DI Link Party.
Your crate turned out just beautiful! I can't wait to try this!
OMG this is so stinking cute! I love all the patterns and colors on this! I need to get myself a crate or two so I can try this! Love it 🙂 Thank you so much for sharing with us at #ThrowbackThursday we hope to see you again this week!
This is fun project! Love the papers you used for your crate! Found you from Inspire Me Monday link up 🙂
I used to scrapbook quite a bit. I'd love to make one of these to hold pretty papers. Love the diy. Pinned & shared. Thanks for joining the Inspiration Spotlight party.
LOVELY! Pinned ... Couldn't be nicer. Have a great week. Linda @Crafts a la mode
I love decoupaging and haven't done it in quite some time. Thanks for the inspiration to get going again! It can be such a fun way to change up your home decor too for the seasons!
This looks absolutely amazing! Pinned and tweeted. You always bring the most amazing creations to our party. Thank you! I hope to see you again, this Monday at 7 pm. It wouldn’t be a party without you! Lou Lou Girls
I love your crate! Thank you Michelle for sharing your lovely project with us at Inspire Me Monday at Create With Joy! You are one of our Featured Guests at this week's party -#197!
This is awesome! Thank you so much for sharing!
Joanita @ Snickerdoodle Sunday
Oh how pretty! What a fun way to dress up a plane crate. Love the different colors of scrapbook paper. Great for storage and pretty too!
This is so lovely and I can make one of my own from supplies I already have! Thanks for sharing at the #ThisIsHowWeRoll Link Party on Organized 31.
I never knew a crate could look that cute!! Love it! I’d love to invite you to my new link party!! It’s still going on with only a few entries. Three of them get featured this Thursday!! Please come over! http://www.diy-crush.com/blog/4-non-scary-stick-puppet-spider-tutorials/
Very cute and clever! LOVE it.
What a great project and a way to pretty up a crate for storage! Thanks for sharing this project.
This is so cool!! I love how you dressed this crate up!! 🙂
what a fun (easy) decoupage project Michele! I love the papers you chose. 🙂
gail
Hi Michele,
I love to decoupage and really love the crate you did. Whata a colorful storage idea! Thanks for sharing. Happy Easter to you and your family!
Cheryl