
{BEST} PVC Pipe Car Wash Tutorial!
Take summer fun to the next level using this best PVC pipe car wash tutorial! It's a DIY that is easier than you might think!

I know you've seen all of the PVC pipe car wash ideas and tutorials out there.
We were smitten with the idea and decided we needed to make one of our own because it is HOT here in Tennessee!
I'm definitely not trying to be snotty by calling this the BEST PVC pipe car wash tutorial.
But mine implements a new idea that makes it even MORE fun!
And I worked hard to put together a great tutorial so you can easily recreate it yourself!
Ready? Let's kick it off with our supply list.

For this PVC pip car wash you will need:
5 ½"x10' pieces of PVC pipe
7 ½" tee pieces
4 ½" side elbow pieces
4 ½" end caps
1 ½" female PVC adapter (not shown)
PVC pipe cutter
PVC cement (optional)
And the key ingredient: misters!
p.s. All of our supplies came from Lowe's!

The misters are what make this car wash SO fun!
You WILL get wet soaked in this car wash.
Depending on the type of mister you get will depend on additional costs you want to incur with the project.
We decided to go for it and bought three different types:
The half circle: the cheapest and definitely a lot of fun! 10 in a pack.
The quarter circle: Definitely going to get you wet! 12 in a pack.
The full circle spinner: Definitely my favorite with 360 degree water movement! ~5 in a pack(?).
You could definitely get by with just the half circle pack of misters.
It's entirely up to you!
We ended up using about 15 misters total, incorporating all 3 types.
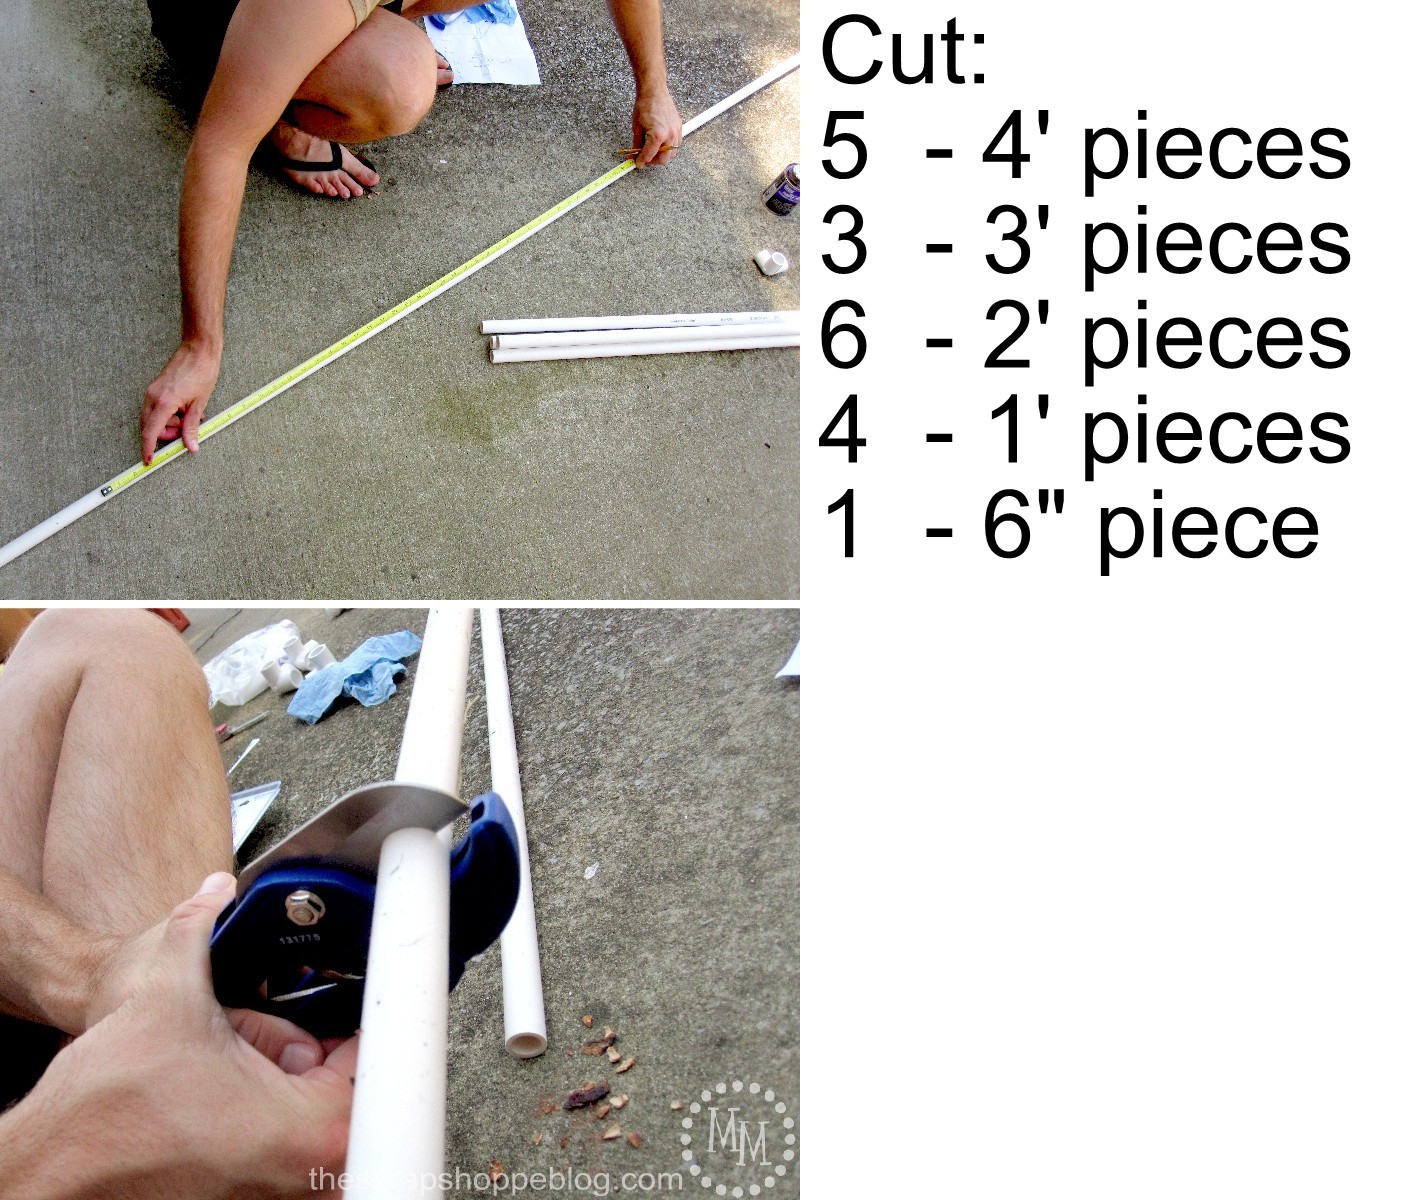
You will need 5 pieces of ½"x10' PVC pipe.
To cut I recommend:
Pipe #1: 2 4' lengths + 1 2' length
Pipe #2: 2 4' lengths + 1 2' length
Pipe #3: 1 4' length + 2 3' lengths
Pipe #4: 1 3' length + 3 2' lengths + 1 1' length
Pipe #5: 1 2' length + 3 1' lengths + 1 ½" length
This is where the PVC pipe cutter comes in so handy.
It cuts through PVC pipe like butter!
Definitely worth the $10 investment.

The above photo illustrates exactly how the pieces will fit together.
The final car wash is 3' (wide) x 5' (tall) x 4' (deep).

The above photo shows where to put all of your connecting pieces to hold the pipe together.
Notice the tees for the sides, side outlet elbows for the corners, caps for the bottom, and one female hose thread.

The caps under each of the four legs of the car wash will keep the pressure running throughout it.
We didn't have a female hose adapter so that isn't what is shown above.
We used a male adapter we had on hand and made it work.
But the hubs says a female adapter is what would be best.
If you haven't guessed it yet, this is where you will hook up your water hose.

We figured out the placement we wanted for our various misters, drilled the holes, and simply screwed them in.
The more misters the better!

I wanted to show you the difference the misters make!
To the left is the car wash with no misters.
Its fun, but not super exciting.
To the right is the car wash with misters.
You can't see all the water because it is so fine and is shooting everywhere!

Time to test it out!!
My boys had an absolute blast running and driving their various cars through the car wash!
And they were soaked with each pass through thanks to the misters.

The 2nd day we had the car wash up I decided we needed some sponge bombs to drive through so I ran to the Dollar Tree for sponges and whipped them up and tied them off onto the car wash.
You can find tutorials for making these sponge bombs all over Pinterest.
I used this tutorial from One Charming Party.

This car wash has been the BEST thing to happen to us so far this summer!
Its fun, relatively inexpensive, and we can use it again and again each year!
A few side notes:
You can use the PVC cement if you want to be certain that the car wash will not fall apart.
We decided NOT to use it for two reasons.
1) We want to be able to easily store this car wash so that means dismantling it at the end of the season so it doesn't take up a lot of room.
2) It is holding up amazingly well without any cement!
One thing I definitely recommend is to tighten all of the joints before each use of the car wash.
We learned that on day two.
Tightening only takes a minute and will ensure your car wash will not bust apart once it reaches full water pressure when the hose is turned on.
It will take a couple of minutes before you reach full pressure once the water hose is turned on.
Be patient and don't complain to your husband that its not working (not that you would ever do that *cough*).
While my husband and I tag teamed this project (and had it started and complete during nap time I might add!), it can definitely be a one person job.
Ladies, you can definitely do this yourself!
Especially with the help of the PVC pipe cutter!
So let's look at cost:
5 pieces of PVC pipe: $8.90
4 caps: $1.62
Tees: $2.52 (10 pack)
4 side outlet elbows: $4.72
Female hose connector: $0.30
Base cost total: $18.06
Optional costs:
Misters: $3.60-$7.75
Primer (for cement): $3.97
Cement: $3.67
So if you didn't want to use the cement and only grabbed 1 or 2 packs of misters, you could do this project for less than $25!
Not a bad investment for multiple summers of fun!!
Have you made a PVC pipe car wash already this summer?
I think you could adapt it to use the misters.
I would love to know if you use my best pvc pipe car wash tutorial!
Happy summer!!

>> See where I party! <<


Wow! So cute! I have some grandbabies that would love that! Thanks for the tutorial!
Great project, what kids would not love it
What size drill bit did you use for misters
AAAH! That looks like so much fun! I would never be able to get my little guy out of there! Thanks so much for sharing at Throwback Thursday!
My 2 year old would LOVE THIS!!!
Well I sure haven't heard of this but it's such a charming and fun idea!! Thanks much for coming to Throwback Thursday and sharing!! 🙂
Mollie
What cute idea! I love it!! Thanks for sharing at the Family Joy Linkup!
What a fun way to cool down and have fun at the same time.
So much fun, wow! thanks for sharing on craft schooling Sunday!
This is so cute and the misters make it awesome! Thanks for sharing at Fridays Unfolded! Featuring you this week 🙂
I have never seen that before, what an awesome idea. Why not make it a bit bigger for the family car ☺ Your kids are loving it. Thanks for sharing on #HomeMattersParty
Kathleen
My brother recommended I may like this website. He used to be entirely right. This publish actually made my day. You can not believe simply how much time I had spent for this information! Thank you! Please keep your blog going! If possible
What a cool idea. This is definitely one for the summer with my Beaver scouts. Thanks for sharing
So excited!! Trying this today I think prices have changed a little since then, but not much, still looking forward to this. I am changing to make it 3 1/2 or 4 ft wide so my daughters power wheels can fit!! So excited
A fascinating discussion is worth comment. There's no doubt that that you should
write more on this subject matter, it might not be a taboo
subject but typically people don't speak about these topics.
To the next! All the best!!
Word of information to people who live in the North...order your misters from Lowe's dot com a couple of weeks before you need them. They are an item peculiar to the South. Mine were shipped from Texas.
what size drill bit for the misters?
Hi Lisa! I can't remember the exact size, but I think it was stated on the package. If not, use a size smaller than the misters themselves.
I think the misters definitely add something to it! What an awesome find! Thanks for linking up at our Summertime Categorically Crafting party at Someday Crafts. We'll be highlighting this tomorrow, so come check it out!
Wow -I love it!!! I have 2 teens now... guess I'm gonna have to wait for grand kids. Or maybe build one for the neighbor kids. 🙂
OMGosh, I LOVE this idea!!! pinning!
I would so love you to add my linky party to your list page, then come link up so I can feature this! what a great idea, this would be a life saver to so many in this horrible heat!
have a blessed Sunday!
Maria
Joyful Stamper blog,
Inspire Me Fridays link party!
We did use your tutorial! LOVE it! Thanks for spelling it all out. Our kids are having a ball with their car wash.
Where were YOU when my boys were little? This is such a great tutorial. Thank you.
Wish I had this when my boys were little. Posted on Facebook. Thank you for sharing.
Shared your cute car wash on Friday Finds today. Thanks!
Hi! Loved your project and have shared it on my Friday Finds today. Thanks!
I featured you today on Blissful and Domestic. Stop by and check it out!
Danielle @ Blissful and Domestic
http://www.blissfulanddomestic.com
What an incredible idea this is, thank you so much for the tutorial, I bet the kids had the time of their lives. I am amazed by this idea, it's really wonderful.
Love, love this wonderful idea for the kids to have fun when it's hot outside.Pinned it.
This is the CUTEST idea I've ever seen! I wish I still had little ones I could make this for and watch play with it. Instead, I'm pinning it to my grandchildren (one day) pinterest board, so I can hopefully someday make it for them. Thanks so much for sharing this (best ever!) tutorial and the adorable photos of it being used. (I found you today over at the My Repurposed Life feature.)
This is awesome! I ran out and got the stuff today (fighting 4th crowds the whole way!) and I'm just waiting for nap time to slap it together. 🙂
Michele--in this hot weather, I bet your car wash is a HUGE hit with the kids! Great tutorial, thanks for sharing at CCC!
gail
Oh wow...this is too fun, Michele! This is such a wonderful tutorial...and from the looks of it, those misters really do make a HUGE difference! Would be super delighted if you could stop by and link this {and any other projects you may have} up with us at Mop It Up Mondays: http://www.ishouldbemoppingthefloor.com/2012/07/mop-it-up-monday-23.html
Have a great week!
{HUGS},
kristi
p.s. can you tell me how to add the recent posts to the top of your blog... I have been seeing this a lot more lately? jenglamgirl@gmail.com thanks, jen
love it, and little tut tut in the front. So cute with the sponges too. winks, jen
Your little guys must want to live in this. You are quite the ingenius engineer!
What a super duper fun idea! I've never seen these before, so it's new to me, but I love it!
Great idea for summertime. Here where I live it gets into the triple digits all summer so I'll probably be cooling off in the car wash with my daughter 😉
Love this idea please come and share it on my link party: http://fabricbowsandmore.blogspot.com/
What an awesome tutorial! How fun! You are right, I have a whole folder of these PVC type sprinklers and yours is the best!
Cute! What a fun way to stay cool in the summer!
Blessings, Grace
Very cute idea :o)
What great fun! On my list of things to do 🙂
Michele, this is an amazing tutorial! Thanks so much for putting it together! I just may have to give this a try! I know my kids (& the neighbor kids!) will love this!
Oh my goodness - this looks like heaven on earth for little guys! Love this, Michele!
This is awesome! Thanks for the excellent tutorial!
What a great idea! This looks like so much fun! My boys would love this.-Erin @ DIY On the Cheap
I would love to make one of these for the grands to use when they visit! Must try to talk DH into it.
This looks like soooo much fun!! I love the idea of using the misters - it seems like it would put out a ton of water! The boys looked like they had a great time! 🙂
This really does look like the best one i've ever seen! I love the sponges you added too!
Sarah
{www.naptimedelights.blogspot.com}
Thanks for this awesome tutorial! I'm planning on making one of these for my son's birthday party- I didn't think of getting misters!