
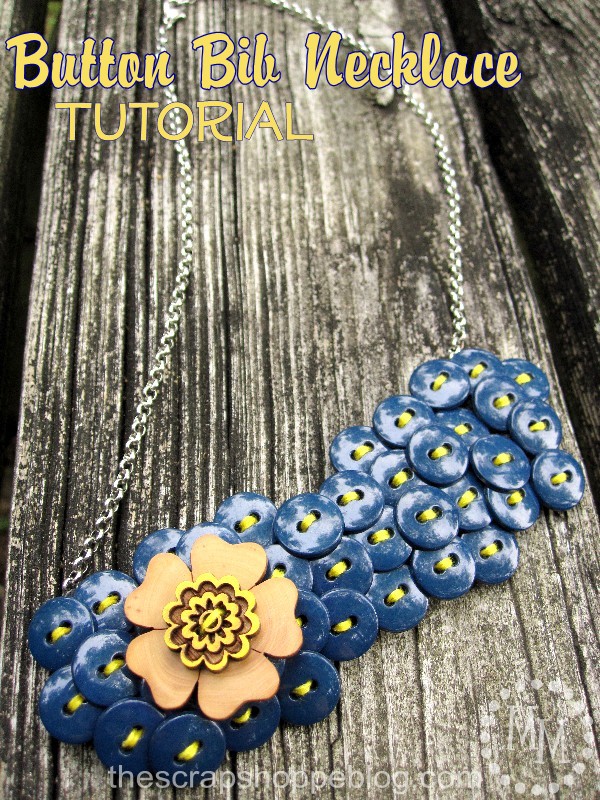
Button Bib Necklace & Earrings Tutorial - PART 1

If you've been hanging around here long enough you know that button necklaces are not a new thing for me!
See this turquoise button bib necklace tutorial and this pearlescent gray version.
But I did make those necklaces differently than this one, and I like this new method better so I wanted to have a handy reference for it for both you and myself!
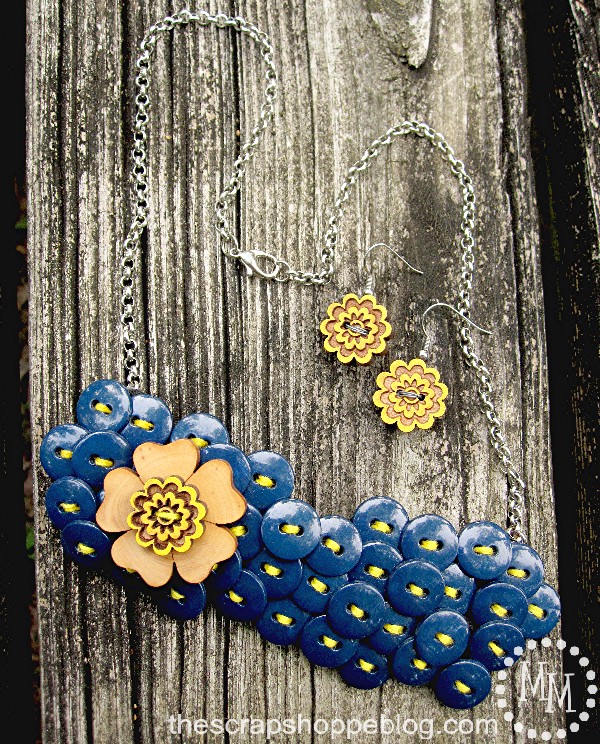
Plus, now I have matching earrings, too.
I don't know about you, but matching jewelry sets make this girl happy!

Because the tutorials for each of these pieces are very picture heavy I am dividing them in two.
Get ready for Part 1: Button Bib Necklace tutorial!

I was looking to make a custom piece of jewelry for myself to wear at SNAP! and needed something to add some color to my wardrobe. I'm a shades of gray kind of girl, but I do try to go bright occasionally!
I was perusing the button aisle at Jo-Ann's when I discovered these wooden yellow flower buttons. How cute are they?? And at half off I snatched up two sets.

I was looking for some more buttons to go with them when I stumbled across this large wooden flower button.
Its like they were meant to be together, don't you think?
A couple of small bags of navy buttons to go with them really makes the flowers pop!
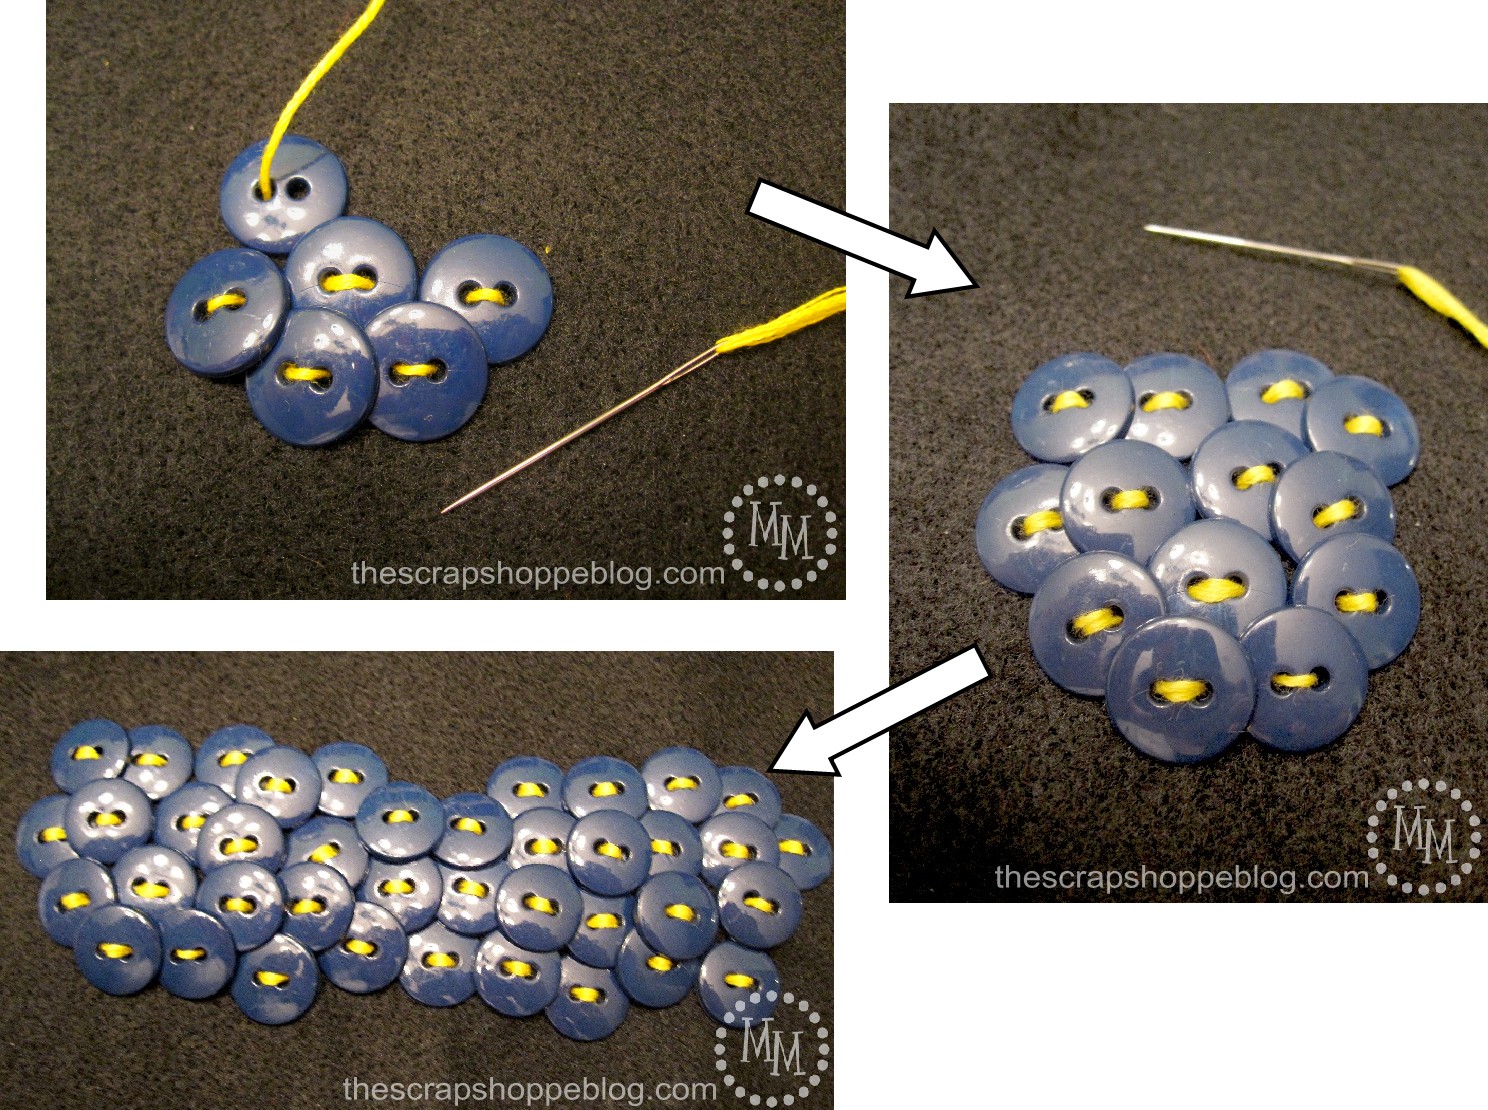
For even more pop, I decided to use some matching yellow thread to stitch the navy buttons on to a piece of felt.
Yep, I stitched them. In my previous tutorial I glued the buttons on to the felt, but I have found that the stitching is actually easier.
When you sew on your buttons the only thing you're really concerned about it overlapping them a bit so that the felt does not show through. Other than that, just try to keep a "bib" sort of pattern as you add the buttons.
There is no wrong way to do this!

After sewing all of the navy buttons to the felt, I went back and added the flower buttons right on top.
Trim the felt around the buttons, but not right up to the edges.
We have a couple more steps we need to do before the final trimming.

The felt can be a little floppy even with the buttons sewn on.
So I like to add a couple of coats of fabric stiffener to the back.
Spritz the felt once lightly and go wash the dishes. 😉
Come back and spray it slightly heavier and let it sit overnight to dry.
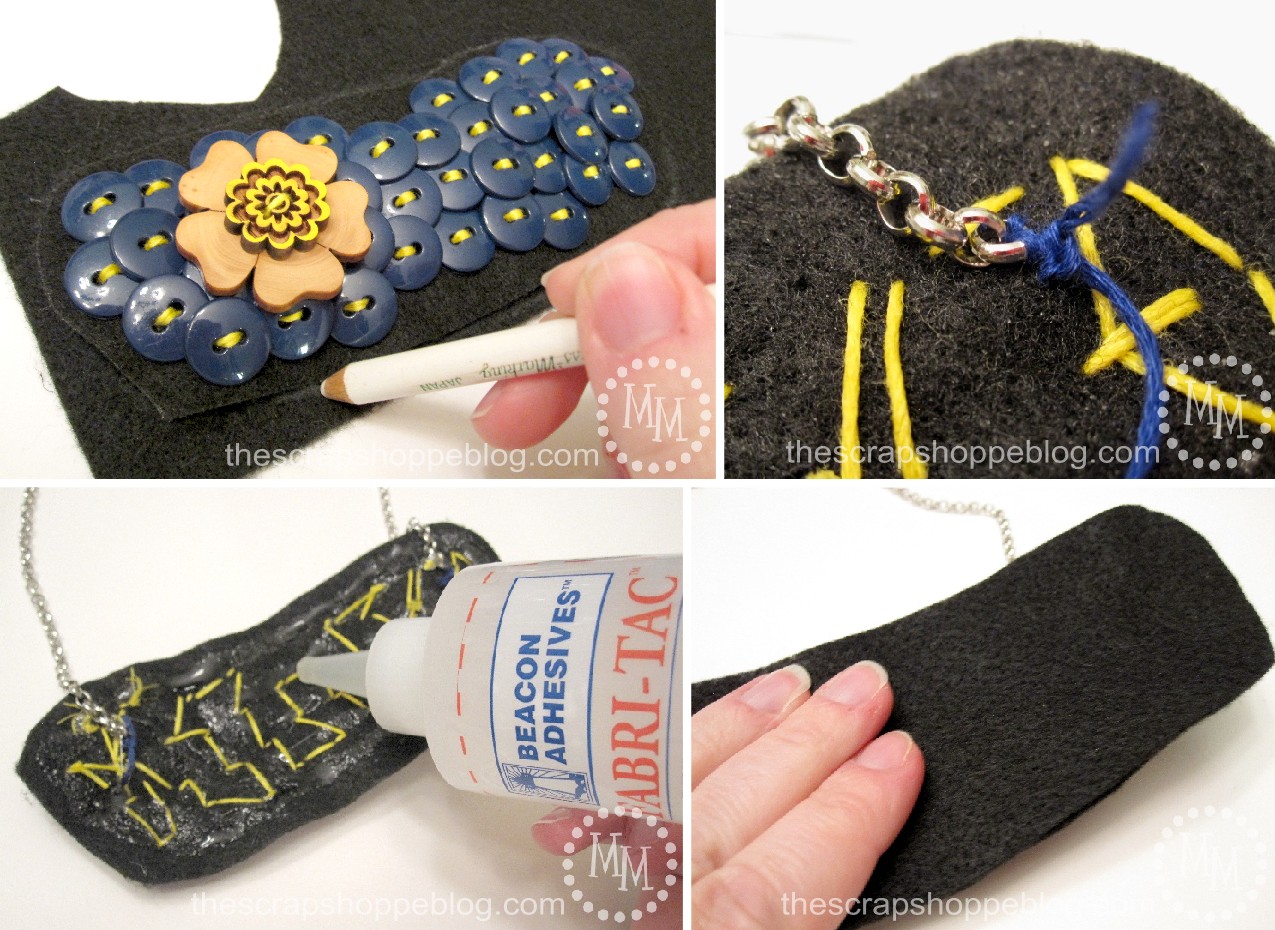
Because the back isn't particularly pretty, not to mention a little scratchy from our fabric stiffener, we're going to cover it up with another layer of felt.
Place the necklace on a piece of felt and trace around the edges with a white pencil or piece of chalk then cut it out.
Before we attach our new back piece of felt we need to add our chain! It doesn't have to be adjusted to length yet, just attached. Stitch the chain on to each end of the back of the necklace.
Now we're ready to cover the back up!
Add some glue (I like Beacon's Fabri-Tac, but you can use any fabric glue or even hot glue) all over the back of the necklace then attach and press on the extra piece of felt.
Let it dry overnight.
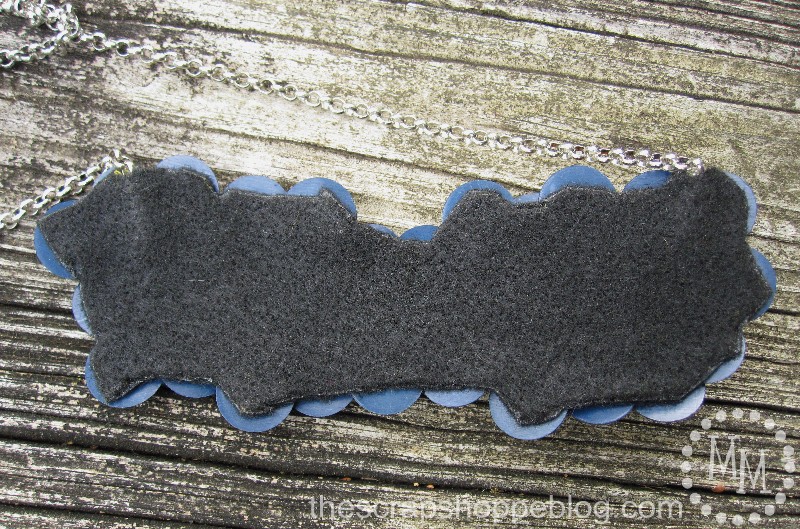
Once the glue is good and dry, slowly and carefully trim the felt down so that it can't be seen from the front of the necklace. Be careful not to cut so close that you snip off any of the stitches from your buttons!
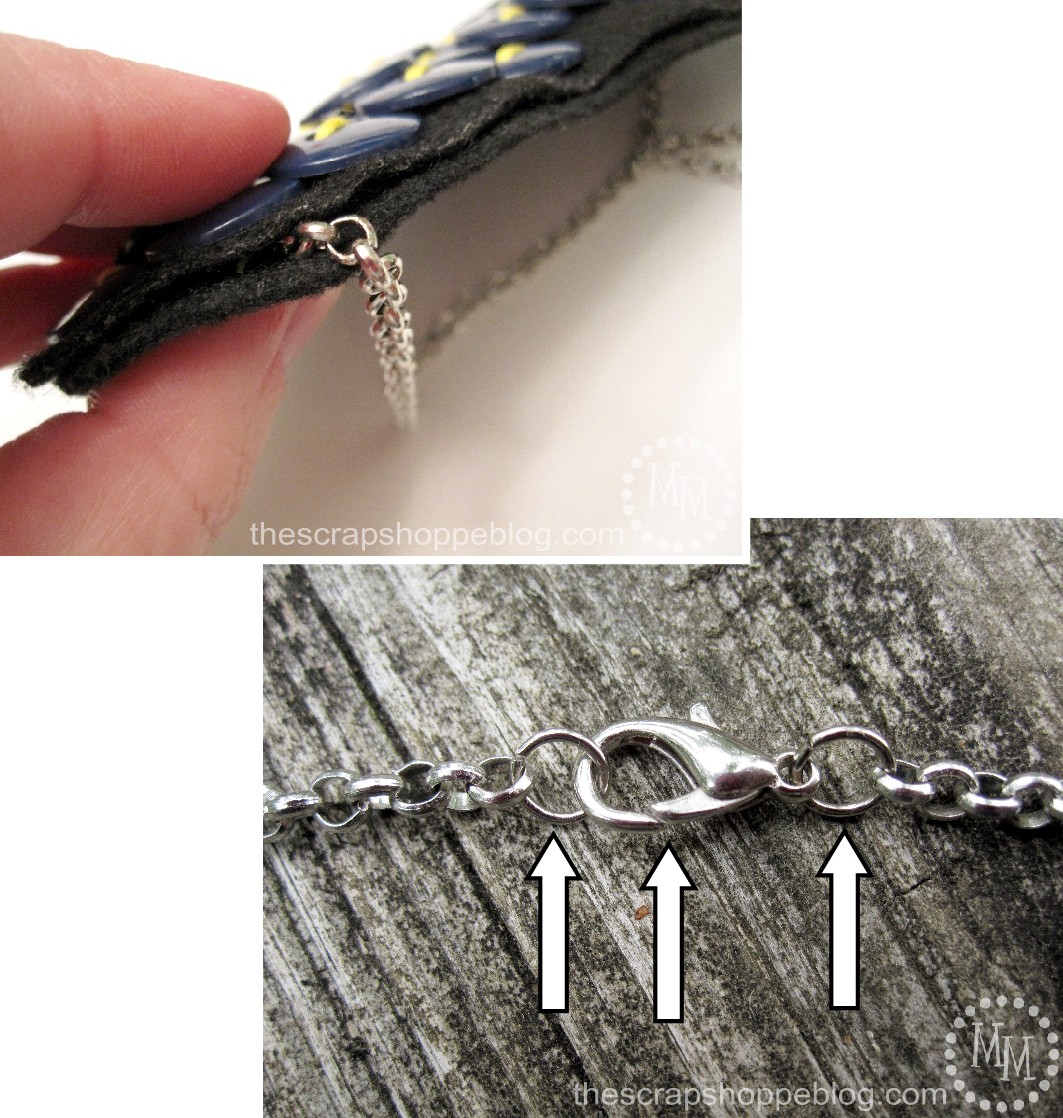
Trimming the felt around the chain can be tricky. Just take your time. Using small pointed scissors will help.
Trim the chain down to the length you want it to be and add a jump ring to each end. Attach a necklace clasp to one of the jump rings and you're ready to go!
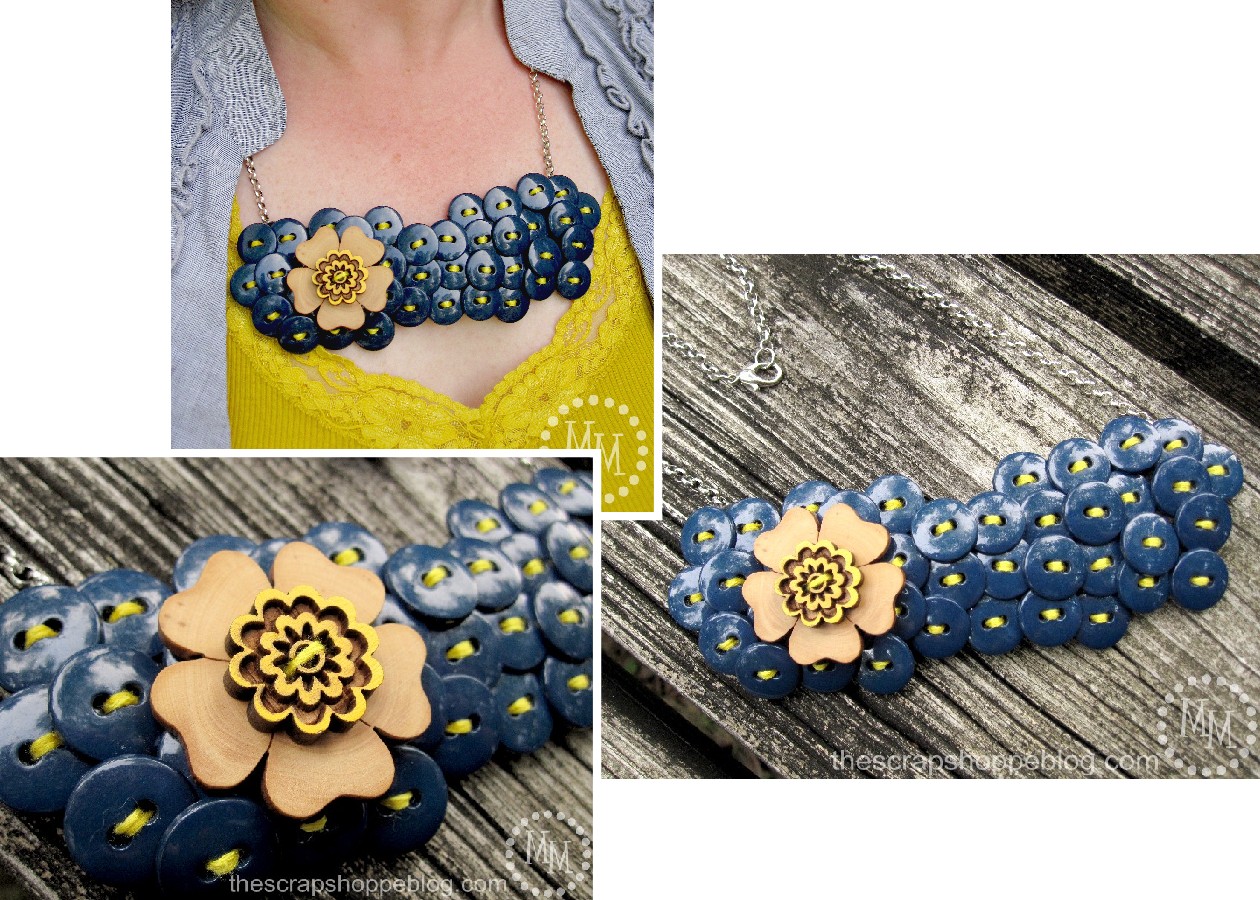
This piece definitely gave me the pop of color I was looking for!
I think I might be addicted to these button necklaces.
It is a lot of impact for really not too much work!
And the color options are endless!
You can fined Part 2: Button Earrings tutorial here!


So adorable!! I love the look of this. Thanks so much for sharing this great idea. I'm so glad I found your blog - your newest follower.Betsy @ Romance on a dime
YOUR TALENT IS FEATURED IN COMS- SATURDAY SPOTLIGHT TALENT SHOW. hugs, jen
So pretty! Love the colors...great combo for Spring and summer!
Wow!! Michele, this is incredible! I have seen this all over Pinterest. I love the colors--stunning!
I love this, it turned out great. I hope you'll stop by and add this and any other posts you're proud of to my Wednesday What We Wore and Made Link party
marissa
http://raegunwear.blogspot.com
Very cute! I'd love for you to add it on my link party at: http://printabelle.com/?p=3188 Thanks!
I am featuring you this evening during Sticker Time!
I've never seen one like this and I totally love it! Great job!
Beautiful!
Thank you for linking up to A Crafty Soiree! Love, love, love this!!! I've featured it in the newest, up this Thursday at midnight. Come see it when you get a chance.
This is a great project! The necklace is really beautiful! Would you consider linking this up at my Pinworthy Projects Party?
So cute,Love it!
You know I love this necklace! And the earrings! You looked so cute wearing them at Snap!
fabulous tutorial Michele! Your bib necklace and earrings turned out great!
gail
Michelle these are both so stinken adorable. I LOOOOOOVE THEM! GREAT JOB! winks, jen
So cute Michelle! And great tip to spray the felt w/ fabric stiffener. Have to remember that! TFS at this week's party!
Really cute, I think my teenager would love this! following from 36th ave. I hope you will stop by my blog and show some love!
http://thefantasticfrugal.blogspot.com/
This is so cute Michelle!! I love that you used buttons - and the yellow pop of color is so fun!
Wow! This looks amazing. I am visiting you via the party at Somewhat Simple. I look forward to seeing you at My Dream Canvas.
This is so hip, love me some buttons! Thanks for the great tutorial! I wish there was a Jo-Ann's in Paducah. The closest one is in, um, TENNESSEE! Ha!
Really cool! I wouldn't even guess they were buttons at first!
I love it! Very, very cute!
Yay!!! I love this necklace!! And it looked so cute on you at Snap!!
Such a great tutorial too Michele! 🙂
This is such a lovely thing to make, and so original! Ive never seen a necklace like it, looking forward to the earrings too! :))
Michele...that is absolutely adorable!! i love the yellow and blue pops of colors!!! I need to go check out the buttons at JoAnns:-)