The Scrap Shoppe

A Place to be Crafty

  • Home
  • About
    • About Me
    • T-Shirts
    • Disclosure
    • Privacy Policy
  • Crafts
    • Must Have Craft Tips
    • Kids Crafts
    • Gardening & Outdoors
    • Jewelry Making
    • Paper Crafts
    • Faux Flowers
    • Paint Projects
    • Silhouette Crafts
    • Clothing
    • Bunting & Banners
    • Monograms
    • Wreaths
    • Fabulous Fonts
    • Scrapbooking Tips
    • “Other” Crafts
  • Holidays
    • New Year’s
    • Valentine’s Day
    • Mardi Gras
    • St. Patrick’s Day
    • Easter
    • Mother’s/Father’s Day
    • Patriotic
    • Fall Crafts
    • Halloween
    • Thanksgiving
    • Christmas
    • Gift Guides
    • Winter Crafts
  • Sewing
  • Home Decor
  • Organize
  • Parties
  • Printables
  • Recipes

“Ceramic” Paper Roses

May 30, 2010 By: Michele McDonald55 Comments

If you missed my guest post during Flower Week at Singing Three Little Birds, here’s the lowdown!

These rolled roses originally started out as plain red cardstock. Now they have an almost ceramic look to them. Let me show you how I made them!

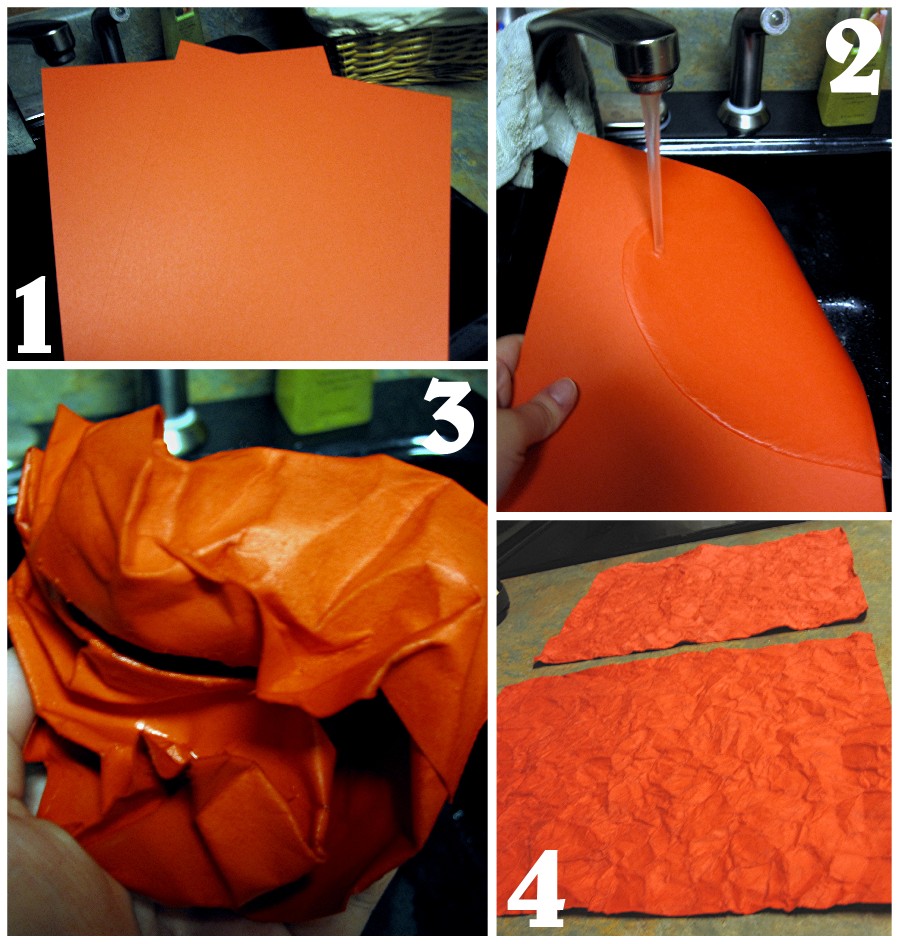
1. Start with a couple of pieces of cardstock (I only ended up needing one for all of these flowers, but I grabbed a 2nd piece just to be sure).

2. Soak the cardstock, one sheet at a time, under running water. Be sure and wet both sides of the cardstock.
3. Wad each piece of cardstock up into a ball. You’re going to want it very rumpled so you will need to wad it up, open it, and wad it up again several times. Just be careful that you don’t rip the paper.
4. Lay the cardstock out flat and allow it to dry. I soaked mine before going to bed and let it dry on the kitchen counter overnight. If you’re slightly more impatient you can take a hairdryer to it.
From here I tried two different techniques to get the “ceramic” look for the roses. Here is the technique for the single rose.

5. From a roughly 5″x5″ square of the dried cardstock, cut out a circle. From the circle cut out a spiral. I like to cut my spirals in a wavy fashion to give the final rose a more realistic look.
6. Start with the outermost part of the spiral and start rolling it between your fingers. Contine you to roll until you get to the center of the spiral.
7. Take the center of the spiral and use some adhesive to glue the base to the rest of the rose so it acts as the base of your flower.
8. A pretty little rose!
9. Ink the edges of the rose with a contrasting color. This just makes the rose more realistic so its not uniform in color. You can skip this step if you would rather.
10. Apply a somewhat thick coat of Mod Podge to the rose with a sponge brush. Not too thick though! If its too thick the glue with dry white instead of clear (especially between the petals).
11. Turn the rose over after the front dries and appy more Mod Podge to the back of the rose.
12. Apply a pin, bobby pin, clip, or whatever you like to the back of the rose.
Note: This starts the 2nd “ceramic” technique. (I think I actually like this one better.)
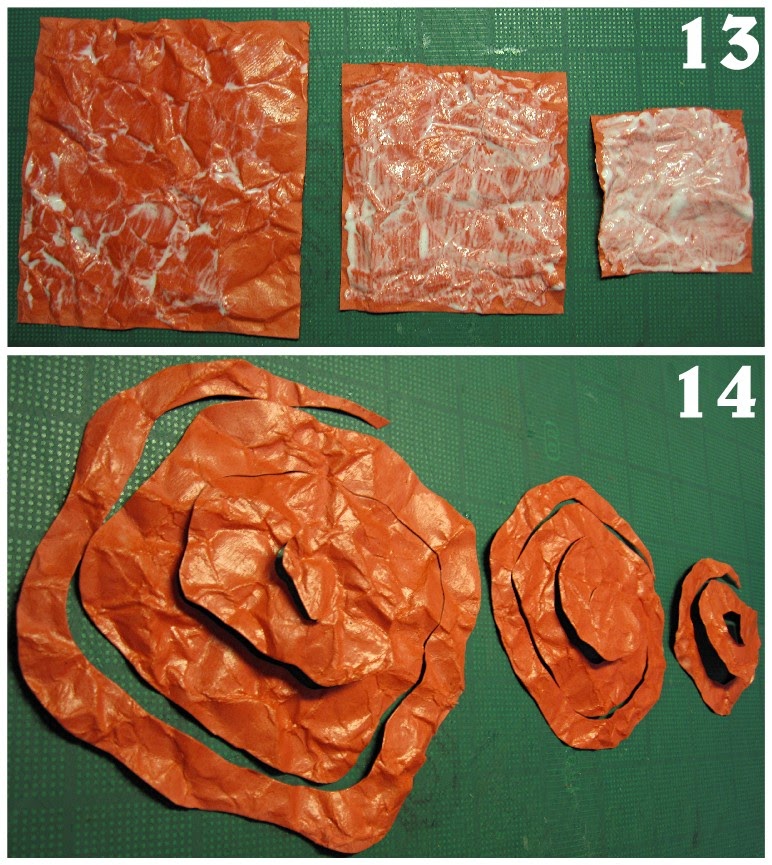
13. Cut three different size squares from the wrinkled cardstock. Apply Mod Podge to each square. Once the front dries, flip it over and apply again to the back.
14. Cut out spirals as before.
15. Once again, start with the outside of the spiral and start rolling the rose.
16. The roses for this set of 3 flowers are more tightly rolled so they can be placed snugly next to one another.
17. Glue the back of the roses as before.
18. Ink the roses at this step if you are so inclined.
19. Apply another coat of Mod Podge just to get the flowers nice and shiny!
20. Line the 3 flowers up in a row and adhere a strip of the red cardstock to the back of the flowers. Apply a small amount of adhesive between each flower to glue them to each other also just to be sure there is no flopping around. Add a pin, bobby pin, or whatever suits your fancy.
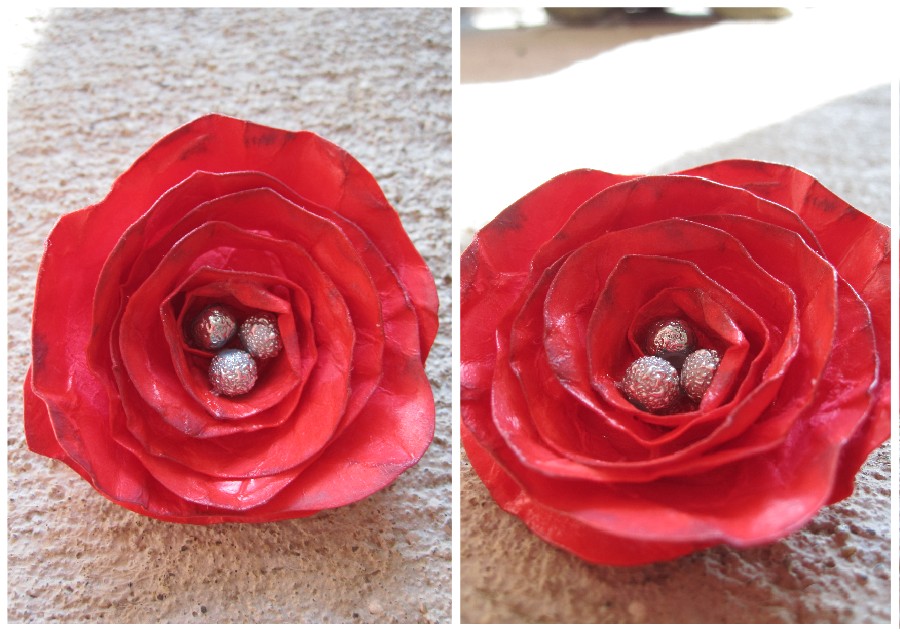
The final single rose. I glued some large silver beads to the center.
The final set of 3 roses. I didn’t add anything to the center of them since they are wrapped so tightly. And I think they look just as good without the extra embellishment.
Its may be difficult to tell from the photos, but these roses have a great shine to them. And the Mod Podge also makes them very stiff so they also almost feel like they could be ceramic. The wrinkled paper and the waviness of the spiral really give them a realistic look!
So, what to do with these fun new flowers?
Well, since they are pinbacks I can add them to any outfit as a brooch, put them on a belt, add them to a headband…
Or thread them through the chain of my DIY go-to necklace! I’m loving this look!
Other than the time it took the cardstock and Mod Podge to dry (which was really only a few minutes), this was a pretty quick project.

Comments

  1. PrettyPotato says

    May 4, 2017 at 10:44 AM

    Just what I was looking for to add to my dressing room decor! Thank you so much!

    Reply
  2. Bev says

    May 21, 2014 at 5:59 AM

    Just STUNNING Sounds and Looks like a Can-Do for Me Will Wet My Cardstock in a Few and give this a Try in The Morning.
    Thank You so much for this Tutorial…..

    Reply
  3. Melanie Barnes says

    December 27, 2012 at 6:02 AM

    Love your flowers, I’m definitely going to try this. Thanks for sharing :0)

    Reply
  4. Max & Mabelline says

    September 11, 2012 at 6:43 AM

    You’re brilliant Michele! Thanks so much!

    Reply
  5. The Stencil Garden says

    October 24, 2011 at 7:17 AM

    What a lovely and innovative way to make flowers from paper….I will be sure to add them to the Handmade Flower Directory so that more people can share your creativity.

    http://www.flowerpot-design.com

    Reply
  6. Leticia says

    July 26, 2011 at 2:51 AM

    HI! Love this!
    What kind of ink..? What brand?
    THanks!

    Reply
  7. Rafath says

    April 17, 2011 at 9:19 AM

    hi ur tutorial is very nice.and rose looks beautiful,u used mod podge but am from india,so in place of mod podge can i use poster colors.will it work,and i would like to know what is cardstock.if u dont mind can u tell me.

    Reply
  8. Emily {WhipperBerry} says

    February 4, 2011 at 10:39 AM

    A friend sent this to me on Facebook, and I’m so glad she did! I am trying to decide when I can make these. Thanks for the great tutorial!

    Reply
  9. Star @ A Load Of Craft says

    January 6, 2011 at 3:21 PM

    Thanks for linking up! No wonder it’s your most popular post it’s fantastic! Great job! I can’t wait to try it out. This and the other great links are making me think I need to start trying and featuring them! Hmmm the wheels are turning… thanks Michele ;D

    Reply
  10. Jenny says

    November 21, 2010 at 4:39 PM

    Your paper roses are absolutely gorgeous!

    I decided to try to make them myself, and they came out beautifully. If I did not know they were made out of cardstock, I would have never guessed, they look just like porcelain!

    I have a wedding DIY blog called Our Day (In the Making) and I posted my flowers on there along with links back to your blog for the tutorial.

    http://jennyandtom91011.blogspot.com/2010/11/diy-paper-flowers.html

    Reply
  11. http://EMEKLİYİM.COM/ says

    November 2, 2010 at 3:34 AM

    çok güzeller ellerinize saglık

    kullandıgınız fon kağıdımı?

    bende beklerim siteme…
    http://niltursamatamerkezi.blogspot.com/

    Reply
  12. Katie P says

    September 13, 2010 at 9:23 AM

    These turned out great!! Love them!

    Reply
  13. Katie says

    September 5, 2010 at 1:53 PM

    Love these! Thanks so much for sharing 🙂 I’m your newest follower and will definitely try making these for myself and gifts! I’ll link back once I do 🙂
    Katie
    miamoodesigns.blogspot.com

    Reply
  14. Cristie says

    September 1, 2010 at 11:31 PM

    Very pretty!

    Reply
  15. Laura @ Ms Smartie Pants says

    September 1, 2010 at 10:26 PM

    This flower turned out so pretty, great job!

    Reply
  16. Jan @ bobbypins boardwalk says

    September 1, 2010 at 3:51 AM

    These roses are beautiful — and such a great tutorial. Well done!

    Reply
  17. Suzanne says

    August 31, 2010 at 9:17 AM

    Very original and fabulous!

    Reply
  18. Cathy @ The Far Fifty says

    August 31, 2010 at 9:03 AM

    How ingenious! Thanks so much for the tutorial!

    Reply
  19. tinka says

    August 28, 2010 at 2:36 PM

    Oh, this flowers are very great.I love it!!!
    Many Greetings
    tinka

    Reply
  20. Dita Maulani says

    July 23, 2010 at 9:38 PM

    Found you via http://diaryofacraftaholic.blogspot.com/ and amaze!! Another blog i’ll follow! Thank you very much for sharing inspiration!

    Dita

    Reply
  21. Amie says

    July 20, 2010 at 9:19 PM

    Found this on the Craftaholics Anonymous facebook post. Love it on that necklace!

    Reply
  22. linda @ CraftaholicsAnonymous says

    July 20, 2010 at 4:09 PM

    Michele,
    These flowers are fabulous!! Thanks for leaving a link. I love them!
    happy crafting,
    Linda

    Reply
  23. Mollye says

    July 16, 2010 at 10:09 PM

    Thank you, I love making flowers and there seems to be no end to the different techniques. Love this one. XXMollye

    Reply
  24. mizdarlin says

    July 10, 2010 at 4:06 PM

    Thanks for posting this tute..well done and good pics..
    I’m wondering how this would work on flimsy but beautiful materials, done in the style of the second
    example..that’s what is so great about these ideas, they are a wonderful springboard for more!

    Reply
  25. ViSart-DaLi Happy Mom and Passionate Artisan says

    July 10, 2010 at 9:14 AM

    Great idea, thank you!

    Reply
  26. Katie says

    June 28, 2010 at 9:50 AM

    These look GREAT! Thanks!

    Reply
  27. Tif says

    June 22, 2010 at 5:22 PM

    Very cool!!

    Reply
  28. [email protected] says

    June 21, 2010 at 3:11 PM

    Those are gorgeous and they do look like ceramic- how fabulous! I just clicked over from Tatertots and Jello. I would love to link to these if you didn’t mind.

    Reply
  29. Princess of Everything (and then some) says

    June 10, 2010 at 9:49 AM

    What a great tutorial!! I am going to have to make this!

    Reply
  30. Amy @ Positively Splendid says

    June 10, 2010 at 7:36 AM

    I saw these featured today on Tatertots and Jello. Way to go!!

    Reply
  31. Leslie says

    June 7, 2010 at 1:53 AM

    Check you out crafty lady! How cute and fun are your flowers? What a fabulous idea! Thanks for linking up to Hoo’s got talent!

    Reply
  32. Natalie says

    June 5, 2010 at 1:23 PM

    These are gorgeous! I will be featuring you on Monday..come by and grab a featured button. Thanks for the wonderful tutorial!

    Endlesscrafting.blogspot.com

    Reply
  33. Summer says

    June 5, 2010 at 10:24 AM

    Thanks for linking up! I featured your idea on my blog today! Come grab a featured button!

    http://sumossweetstuff.blogspot.com/2010/06/saturday-showcase.html

    Reply
  34. [email protected] Insanity says

    June 4, 2010 at 10:43 PM

    Those look so real! And the mod podge makes them fairly sturdy, huh? Thanks for the idea!

    Reply
  35. Mormishmom says

    June 4, 2010 at 9:51 PM

    These are so cool! Thank you for sharing!

    http://funkypolkadotgiraffe.blogspot.com/

    Reply
  36. sydney says

    June 4, 2010 at 9:38 PM

    wow these are awesome! and I already have all of the supplies. I’ll be trying this next week!
    thanks for the tutorial.
    http://www.sewineededapaycheck.blogspot.com

    Reply
  37. C'est Magnifique says

    June 4, 2010 at 8:53 PM

    Great project! I’ve made the spiral paper flowers like that, but never thought to add Modge-Podge to them!

    Tania

    Reply
  38. Kori says

    June 4, 2010 at 6:42 PM

    Fabulous!

    Reply
  39. Melanie Beth says

    June 4, 2010 at 12:33 PM

    wow – i really love these flowers! beautiful!

    Reply
  40. Donene says

    June 4, 2010 at 11:53 AM

    These are great! I love how they turned out!

    Reply
  41. Lisa says

    June 4, 2010 at 8:09 AM

    Saying hi from NFF…these are so pretty! It’s so interesting that you wet the paper first to get the crinkled look. Very nice!

    Reply
  42. ourlifeinaclick.blogspot.com says

    June 4, 2010 at 7:58 AM

    These look amazing. Might be too many steps for me but I’ll see if my daughter wants to try them.

    heather

    Reply
  43. Whimsical Creations says

    June 4, 2010 at 7:03 AM

    Those are so pretty!

    Reply
  44. Katie says

    June 3, 2010 at 9:02 AM

    I love that you used the mod podge. I’ve been making theses with my students, but the mod podge is such a great addition!

    Reply
  45. Stephanie Lynn says

    June 2, 2010 at 11:15 PM

    So clever! These look fabulous on the necklace! Fabtasic job and great tutorial! Thanks so much for joining The Sunday Showcase! I greatly appreciate it. Hope you are enjoying your week! ~ Stephanie Lynn

    Reply
  46. AlMcLeary says

    June 2, 2010 at 6:16 PM

    These are gorgeous, great job
    Al @
    http://almcleary.com/blog

    Reply
  47. Alison says

    June 1, 2010 at 5:45 PM

    Okay, these are seriously just stunning! Great tutorial and I love the color of the flowers!! I need to try this one out!!

    Reply
  48. Olivia says

    June 1, 2010 at 1:53 PM

    Awesome project! I’m definitely going to try this sometime! Thanks for the tutorial.
    suchakingdom.blogspot.com

    Reply
  49. [email protected] Not Just Paper and Glue says

    June 1, 2010 at 8:58 AM

    These are just beautiful! Great tutorial!

    Reply
  50. Theresa says

    June 1, 2010 at 8:08 AM

    So pretty and GREAT job on the tutorial! Thanks for sharing!

    Reply
  51. Mandy says

    June 1, 2010 at 12:35 AM

    These are very pretty. Thanks for sharing a great tutorial! 😉

    Reply
  52. Ann @ makethebestofthings says

    May 31, 2010 at 10:49 PM

    Love these roses and your how to is fabulous. Can’t wait to try it! The roses look lovely with your dress, too.

    Reply
  53. kristen says

    May 31, 2010 at 7:12 PM

    Beautiful creation and a wonderful tutorial too! Thank you 🙂

    Reply
  54. Mod Podge Amy says

    May 31, 2010 at 3:45 PM

    SO pretty! I love them!!!

    Reply
  55. alwayslearning says

    May 30, 2010 at 9:09 AM

    those look stunning and I know my daughter would like to make them!

    Reply

Leave a Reply Cancel reply

Connect with:
Facebook Google Twitter WordPress Instagram

Your email address will not be published. Required fields are marked *

This site uses Akismet to reduce spam. Learn how your comment data is processed.

Never miss a post!*
Please enter all required fields
Correct invalid entries
Please choose a color:

Categories

Never miss a post!
Name: 
Your email address:*
Please enter all required fields
Correct invalid entries
No spam, ever. Promise. Powered by FeedBlitz
Please choose a color:
Visit The Scrap Shoppe

Visit Michele {The Scrap Shoppe}’s profile on Pinterest.

Follow on Bloglovin

AMAZON AFFILIATE
Amazon and the Amazon logo are trademarks of Amazon.com, Inc. or it's affiliates.
Michele McDonald is a participant in the Amazon Services LLC Associates Program, an affiliate advertising program designed to provide a means for sites to earn advertising fees by advertising and linking to Amazon.com.

MyFreeCopyright.com Registered & Protected
DISCLOSURES
disclosure
PRIVACY POLICY

Copyright © 2021 · Web Hosting By RFE Hosting

This website uses cookies to improve your experience. You can choose to opt-out if you wish.Accept Reject Read More
Privacy & Cookies Policy

Privacy Overview

This website uses cookies to improve your experience while you navigate through the website. Out of these cookies, the cookies that are categorized as necessary are stored on your browser as they are essential for the working of basic functionalities of the website. We also use third-party cookies that help us analyze and understand how you use this website. These cookies will be stored in your browser only with your consent. You also have the option to opt-out of these cookies. But opting out of some of these cookies may have an effect on your browsing experience.
Necessary
Always Enabled

Necessary cookies are absolutely essential for the website to function properly. This category only includes cookies that ensures basic functionalities and security features of the website. These cookies do not store any personal information.

Non-necessary

Any cookies that may not be particularly necessary for the website to function and is used specifically to collect user personal data via analytics, ads, other embedded contents are termed as non-necessary cookies. It is mandatory to procure user consent prior to running these cookies on your website.

SAVE & ACCEPT