
DIY Tiki Torches
DIY tiki torches are simple to make and keep the bugs away all summer long.

Summer may not officially begin until late June, but we start our summer celebrations as soon school ends.
So that means spending a LOT of time outdoors.
But with the outdoors comes the bugs!
Today's project will not only dress up your outdoor space, but help keep those pesky bugs at bay.
Tiki torches are a great way to keep the bugs away while you enjoy the outdoors, but they can be pricey and often come as large stakes that go out in the yard.
Keep your patio or deck bug free with these inexpensive DIY Tiki Torches that you can move around and place on any surface.
And you can dress them up any way you like!
I even made some fun patriotic tiki torches for the 4th of July!

Supplies:
Glass bottles
Sand
Wicks
Torch fuel
Copper couplings (reducing ½"x⅜")
You can upcycle bottles from your kitchen or purchase them fairly inexpensively.
You can find the couplings in the plumbing section of your local hardware store.
They are ~$1.50 each.

These glass bottles can be decorated or not.
If you do choose to decorate them, dress them up to match your outdoor decor.
I used DecoArt Glass Paint Markers to draw stems and leave on the bottles.
The paint becomes permanent and won't wash off if you follow the directions on the markers to heat them in the oven.
Unfortunately, this also makes the bottles lose their color.
If you plan to keep the tiki torches out of the weather and only bring them out when you are using them, you may prefer not to heat them.
Once the glass cooled, I used E6000 to glue flowers to the glass.
This adhesive has a great hold and is also waterproof.
To prevent the flowers from sliding on the glass while the adhesive dries you an wrap each flower with a piece of twine or ribbon.
Distribute 1 bag of sand between 2 bottles then fill with torch oil.
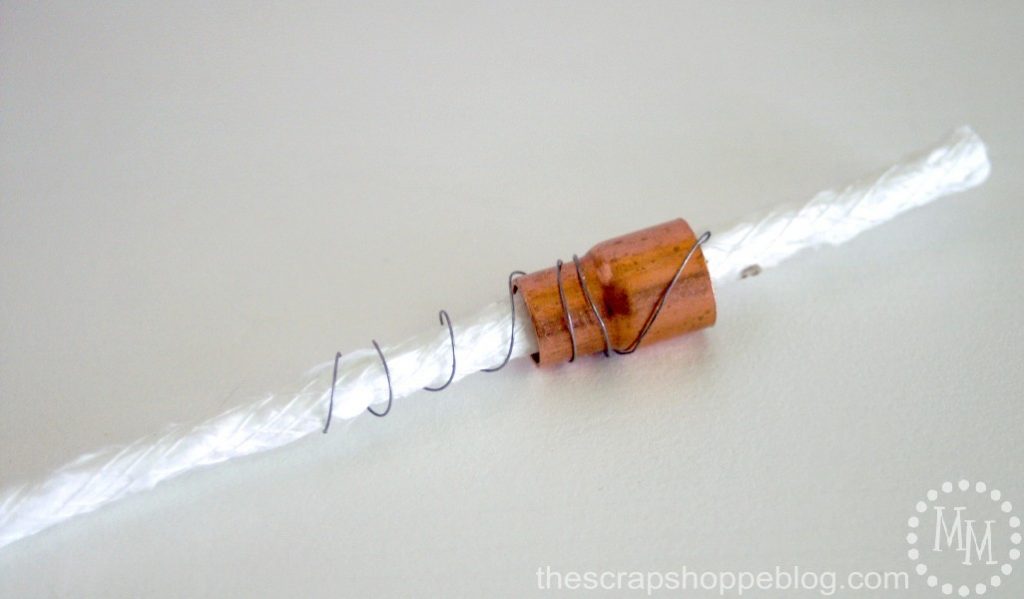
The wicks will be a little loose when slipped through the coupling.
Use wire to help keep them in place.
Cut a piece of wire ~8" long.
Wrap half of the wire around a pen or pencil.
Slip the wick through the new coils, being sure that the coils aren't too snug - you want to be able to move the wick up as needed when it's been burned away.
Wrap remaining wire around the bottom, smaller end of the copper coupling then up and over the lip at the top of the coupling.
Then coupling will sit in the opening of the bottle.

To make the patriotic tiki torches, you will need a white DecoArt Glass Paint Marker and some patriotic ribbon.
Draw stars on one bottle with the marker and stripes on the other.
Bake (or not!) according to directions then tie bows on after bottle are cooled.
Fill and create wicks following previous directions.

Once the wicks have soaked up the oil you are ready to light them.
Only light outdoors!
When you are ready to put the fire out, use an old glass vase or Mason jar turned upside down over the flame.
Hold in place until the glass starts to fill with smoke.
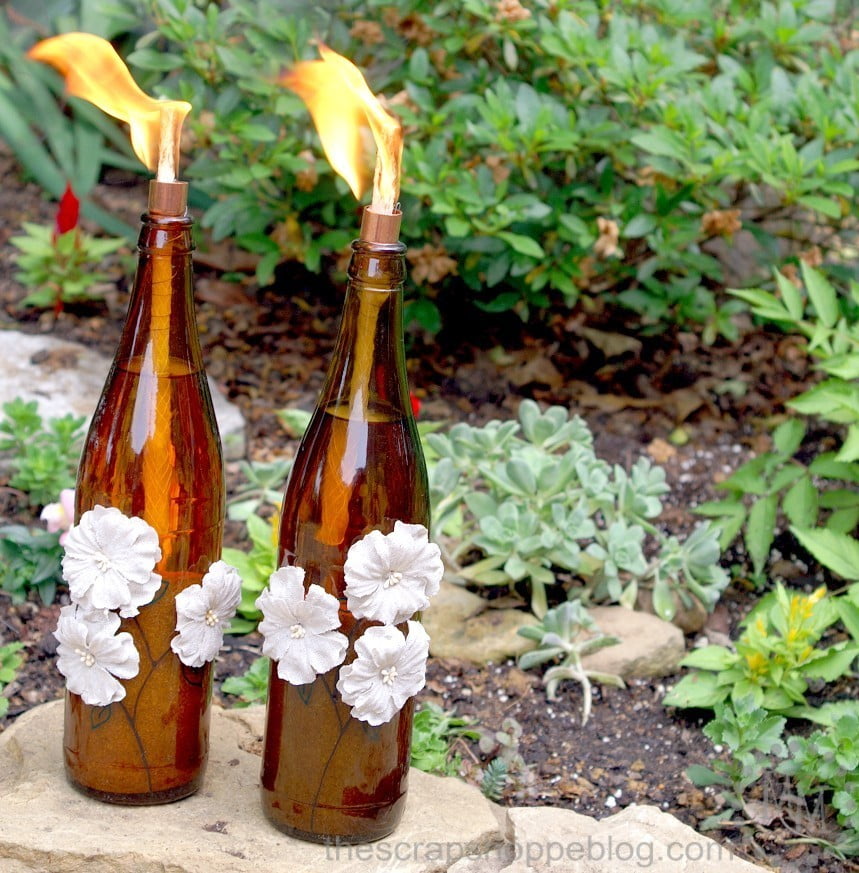
I love how they turned out!
Even plain, they would be the perfect accessories for your patio, deck, or balcony to keep the bugs at bay.

For just a few dollars you have created some fun and useful new outdoor decor.
I can see making a LOT more of these this summer to place all around the patio!

>> See where I party! <<
This post was originally shared June, 2015.


What fun are these tiki torches??? This is always one of those...now why didn't I think of that! LOL
Thank you so much Michele for joining our link party at Celebrate Your Story...remember we reveal our choices and start a new link party every Monday at 8 p.m.!
Kari
http://www.meandmycaptain.com/
Love the idea that they are portable! I could have used these tonight when I was outside getting bit by mosquitoes! Thanks for sharing with us at The Blogger's Pit Stop!
Okay, so I have oil lamps on my patio, but I make them a little differently. First, I use old wine bottles and then I buy premade wicks (designed for use in wine bottles), but I like your DIY version with the copper piece. I have a few that need to be replaced, so I'm going to try your method. Thanks for inspiring us at the Weekend Blog Hop at My Flagstaff Home. --Jennifer
What a fantastic idea! Both pretty and functional.
Great ideas for diying and decorating your own tiki torches... love the painted stems/leaves you added, too! So happy to have you at Tuesday Turn About!
Awesome, love this!! Pinned ♥ I invite you to link up at my #UnlimitedMonthlyLinkParty!
Hey, Michele! Just wanted to let you know that we loved your DIY Tiki Torches so much when you shared it at the #HomeMattersParty last week, we've FEATURED it THIS WEEK! Hope you can check it out when you get a sec. Happy Friday!!!
http://lifewithlorelai.com/2017/05/25/home-matters-linky-party-137/
~Lorelai
Life With Lorelai / Home Matters Linky Party
Such a cute idea and so affordable. Love the patriotic ons. Thanks for sharing at DI&DI.
I like the way you've decorated the bottles for these tiki torches. They would be pretty out by the patio at night in the summertime.
What a great project for the summer! Thank you for posting all of the steps. Let there be light!
Great project for summer. Thanks for sharing at the party! Pinned & shared. Hope to see you again soon.
What a FUN idea! And you have decorated them up so cute. Love this for summer parties! Thanks for sharing at the #HomeMattersParty - we're looking forward to what you have to share next week. 🙂
~Lorelai
Life With Lorelai
Hello beautiful! I’m stopping by to let you know that we will be featuring your tiki torches at our party tonight at 7 pm. Happy dance time! Thanks for sharing it with us! Lou Lou Girls
Wow! That looks incredible. I’m so impressed. Pinned and tweeted. We appreciate you stopping by to party with us. We hope to see you, tonight at 7 pm. Happy Monday! Lou Lou Girls
Michele, these tiki torches are wonderful! I love that you decorated them with flowers, but I love the patriotic ones even more! This is such a clever idea and I have plenty of wine bottles lying around. I will be featuring these tonight on Motivational Monday, you can check out the full post here: http://makingitinthemitten.blogspot.com/2015/06/motivational-monday-june-14th.html
this is such a great recycle diy. Thank you for sharing at the Thursday Favorite Things blog hop. Watch for your feature on Monday xo
This is such a great use of all those bottles that accumulate. Love it. Thank you for sharing your great tutorial at Share It One More Time. Cathy
Really neat idea. Love this!
Wow!! I'm completely amazed at how cute and frugal this is!! We camp every weekend so this is a perfect activity for me and my little girl to do!! I can't wait to try this!! Hope mine looks as cute as yours!
Visiting from WOW! This is such a cool idea and I will have lots of tiki torches on my deck. Now I know what to do with all my old bottles. Pinning!!
These are so cute and I love how easy they seem to be to make! Thanks so much for sharing at Share The Wealth Sunday!
xoxo
Lisa
Michele!
I love this idea! Super tutorial.
Catching you, can't wait to feature this project on the blog, fb and pin it!
gail
Thank you, Gail!! I've been terrible about linking up this summer but trying to do better. 🙂
What a great idea! I didn't know you could do this. 🙂 Gonna pin it. Stopping by from Lou Lou Girls hop. Have a great week!
These are so fun! What a great idea to make your own torches from pretty glass bottles!
these look so cool I'm going to have make them thanks for sharing have a great week
Pinned! Thanks for posting on Snickerdoodle Sunday