
Grow Crystals on Styrofoam
Grow crystals on Styrofoam with the kids! This fun science experiment doubles as a gorgeous home decor project!
This post contains affiliate links.

It may only be February, but spring is in the air here in Tennessee!
Daffodils are blooming, trees are budding, and even my iris are starting to peak out of the ground.
It has me in the mood to decorate for spring!
This month's FloraCraft® Make It: Fun challenge was to create a spring project using their foam egg shapes.
As a former scientist, I love it when I can bring science into my crafting.
I had this crazy notion to grow crystals on Styrofoam eggs to make them a spectacular piece of home decor in the form of crystallized egg.
And it worked!
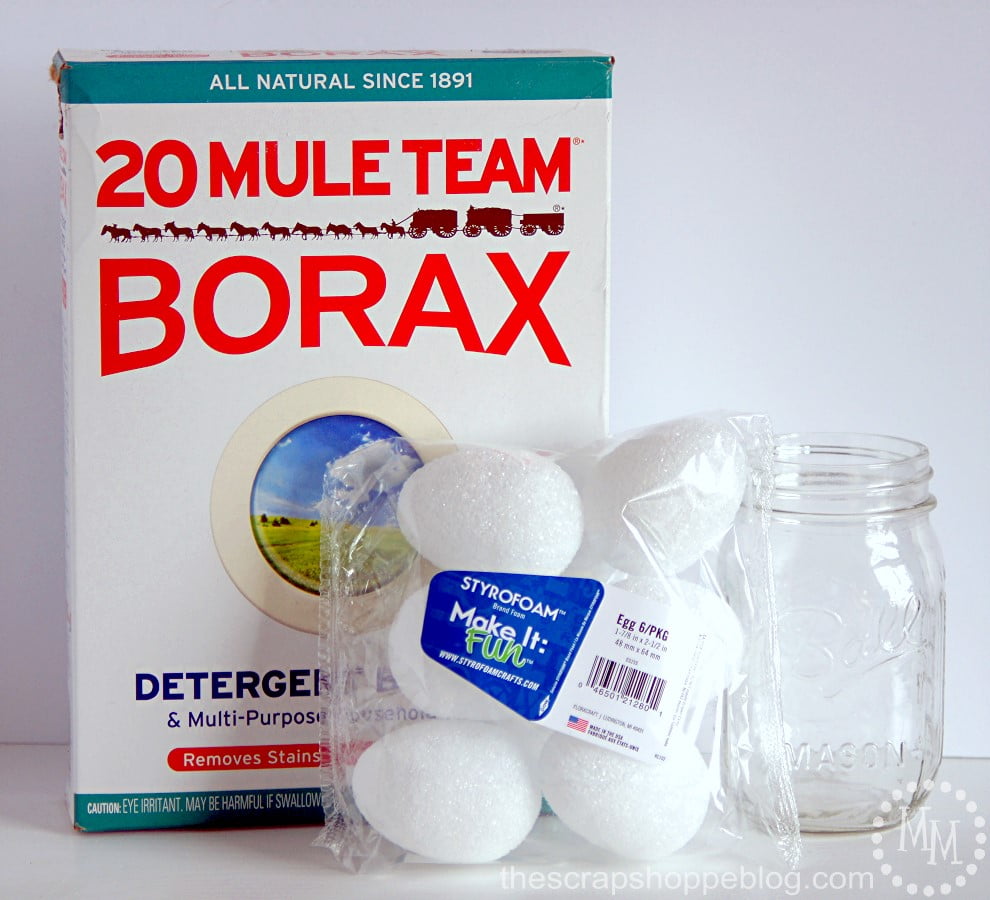
Supplies to Grow Crystals on Styrofoam
FloraCraft® Make It: Fun® Foam Eggs, size 2 ½"
Mason jar
Not shown: twine, heavy duty magnets, Popsicle stick, toothpick, food coloring
Borax is a standard detergent that you can find at your local grocery store.
Setup to Grow Crystals on Styrofoam
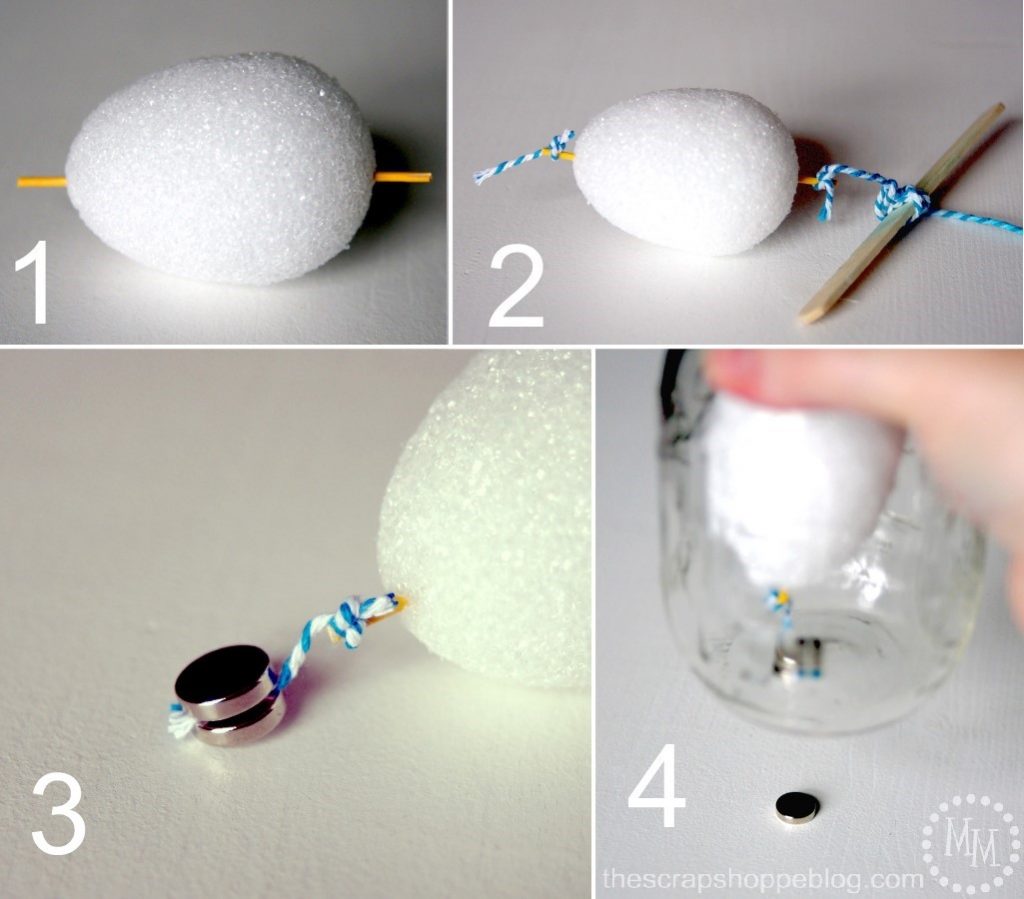
Before we get into how to grow the crystals, we need to figure out the setup of our experiment.
The main drawback to growing crystals on foam is that foam floats.
And to grow crystals over the entire surface of the egg we need it to be completely submerged in our solution.
So we are going to rig it!
1. Cut a toothpick in half and push the sharp ends into each end of the foam egg, about halfway in.
2. Tie a short piece of twine to one toothpick and a longer piece to the other end.
Tie the other end of the longer piece of twine to the Popsicle stick.
3. Place the end of the short piece of twine between two heavy duty magnets.
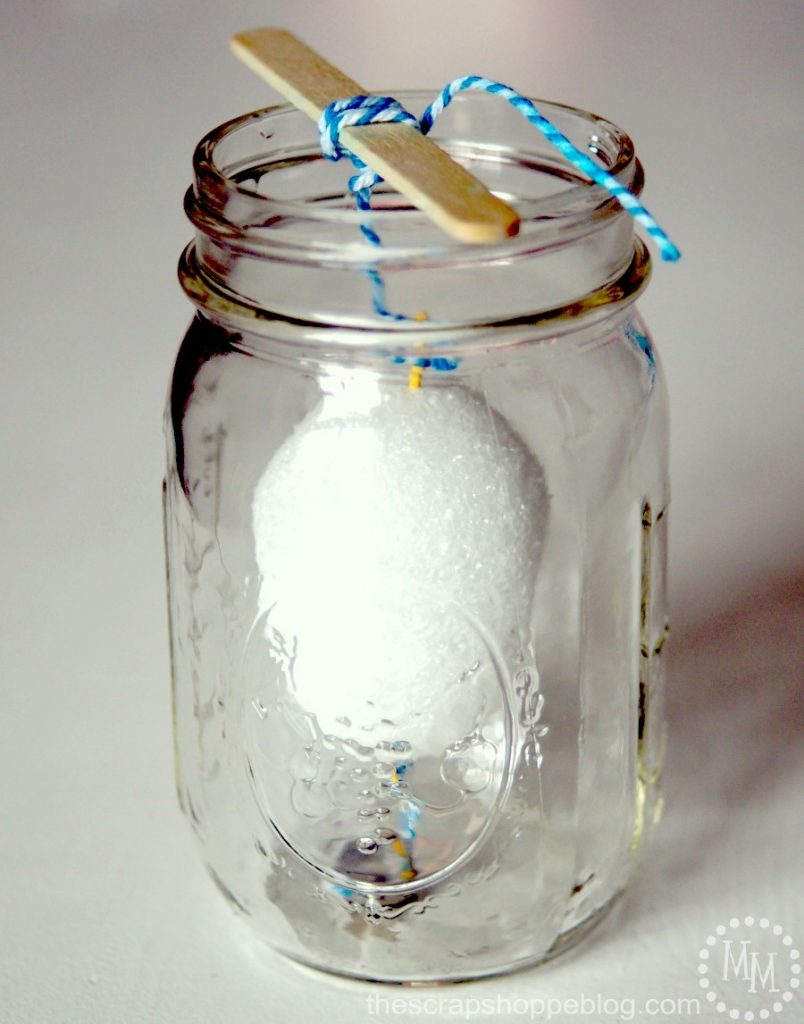
4. Place the egg contraption, magnet end first, into a Mason jar and rest the Popsicle stick on the rim.
Set a third magnet under the jar.
The magnets attached to the twine will be drawn to the magnet under the jar.
Adjust the lengths of twine as needed to be sure the egg will be in the center of the jar (from top to bottom).
The magnet under the jar and the Popsicle stick can both be adjusted to be sure the egg stays away from the sides of the jar.
If the crystals growing on the egg or the side of the jar touch, they will fuse together.
Solution to Grow Crystals on Styrofoam
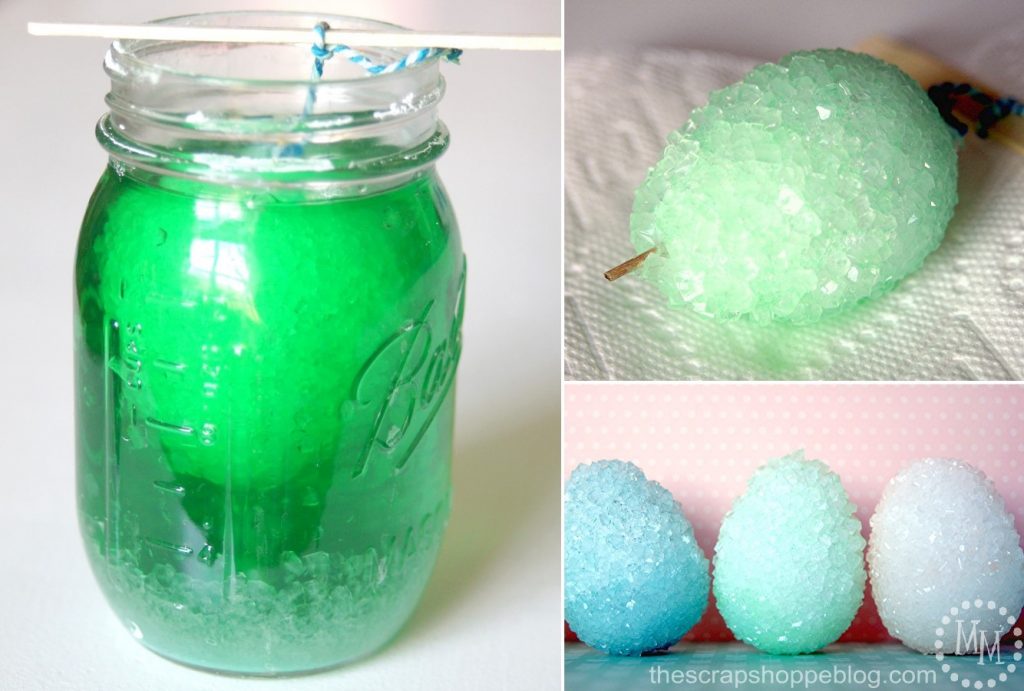
Now it's time to create the solution!
Remove the egg from the jar. We will add it back once the solution has been made.
1. Boil enough water to fill the jar.
2. Once boiled, carefully add the water to the jar. Do not fill all the way to the top! Adding the egg will displace the water so it will overflow if too full.
3. Add Borax to the water while stirring. Continue to add Borax until it no longer dissolves in the hot water. We are creating a saturated solution.
4. Add food coloring if desired.
5. Add the egg contraption as you practiced previously. Be sure the egg is not touching any of the sides of the jar.
6. Wrap the jar with a dishtowel and cover the top with a potholder so that the solution cools down at a slow rate.
Leave for 12-24 hours. The more saturated the solution you create, the bigger the crystals will be. Once you remove the egg from the solution, remove the toothpicks and set the egg on paper towels to dry.
The coloring is really faint.
If you want a more intense color you could try spray painting the eggs and allowing them to dry prior to placing them in the solution.
I like the subtle color of the crystals shown here.

These little crystal eggs can be displayed as is or further decorated.
I thought they looked pretty cute with these little faux blooms in them! I simply inserted the stems in the holes from the toothpick.
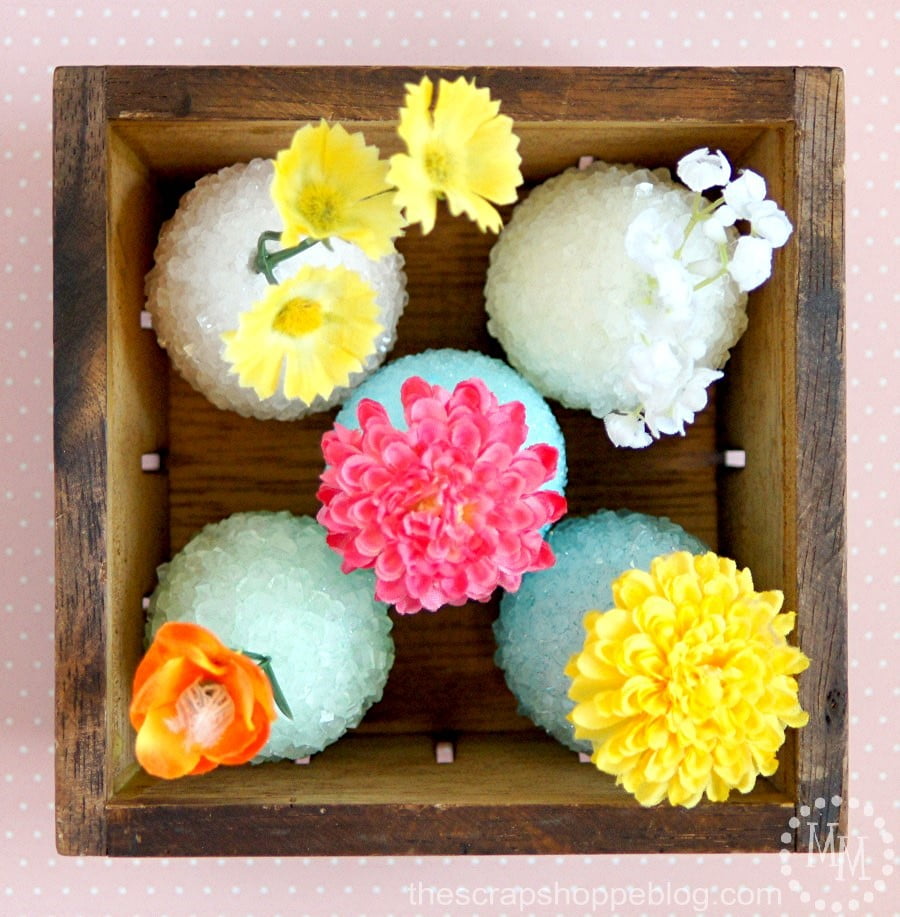
They make pretty little vases, don't you think?
These crystallized egg vases are a fun little pop of spring decor to get me started with my indoor decorating.
Did you know you could grow crystals on Styrofoam?
Now I'm itching to crystallize some more things!!
This is a fun project to let the kids help with.
Just be sure an adult handles the boiling water.

>> See where I party! <<
This post was originally shared February, 2017.


These are so pretty and great with Easter coming up. Thanks for sharing!
Science and crafts definitely work on your project. What a pretty vases you have created. Love the colors too! Shared!
So digging these lovelies. Sharing on my FB page at Coastal Bohemian and pinning . Thx for posting at Funtastic Friday
These are just so pretty! And I love that kids could help make them. Pinned!
This is SO cool! And what a fun home decor item you have at the end. Happy Easter!
#wonderfulwednesdaybloghop
Love these! Sharing on my roundup on Merry Monday this coming week! Come check it out!
Hi Michele, I've featured your crystallized egg vases on this week's Party in Your PJ's #199!
These are so pretty! Thank you so much for sharing with us on Party in Your PJ's. Pinned!
These egg vases are so cute! They remind me of the inside of a geode. My kids would love to do this egg experiment with me. Thanks for linking up with us at the #HomeMattersParty this week.
I remember these from last year and still think they are cute. Thanks for sharing at the inspiration spotlight party. sharing
I love this! What a great, detailed tutorial. Thank you. Pinning.
These are adorable - what a great spring/Easter decoration project.
My son was just asking to make crystals, he would love to make these. Pinning and sharing. #HomeMattersParty
Wonderful Idea!! I think these would be perfect to use as place cards for Easter brunch or supper. Thank you for the inspiration! 🙂
Your crystal eggs are so pretty! I love the sparkle and the subtle color! I'm going to have to make some of these! I love them as lil vases too! Thanks! Jeannee #HomeMattersParty
Hey, Michele! Just wanted to let you know that we loved your Crystallized Egg Vases so much when you shared it at the #HomeMattersParty last week, we've HIGHLIGHTED it THIS WEEK! Hope you can check it out when you get a sec. Happy Friday!!!
http://lifewithlorelai.com/2017/03/09/home-matters-linky-party-126
~Lorelai
Life With Lorelai / Home Matters Linky Party
These are really fun. Pinning
That is so cool!! I want to do these so bad now! So cool!!!
Thank you for linking up at #bloggerspotlight this week
These are so pretty! Reminds me of sugar coated eggs from my younger years! Thanks for linking up with Funtastic Friday!
How clever!! We definitely want to try this
Oh, this would be a fun one to do with the kids. A little science and craft combo. They turned out pretty too! Thanks for sharing at the #InspirationSpotlight Party. Pinned & Shared.
Those are so cute! I made crystallized hearts with pipe cleaners once but I've got to try Easter eggs!!
Tania
These stopped me dead in my tracks (well, scroll) from the Artsy-Fartsy Link Party! They are INCREDIBLE!! Such a creative idea and they look so elegant. Thanks for sharing!
These eggs are adorable. What a cute idea.
Thanks for sharing at Over The Moon Party,
Bev
What a pretty idea. Thanks for sharing!
Love the crystal eggs with and without the flowers
Wow these are way cool! So pretty and so interesting. Sharing on Fb Thank you for sharing on Merry Monday! Have a great week!
Kim
This is a genius idea! Thanks for sharing this at the DI & DI Link Party, we loved it. Pinning an sharing this!
I absolutely love this!! Omgosh, how smart. Not only would my kiddos have a blast making these but I agree that they will then make gorgeous Easter decor. Thanks so much for the tutorial!
These are so pretty! I used to make crystals with my students at Christmas using laundry bluing when I was a science teacher. They always loved it!
They are so so beautiful! Love the idea.
Very cool technique and final result! Looks like a good crafty science project to share with my kids!! Visiting from Monday Funday party.
Cute glitter eggs and using them as a vase is a cute idea! Thanks for sharing at #Snickerdoodle! Pinned.
These are really cute. I've seen similar done using real egg shells so they are hollow inside. I take it the foam eggs are still there underneath? Would be nice if the foam melted away or dissolved. Can't wait to try them!
Oh yes, the foam egg is still there. I think it gives the crystals some stability. 🙂
How much Borax do you use in a pint jar??
I didn't include an amount because it will vary depending on exactly how much water you have. Just continue to add borax until it no longer dissolves in the water when you stir it in. The more the better! 🙂
We've done this w/ pipe cleaners before but this is AWESOME!!! Thank you for the tute!!!
Thank you so much! This is one of my favorite science experiments to do with the kids. 🙂
What?!? These are AMAZING!!
Thanks, Jamie!
These are really cool!!!
Thank you, Mom!! ♥
Oh my gosh, these are fabulous! So gorgeous!
Thank you, Sharon!