I've had mixed feelings about book page art since I first started seeing all of the fabulous crafts being done with it. On one hand, the art looks fabulous! On the other hand, I'm an avid reader (when I can) and couldn't imagine cutting into a precious book. Even one I don't care for (*ahem* I'm talking about you The Old Man and the Sea!).
But as you can see above, I managed to overcome my fear to make my
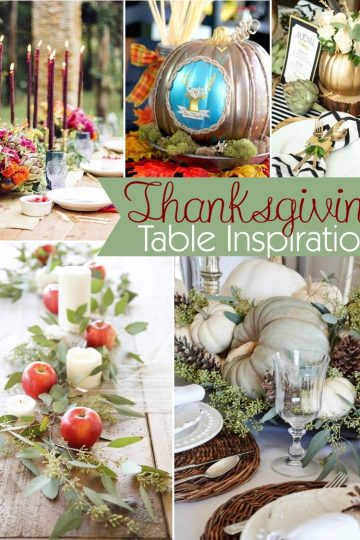
Framed Book Page Pumpkins!
Supplies
book
(mine is a dictionary I've had since the early 90's. since its outdated anyway, I gave it a go!)
scissors
ruler
pencil
scrapbook paper
frame
binder clip(s) (not pictured)
stapler (not pictured)
orange ink (not pictured)
Beacon's 3-in-1 adhesive (not pictured)
ribbon (not pictured)
twigs (not pictured)
I found this frame at Home Goods, but immediately ran into a problem. The glass was glued to the frame! I needed it off for my 3D art. Enter the hubby and his heat gun. Popped that glass right off of there! Then I let it cool down again and picked the glue off.
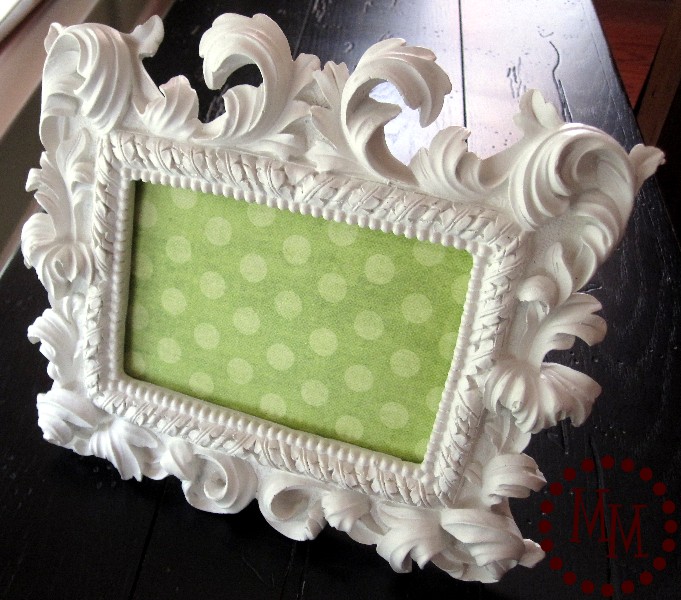
I trimmed some scrapbook paper to size and inserted it into the frame. I kept the glass with it and used it as backing in the frame.
Let me show you how I made the pumpkins:
1. I measured the width of my frame to figure out how big my pumpkins could be and drew one onto the first page of the dictionary.
2. I only cut 10 pages at a time and used a binder clip to keep the pages together. I cut out a square of the dictionary to make it easier to cut out the pumpkins.
3. I used anywhere from 1-2 binder clips while cutting the pumpkins. I didn't want any slippage! I just rotated the clip around my drawing as I cut.
4. I kept a binder clip around the cut pumpkins to keep them lined up.
I used my original drawing to continue to trace more pumpkins, always cutting only 10 at a time.
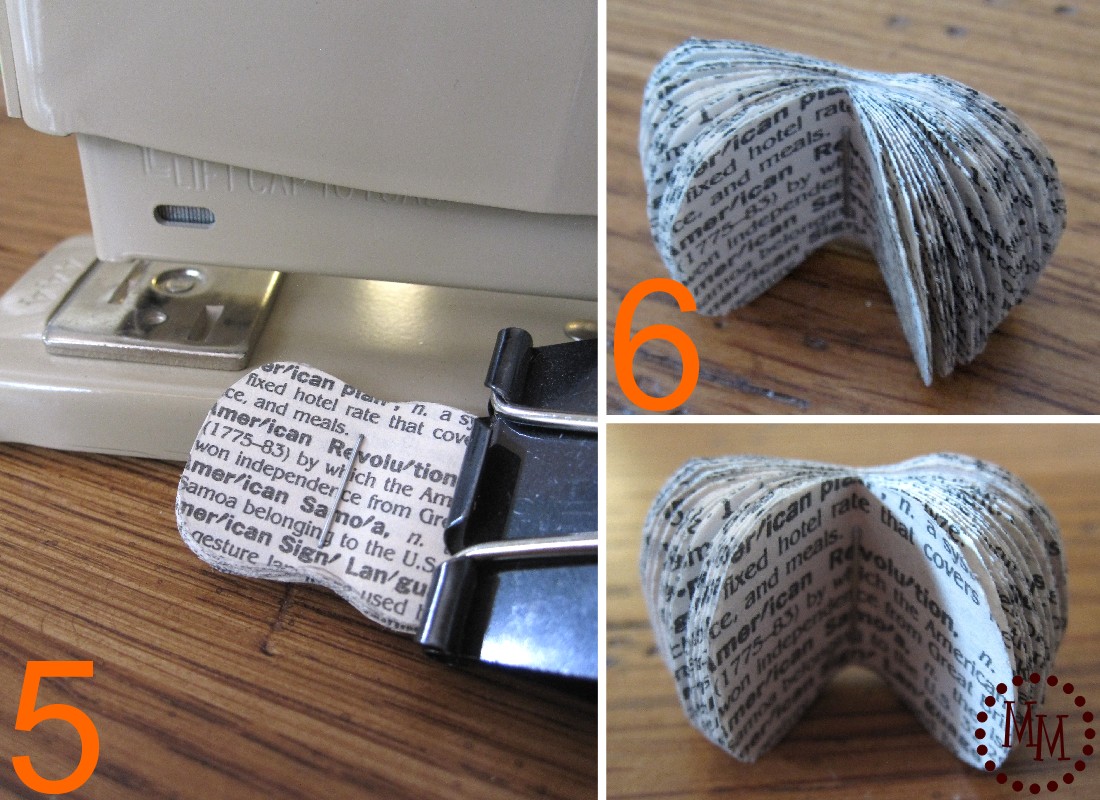
5. I cut a total of 30 pumpkins before deciding that I had a thick enough stack for my artwork. To keep them together I stapled them in the center.
6. Now its time to fan the pages out. You can see we have a gap in the middle.
7. To cover the gap in the middle of the pumpkins, we're going to make a filler.
We will need 5 more cuttings. Fold them all in half.
8. Cut 2 of the 5 pumpkins in half.
9. Apply a small amount of glue to along the seam in the center of your 3 folded pumpkins.
10. Stack the 3 pumpkins with glue on top of one another. Do not press them together too hard or the glue will smear.
11. Set the 4 pumpkin halves into the glue on the top pumpkin.
12. Use your fingers to keep the pages fanned out so that they don't all fall flat.
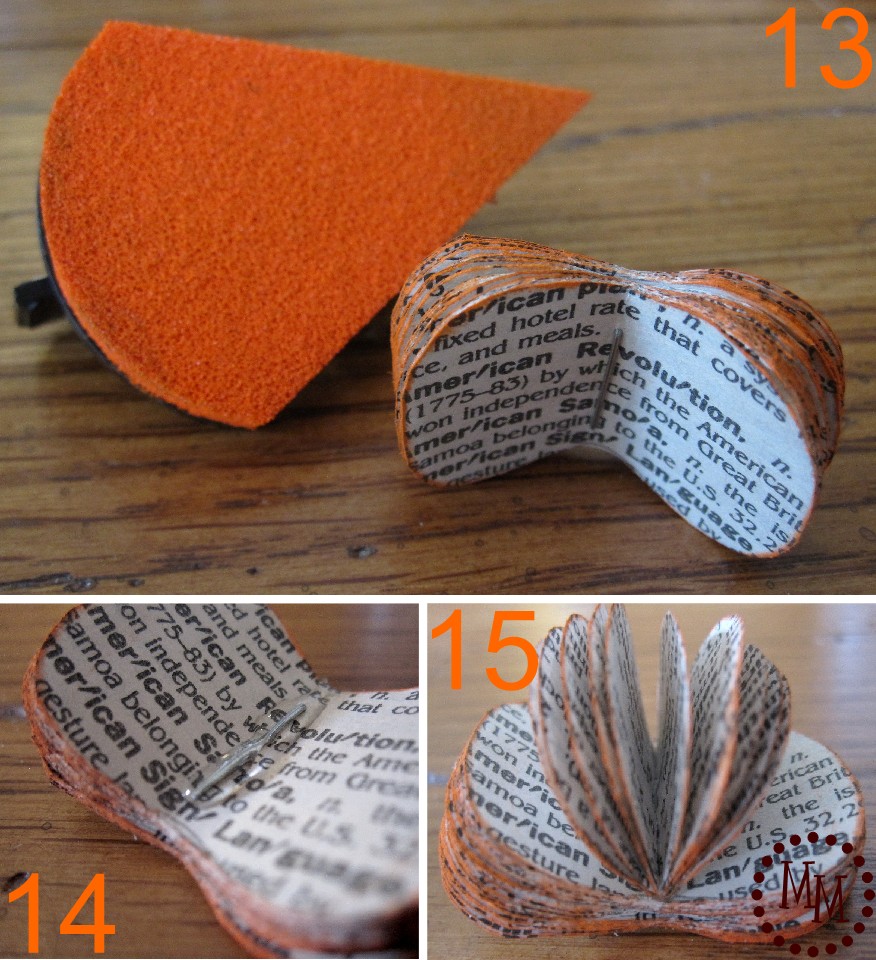
13. Ink the edges of all of the pumpkin pages.
(I also went back and inked the edges of my scrapbook paper in the frame also.)
14. Apply a thin line of glue along the staple of the large stack of pumpkins.
15. Set the filler piece onto the pumpkin. After allowing the glue to dry, fan the pages of the pumpkin once again.
Repeat steps 1-15 two more times.
Time to make the stems!
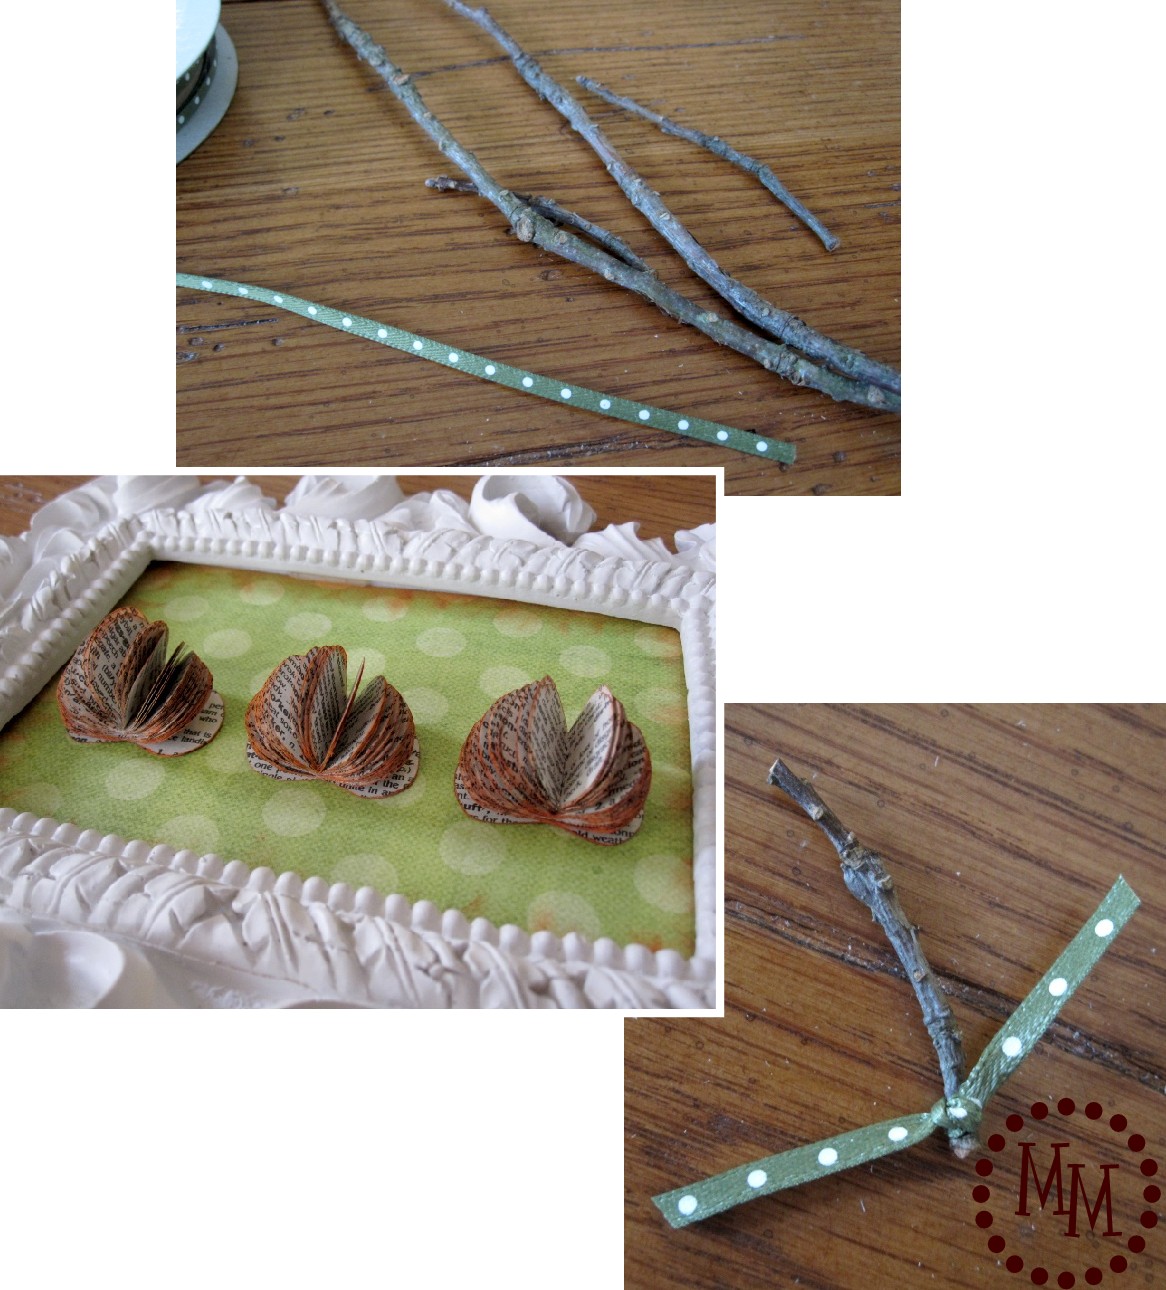
I gathered some small twigs from the yard and grabbed some thin green ribbon I had in my stash.
I glued the pumpkins to the scrapbook paper so I would know how long to cut my stems. I trimmed them with scissors.
I tied the ribbon in a knot on the base of the stems.
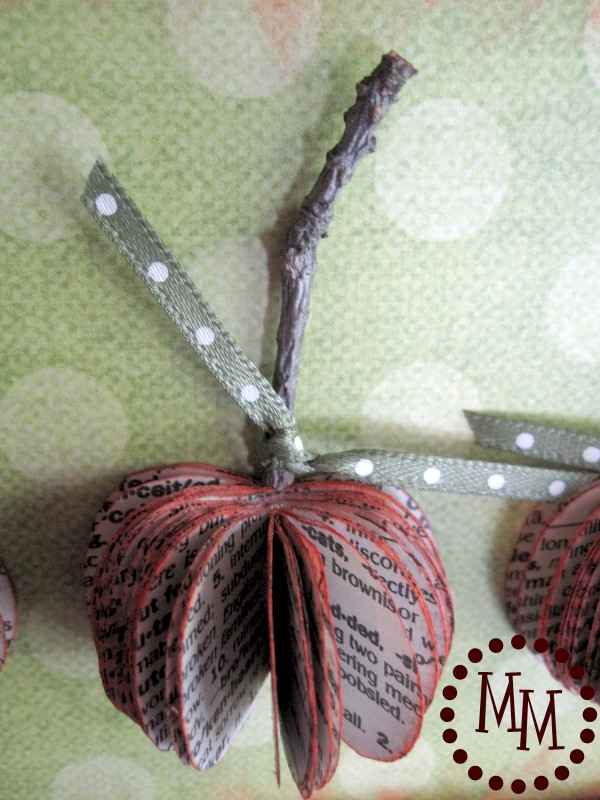
I used a small amount of glue on the bottom and the back of the base of the stem
to adhere it to the scrapbook paper.
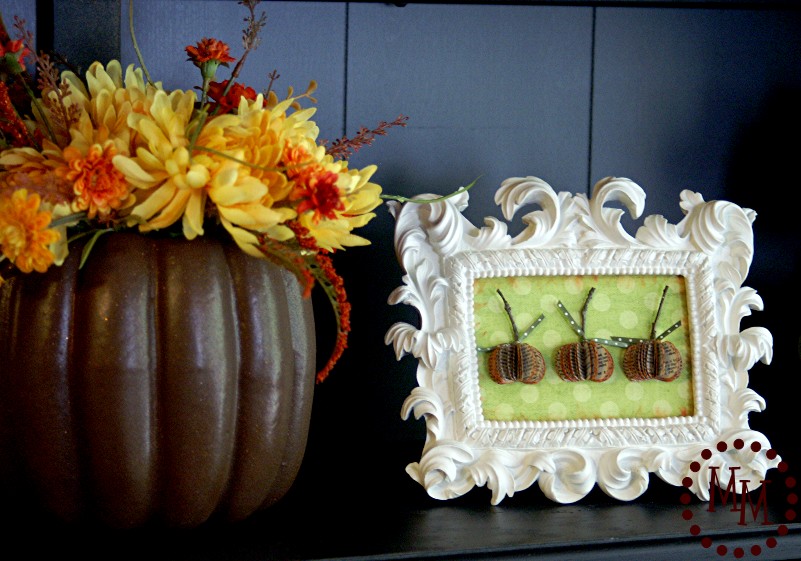
I'm loving how it turned out!!
Doesn't it look great next to my pumpkin vase?
And I can change out the artwork for other holidays!
I'm thinking Christmas trees for December... :)
And this is how my poor dictionary looks. The pumpkin cuttings only took me to the E's!
I'm still reluctant to cut into a real book.
But its growing on me!
What do you think?
Would you cut into a book to do a project similar to this one?
I link to these fun parties.


I think that is jst the cutest frame. Love those lil pumpkins. I want to try it now.
ReplyDeleteOh wow! This is absolutely gorgeous! I know what you mean about cutting up books. It was drilled into me in school not to damage a book in any way ;) I could cut up an old phone book without any problems though.
ReplyDeleteThese are the cutest!!! Love them!
ReplyDeleteLOVE them Michele!! They are sooo super cute - and the twiggy stems are perfect!!
ReplyDeleteI am also in love with that Frame!! I'm going to have to see if my store has it!!
cute cute cute! Sure, I would cut up a book for this!
ReplyDeleteLove this idea! It seems like it would be pretty inexpensive too:) I would so take one of my older books and cut it just to make the cute little pumpkins!
ReplyDeleteThis is super duper cute!
ReplyDeleteMichele I absolutely love this! What an adorable idea! You are so creative!
ReplyDeleteIt took me a while to "destroy" my first book but I pick up ones that are on their last legs and figure I'll save them from a worse fate.
ReplyDeleteLOVE LOVE LOVE LOVE this idea! Such a fresh take on book page art and everything about it from the frame to the background is just wonderful! Sharing on FB !
I love how this looks with the little twigs. It gives it a rustic fall look. Great job, and great picture frame.
ReplyDeleteHopping over from Someday Crafts
Amanda Joy
www.joyinthejumble.com
I think this is an adorable craft, and the frame really makes it awesome :)
ReplyDeleteI'm a member of paperbackswap.com, so I know first-hand how many books there are that can only be destined for destruction. It sounds terrible, I know, but some authors (John Grisham comes to mind) are just ones who EVERYONE reads once, then never again. Romance novels are another type, especially the series-ones like Silhouette.
Books with wavy pages are good to use too, since that indicates water damage and even the library will toss it directly into to their "take one-leave one" pile.
I've loved books all my life, and while I love actual books very much, I do linger over Amazon's Kindle ad every time I see it....
So adorable!
ReplyDeleteUsing an old dictionary was a good call, Michele! I've been wanting to make some book birdhouses but didn't have any books I wanted to part with! These came out adorable! Thanks for sharing how you did it!
ReplyDeleteSo, so cute! Love the frame and I just love the branch stem!
ReplyDeleteOh goodness! This is sooo cute. I followed you over from Some What Simple. I'm a new follower. Love your projects.
ReplyDeleteI'd love it if you would link this up to my party that started on Tuesday at www.projectqueen.org
Can't wait to see your other projects!
This looks adorable! You're so creative! Love the step by step tutorial too..I might be trying this project soon!
ReplyDeleteThanks for sharing!
Love it..How creative and awesome..I would totally love for you to share and link this to my Pin'Inspirational creative Thursday party happening today pweeease..Link ~ http://theartsygirlconnection.blogspot.com/2011/10/pininspirational-thursdays-linky-party.html .Wishing ya a lovely day :))
ReplyDeleteOh goodness, this is too cute!! That frame is TO DIE FOR!! Wonderful project:)
ReplyDeletethis is such a well-done tutorial AND i LOVE LOVE LOVE the wee pumpkins. i will be pinning and adding to our list of projects this weekend- thanks for linking up to 504Main so i could find you! :)
ReplyDeleteWhat a cute picture, thanks for showing how its done :)
ReplyDeleteWish you a good weekend!
So pretty! LOVE how it turned out!! I've had mixed feelings about cutting into books too, but I know they're are some I wouldn't mind using. Thanks for the great tutorial! :)
ReplyDeletethose little pumpkins are adorable come see me at http://shopannies.blogspot.com
ReplyDeleteI've seen bigger versions of this, but I love the framed little ones!
ReplyDeleteThese are simply adorable!! I love them! Great tutorial too. :)
ReplyDeleteSaw you on TT&J
I love this idea. It looks fantastic. I don't like tearing up books either but there are some at thrift stores that need a new life.
ReplyDeleteRuth
What a cool tutorial! Such a lovely piece of art! This is quite amazing. :)
ReplyDeleteShared it on FJI Facebook for SNS 104:
https://www.facebook.com/photo.php?fbid=10150413913746141&set=a.192514281140.164586.175378011140&type=1&theater
Donna
absolutely adorable!! i love it! thank you for the tutorial! off to try this one out for sure!
ReplyDeleteWhat a great little project! I love books and book pages, so I'd definitely try this one. Pinning it now.
ReplyDeleteSo cute! I love your take on this-especially because they are mini!
ReplyDeleteThat is such a cute idea, and it looks great! :)
ReplyDeleteThese are so flipping adorable!! I love the frame and the green polka dot background!! Great job!
ReplyDeleteWell, Using an old dictionary was a good call, Michele! I have been wanting to make some book birdhouses but didn't have any books I wanted to part with! These came out adorable! Thanks for sharing step by step guide.
ReplyDeleteSolvency II
Wanted to let you know I featured this as part of my BFF Open House Wrap Up! Grab a featured button from my sidebar if you like!
ReplyDeleteHow stinking cute. I would love for you to stop by and link up your book page pumpkins to More the Merrier Monday. It lasts through Wednesday so you have plenty of time to link up. I also have a link party for Halloween projects only at http://diyhshp.blogspot.com/2011/09/trick-or-treat-link-party.html that I would love for you to link up to as well.
ReplyDeletehttp://diyhshp.blogspot.com
I featured you today at my Hookin Up with HoH Party!
ReplyDeleteCongrats!! Feel free to stop on by and grab a button if you'd like.
xoxo
Allison @ House of Hepworths
These are great! I've been posting to some of the same link parties and these always catch my eye!
ReplyDeleteStephanie @ All Artful
This is too cute! I love your creative twist on a traditional book craft! Nice! Your newest follower,
ReplyDeleteCarrie
www.projectpossessed.com
WHOOP-T-WHOOP you are featured today on COM in the Saturday Spotlight Talent Show. Congrats.
ReplyDeletewinks, jen
I struggle with the same question sometimes...Should I destroy one thing to create another? The answer for your project is obviously YES! The framed pumpkins are adorable!
ReplyDeleteVery Cute! I saw our post over at the Fall party at "Domestically Speaking". Thanks for the great "how to"s.
ReplyDeleteSo Cute. I was just thinking the other day of doing a book page pumpkin.
ReplyDeleteCheri
what a cute little project! Simply love it.
ReplyDeleteHow cute!! I was hesitant about cutting into books at first, but I actually made a book page tree for our playroom that turned out amazing and it got me over cutting up books! I love that you added that touch of orange to the edges and the frame you picked is perfect!
ReplyDeleteLike you I can't/couldn't bring myself to cut into a book. It's just on my list of no, no's. But using one that is already beyond hope as far as damage might be all right. My daughter and I had this conversation that other day, it got a tad testy actually. She is not attached to "material" things and can cut, trash or it or burn it without giving it a second though...and how old it is or special in her life..cut it or trash she will. Me..I can't part with anything or cut it up to make something it wasn't intended for. The way crafter's are going these days...there will be no antique's or vintage items for the next generation. It makes me hurt when I see people cutting up vintage tablecloth or such.
ReplyDeleteOkay...sorry ladies I got sidetracked. I could use a magazine or a telephone book would work though. Jesus think about soon there won't be any telephone books...with less and less people having a home phone. Though I don't understand that at all...but another subject. lol!
Like you I can't/couldn't bring myself to cut into a book. It's just on my list of no, no's. But using one that is already beyond hope as far as damage might be all right. My daughter and I had this conversation that other day, it got a tad testy actually. She is not attached to "material" things and can cut, trash or it or burn it without giving it a second though...and how old it is or special in her life..cut it or trash she will. Me..I can't part with anything or cut it up to make something it wasn't intended for. The way crafter's are going these days...there will be no antique's or vintage items for the next generation. It makes me hurt when I see people cutting up vintage tablecloth or such.
ReplyDeleteOkay...sorry ladies I got sidetracked. I could use a magazine or a telephone book would work though. Jesus think about soon there won't be any telephone books...with less and less people having a home phone. Though I don't understand that at all...but another subject. lol!