
DIY Captain America and Thor Costumes
Your kiddos will love these DIY Captain America and Thor costumes! And you will love how easy they are to make.
This post contains affiliate links.

I tried oh so hard to convince my 4 year old to be Batman this Halloween.
Mostly so his brother could be Robin.
How cute would that have been, right?
But he refused.
And I want to be mean and make him do it anyway.
So when asked which superhero he wanted to be (and it was pretty much a given he was going to be a superhero; especially after his last birthday party!) he selected Captain America.
And we decided his brother would make a cute Thor with all his bleach blonde hair.
So I got to work DIYing some costumes!
I think you will love these DIY Captain America and Thor costumes!
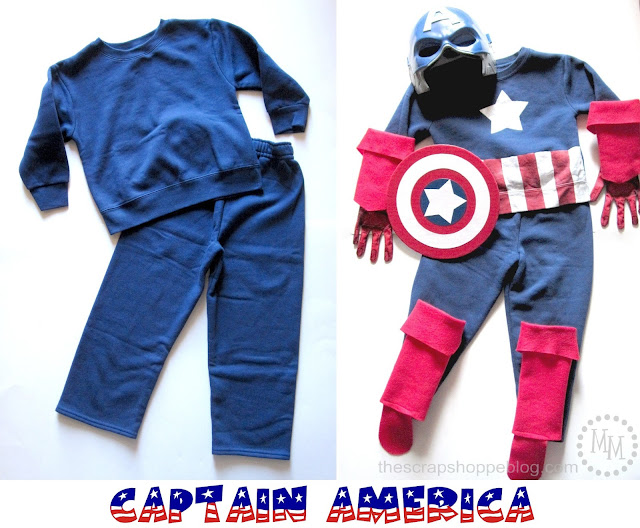
DIY Captain America and Thor Costumes: Captain America

Let's start with the DIY Captain America costume, shall we?
I started off with a pair of navy blue sweats.
Needed: shirt with a star, belt, gloves, boots, shield, helmet
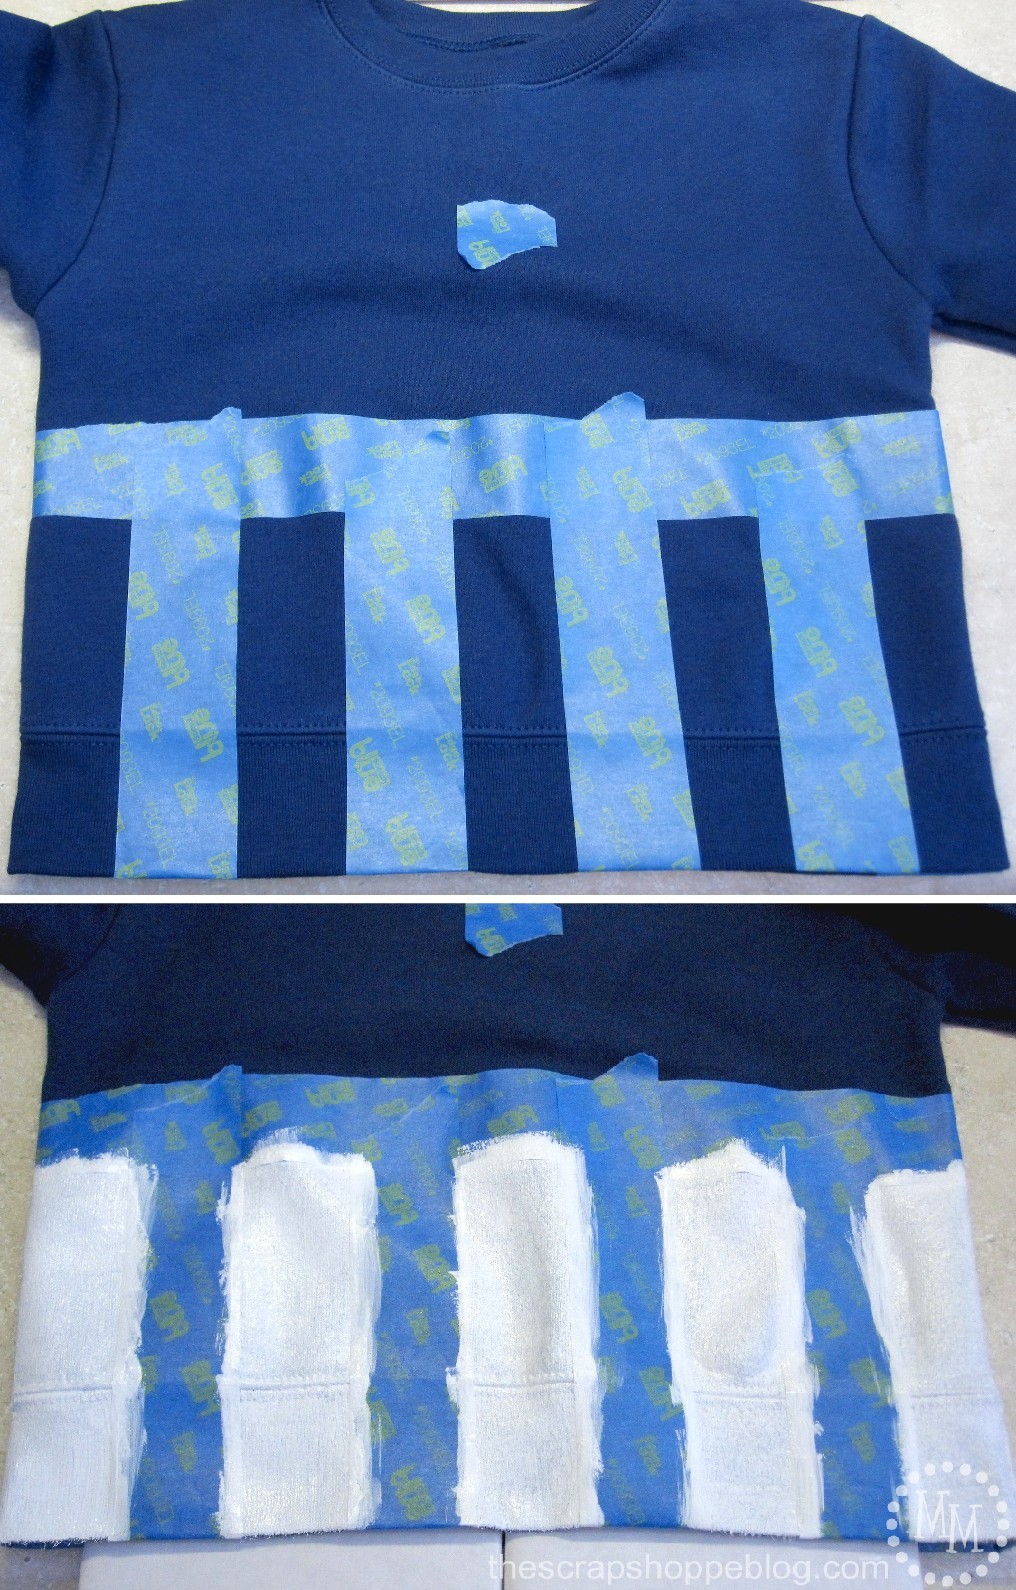
I decided the belt would work best if applied directly to the shirt.
I taped off a several inches of the bottom of the shirt and got to work on painting some stripes.
Whenever I paint on clothing, I mix acrylic paint with a textile medium (typically found with the acrylics) according to the bottle suggestion.
After washing, the paint becomes flexible and is more comfortable to wear.

I printed a star to use as a template then taped around it to make a stencil.
Press the tape down firmly around the edges so your paint will not bleed onto the fabric.
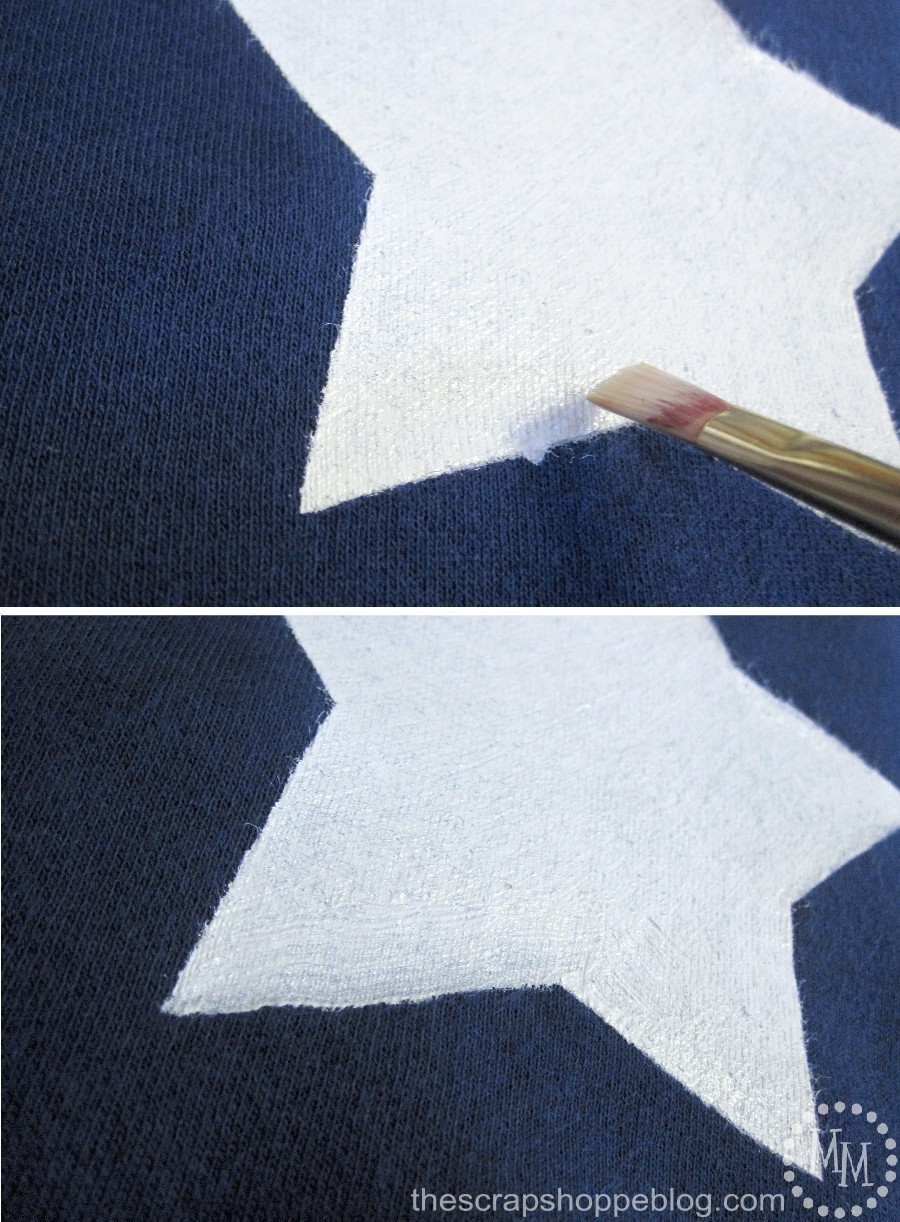
FYI: If any of your paint leaks under your tape you can always use a large flat paint brush and touch it up.
It will be like the mistake never happened!

DIY Captain America and Thor Costumes: Superhero Gloves
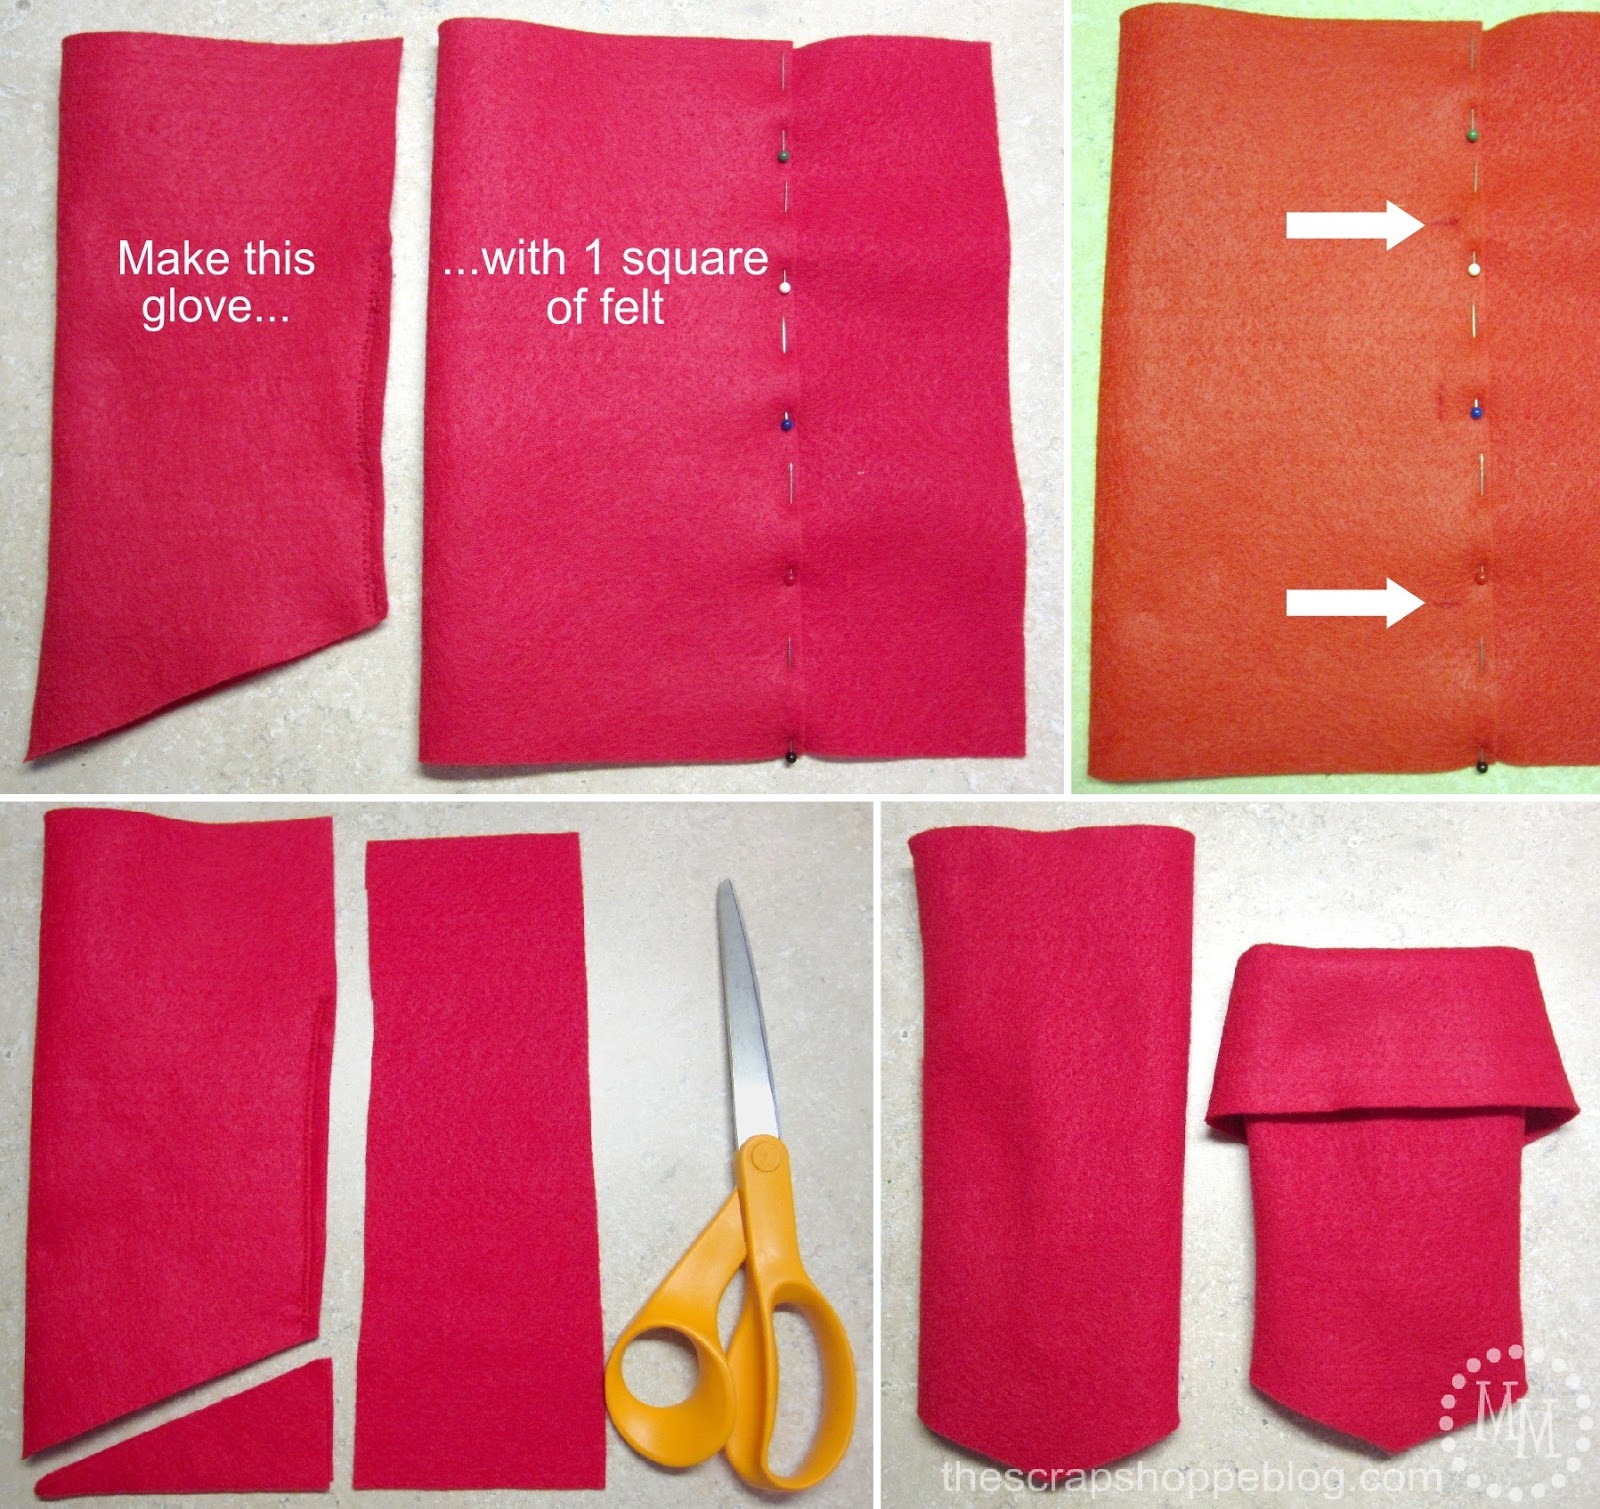
I found a pair of red gloves for my son to wear, but needed to make some sleeves to make them long like Captain America's.
It will take one piece of red felt for each sleeve. Measure your child's arm to get a good idea of how big the sleeve will need to be.
The idea is for the sleeve to fit over the sweatshirt sleeve so it will need to be roomy.
Fold a square (ok, its really a rectangle) of felt over and pin it in place.
Mark where you want to stitch which is about 1.5 inches from the bottom and two inches from the top.
After stitching, cut off the extra felt to the right of the stitching and set it aside.
We'll need it for the boots! Also cut the bottom of the felt up at an angle towards the bottom of the stitching.
This will create a point for our sleeves which will be over the hand.
Pull the sleeve right-side-out then fold over the un-sewn material at the top of the sleeve to complete the look.
Repeat for the second sleeve.
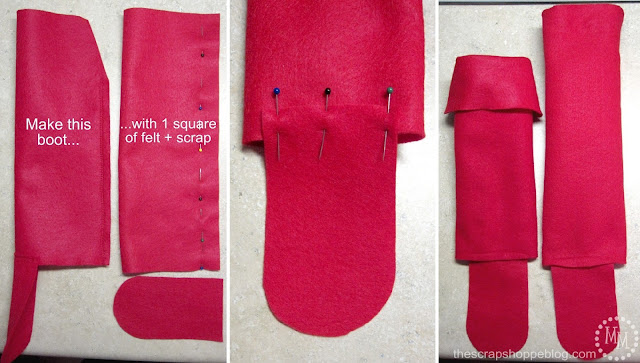
DIY Captain America and Thor Costumes: Superhero Boots
I styled these boots after the ones I made a few year's ago for my son's pirate costume.
They are basically a sleeve with a little flap at the bottom that sits on top of the shoes to give the look of a boot.
It will take one piece of red felt for each boot plus one of the strips of scrap from making the glove sleeve.
Measure your child's leg to get a good idea of how big the boot will need to be.
I wanted a tall boot so I had to I just fold the felt in half which ended up making it a little snug and there was no way that the sweatpants were going to fit under it.
So I just rolled the pants under until they were above the boot.
Stitch up the length of the felt stopping two inches from the top.
Fold the scrap of red felt in half so that you can cut two identical rectangles of fabric in which one end is rounded.
It will need to be large enough to cover the top of the child's shoe. Stitch the foot cover to the bottom of the boot sleeve
Pull the boot right-side-out then fold over the un-sewn material at the top to complete the look.
Repeat for the second boot.
This boot tutorial works for both DIY Captain America and Thor costumes.

DIY Captain America and Thor Costumes: Captain America Shield

Grab some scrap cardboard (I used a diaper box) and cut out a circle 10" in diameter.
Cover it with red cardstock using Mod Podge.
Cut the excess paper around the edge into strips and fold/glue it down one piece at a time to the back of the cardboard.
Find something round to use as a template and cut out a circle on white cardstock.
Cut a smaller circle out of blue cardstock and glue it to the center of the shield.
Cut a star out of white cardstock and glue it on top of the blue circle.
Cover the back of the shield with a circle of blue cardstock.
Create a handle for the back of the shield.
I used a scrap piece of white felt I had on hand.
I folded it into thirds to make it extra sturdy then glued each end to the back of the shield.
Go back and cover the entire front and back of the shield with a coat of Mod Podge.
Make a helmet if you need one.
We happen to have a mask on hand.
And now we have all of our extra accessories needed for Captain America!

DIY Captain America and Thor Costumes: Thor
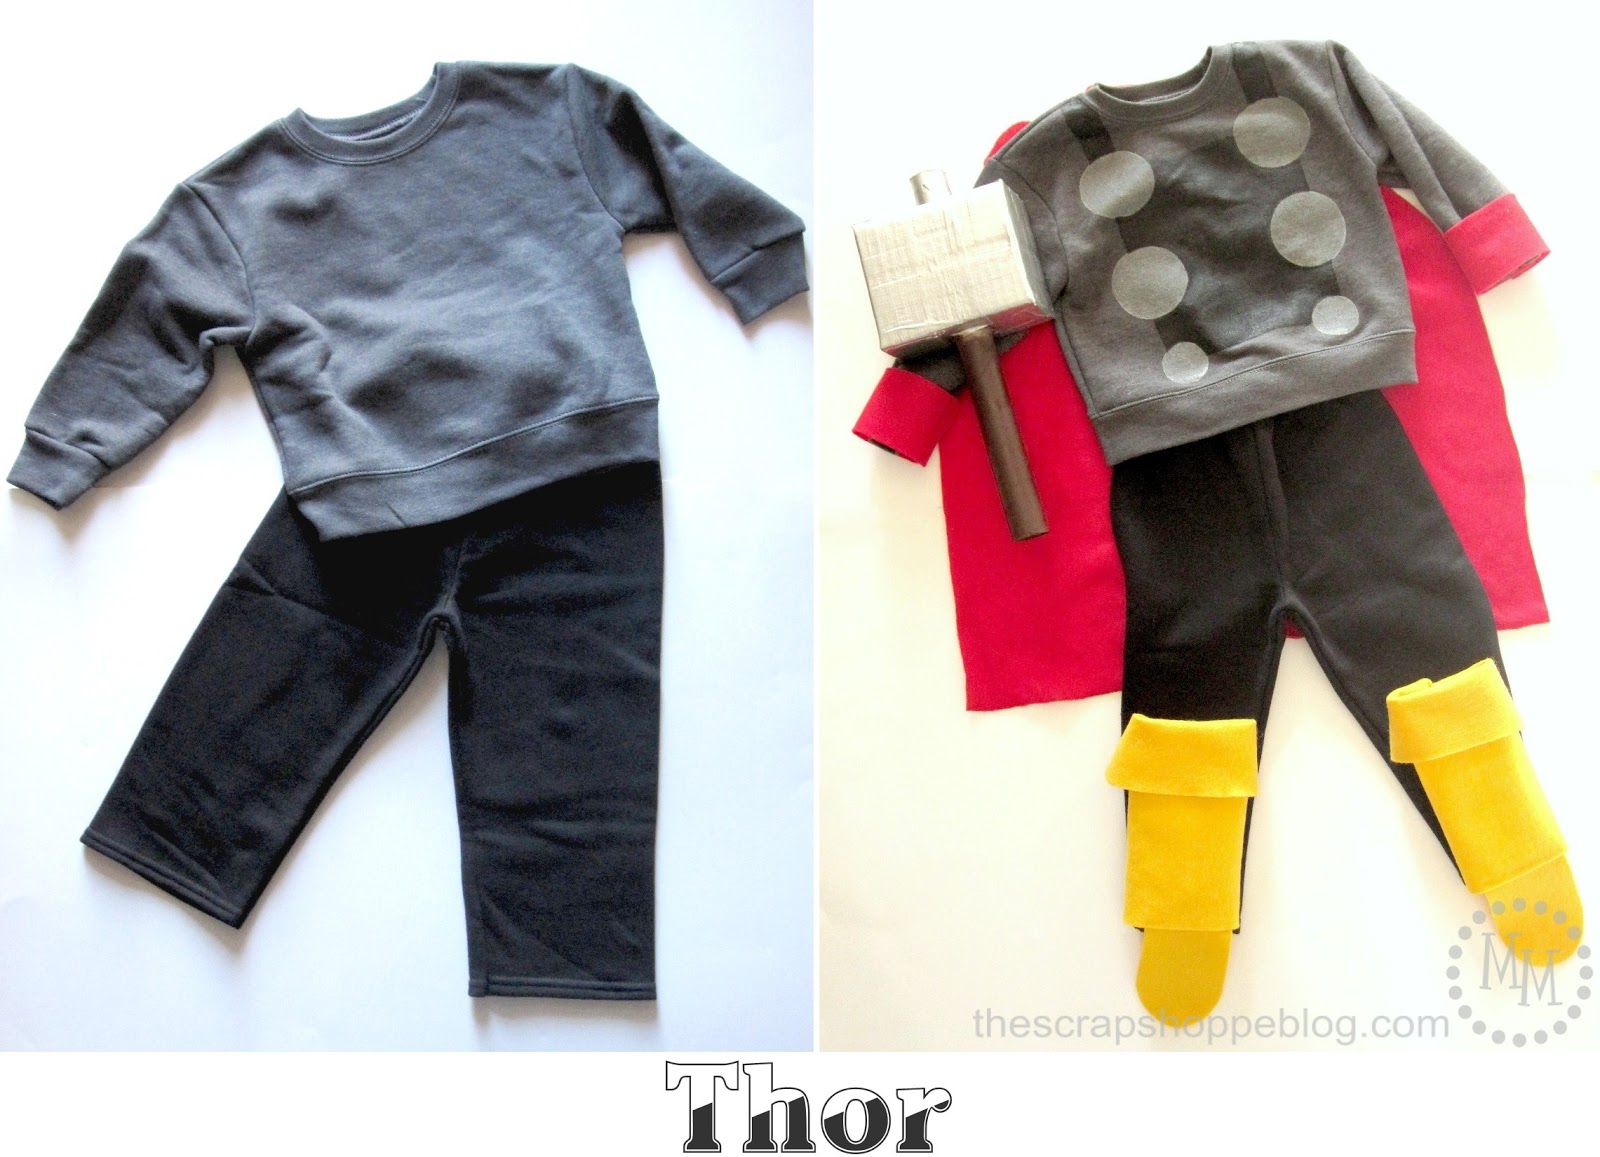
For the DIY Thor costume, I started off with a gray sweatshirt and black sweatpants.
Needed: shirt with chest protector, wristbands, boots, hammer, cape

To make our chest protector we need to start with a template.
On contact paper, vinyl, stencil paper, or whatever you happened to have, draw 6 circles: 4 2-inch circles and 2 1-inch circles.
Using an X-acto knife or circle cutter if you have one, cut out the circles.
Be sure to keep the circles because we will need them later.
Cut apart the circle templates so you can place each individually on the shirt.

Place the circle templates on each side of the shirt, almost where you would place suspenders.
Place the larger circles at the top and the smaller at the bottom.
Paint the circles silver (again, acrylic paint mixed with textile medium).
Once dry, remove the circle templates and cover the the painted areas with the circles we set aside earlier.
Tape off a chest protector around the circles covering a majority of the front of the shirt.
Paint this area black.

DIY Captain America and Thor Costumes: Thor Hammer
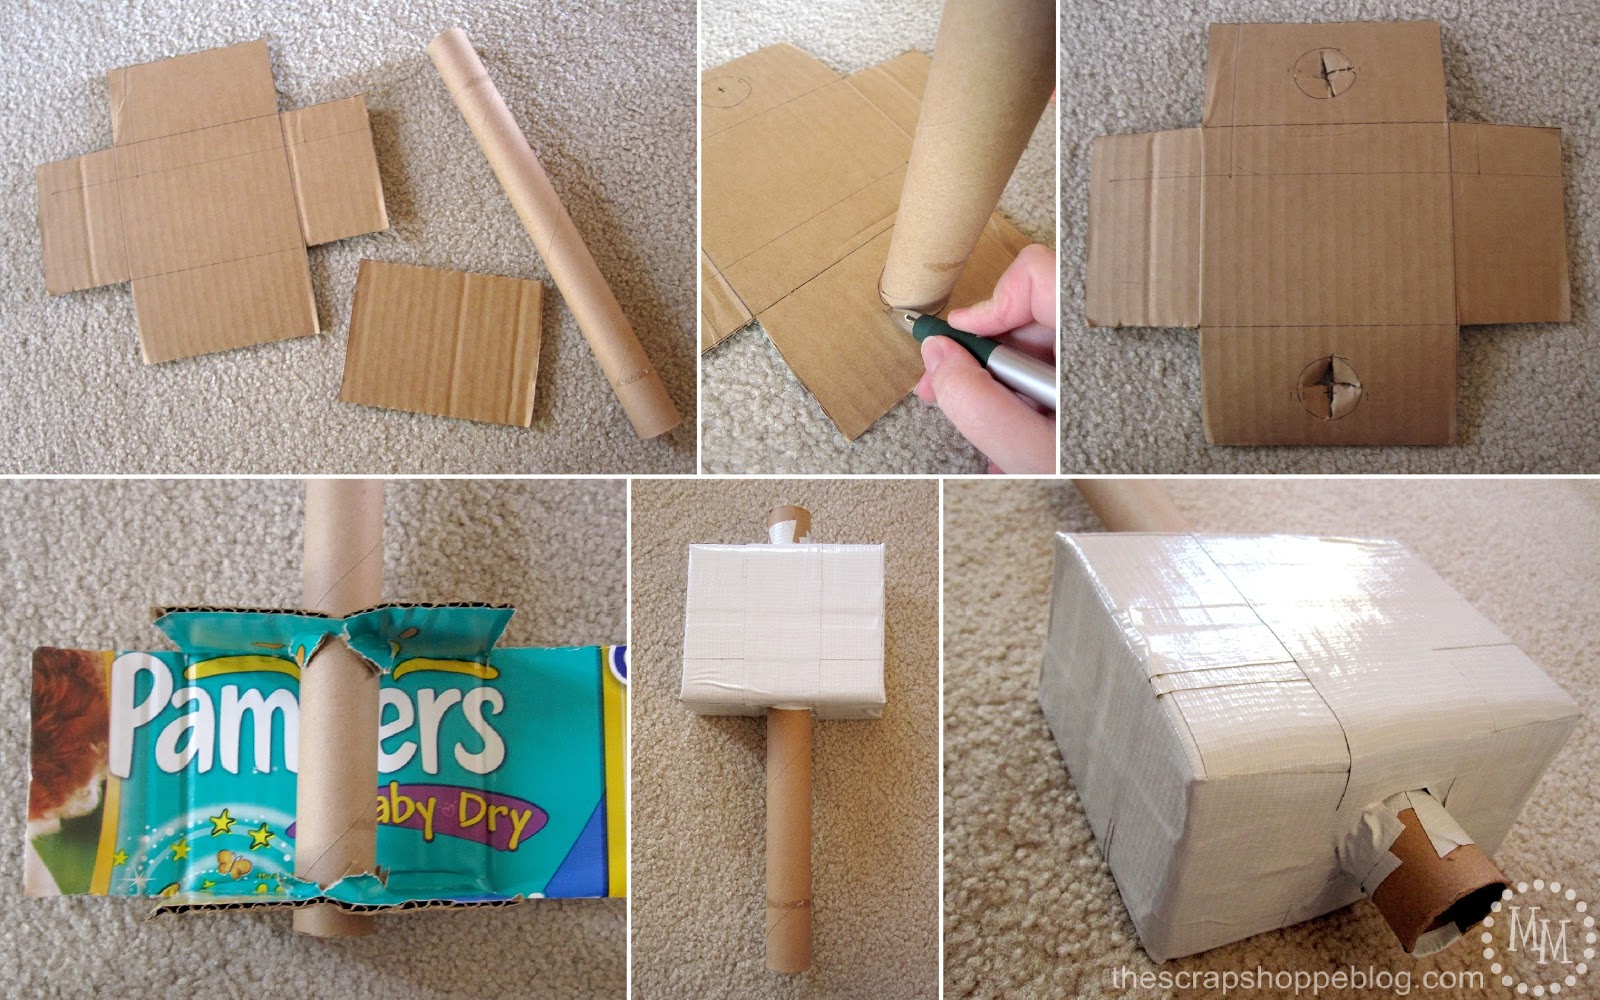
Use scrap cardboard (again, I went back to my trusty diaper box!) and draw out the two pieces I have shown above.
Hammer dimensions above are 5x4x2.5".
You will also need a cylindrical piece such as a paper towel roll (or AL foil roll like I used).
I like the AL foil roll because its smaller in diameter and sturdier that the paper towel roll.
On the flaps that will ultimately be the top and bottom of the hammer, trace the circumference of the AL foil roll then, instead of cutting those circles out, cut them into fourths.
This will make the roll tighter when you push it through the holes.
Crease the side flaps and insert the roll so that all of the all extra pieces of cardboard will face the inside of the hammer.
Using Duct Tape (silver if you have it), tape the box of the hammer together thoroughly.
Attach the smaller piece of cardboard to the back side of the hammer to complete the box look.
If you don't have silver Duct Tape on hand (whaaaaat?) then you can paint the hammer silver.
That's what I did and then painted the handle brown.
Make a pair of yellow boots following the same directions as above for Captain America.
For the wristbands I simply cut rectangles of red felt and glued Velcro to the ends to easily take them on and off.
Make a cape if you need one.
We have a red one on hand already.
And now we're done with Thor!

I think its pretty safe to say that Captain America is quite pleased with his costume!
He's so excited to wear it to daycare for his Halloween party on Wednesday.
You can see that I folded the bottom of his pants under so they rest on top of the boots.
It actually kind of adds some bulk to his skinny little legs making them look a little more muscular!

Thor was pretty enthralled with his hammer and, for a 19 month old, was pretty patient getting on all his gear.
His pants are also rolled under to the top of his boots.

I think we'll have some fun dress ups this winter!
There's no way these costumes will not become play items after Halloween.
I'm so excited for them to wear them this week!
Give these DIY Captain America and Thor costumes a try for your little ones.
Looking for more costumes for boys? Check these fun ideas out!
Upside Down Man | Charlie Brown | Football Field | Mad Scientist
Circus Strong Man | PJ Masks Cat Boy | Batman & Robin
Aladdin | Monsters Inc. | Werewolf & Werewolf Hunter

>> See where I party! <<

Awesome !!! I really like the simplicity in this. Didn't even know, how much you can do with Pampers box 🙂
Well done.
Wow, you are so great, really amazing work, your kids looks really adorable wearing your DIY captain american and Thor, as you know, the civil war movie is coming soon, and i am planing to get a civil war costume for my 5 years olds boy from some uk store or online store like cosplaysky.co.uk, but they decline my request, as they are unable to custom made a costume for so young kid, do you have some some ideas on how to DIY the civil war? if yes, then could you pls help me ? my son is really eager to have the captain american.
Awesome DIY costumes.Your boys looks adorable.Thank you for sharing with us at #HomeMattersParty. We would love to have you again next week.
What adorable little superheroes!!! I especially love the boots and the hammer. That was smart to make the hammer out of cardboard so it wouldn't be too heavy for Thor to carry.
These are just so creative and adorable. i am in awe!
Brilliant! I'm putting together an adult Captain America Costume for this season's various dress-up events and I've been trying to figure out the best way to do the red & white strips on the blue tunic. THANK YOU!!!
I stumbled across your blog and smiled ear to ear! Your boys are living a very similar life to mine! Costumes all the time, always superheroes. Thank you for sharing and the smile.
I just finished the captain america costume for my twenty month old. Super easy. And I cheated with a hot glue gun on the felt 😉 Thank you for the tutorial!
That is awesome!! I don't consider it cheating if it all looks the same in the end. 😉 And your little one will never know! My lips are sealed!!
I love this idea! I am using your tutorial to make a Thor costume for my 2-year old. I couldn't find a 3T crewneck sweatshirt so I opted for a long sleeve T. I hope it works out.
How cute!! I think the long sleeve shirt will work fine. I would love to see a pic when you're done! 🙂
You get the super mom award!!! I love how much detail you put into those costumes. You are going to have super hero boys all winter long now:-)
Michele! I JUST found your blog and I love this tutorial! Amazing! How did you find the time with working and having two kiddies!? I am sure they loved having such comfy and awesome outfits/costumes! My kids would never take something like this off!!!
These are so cute for a boy!
SO cute, Michele! And your models are adorable. 🙂
We're really into making our own costumes too. Yours are absolutely fabulous. Great ideas and techniques. Jodi @ http://www.meaningfulmama.com
Those are just adorable ... and I love that they're so simple to DIY. Great job!
Seriously cute....those are the cutest superheroes ever!
Hi new follower here from the Take-a-look linky party. These costumes are freaking amazing! I love that you made them out of sweats.
I feel like we are in the same boat here!! My son is almost 4, and he wanted to be Iron Man this year. I did his costume out of cardboard. We just moved a few weeks ago, and before we left we threw my son an early birthday to celebrate with family and friends, and the whole party was Avengers themed.
I've got it all on my blog as well, I hope you come check it out!
http://sunshineandasummerbreeze.blogspot.com
These are great! Super easy too! I love the Thor! My son wanted to be Captain America too this year! I like to make his costumes out of fleece so they are really warm. He also can't wear a mask to school, so I opted for a hood! If you want to check it out you can here. 🙂
http://phunkyphashionsbywendy.blogspot.com/2012/10/captain-america-aka-max.html
How stinkin' adorable are these?! Your boys are so lucky to have you!
These are so cute and creative Michele! And they look so much more comfy than store-bought costumes!! The boys are super cute!!
You're amazing, Michele! These are so cute and that hammer is awesome. Thanks for the tutorial!
Too much cuteness, Michele! What a creative mama you are. 🙂
are you kidding me? these are great, michele!!! so creative.
oh my gosh michele! you did a fabulous job, and your boys are soooo adorable! How fun!
gail