
DIY Wedding Reception Table Number
This is a sponsored post for DecoArt for whom I am a Core Blogger. As always, all ideas and opinions are 100% my own.
 Wedding season is upon us! If you're a DIYer (my entire wedding was done on a budget and almost completely DIYed!) then I have a pretty, super simple, and easy to coordinate idea for your wedding reception table. A lot of couples number their tables for their guests and do assigned seating. Even if you don't do assigned seating, it could still be nice to number the tables so guests remember where they were sitting when they get up for food or to dance.
With a little DecoArt paint, you can get a custom look to your tables with minimal effort!
 Supplies:
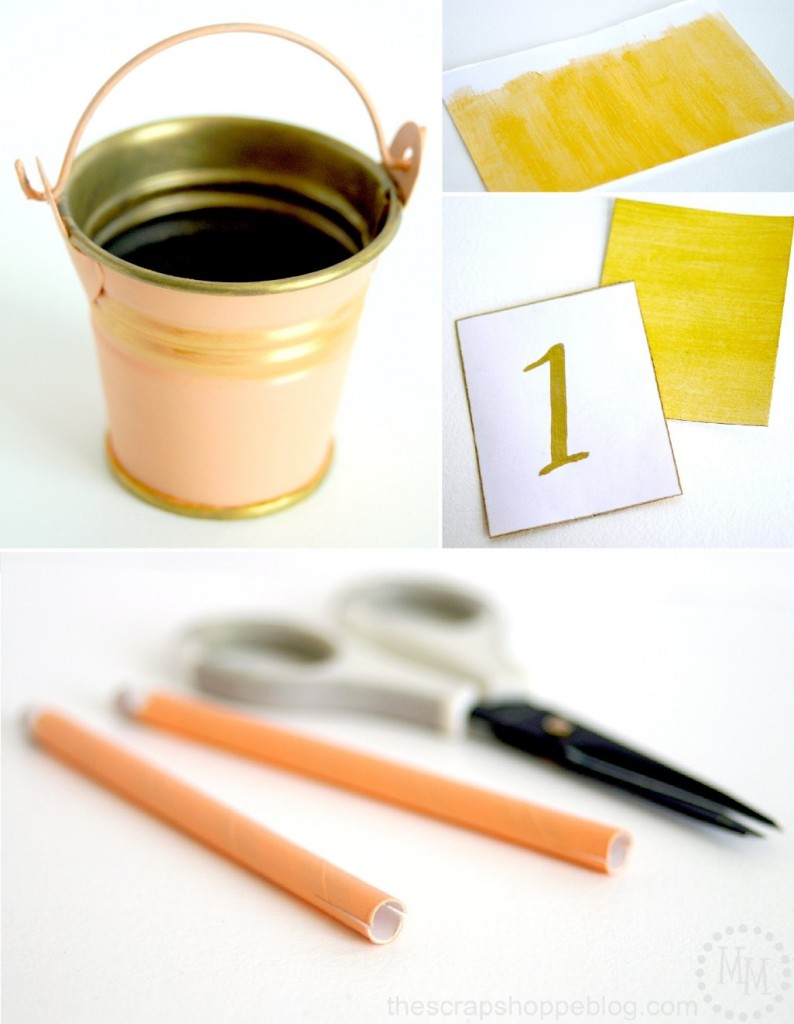
Americana Multi-Surface Metallic Paint in Yellow Gold
Americana Multi-Surface Satin Paint in Peach Silk
Gold marker or pen
Paper straws
Small metal buckets
Moss
White cardstock
 Bucket
Start by painting the outside of the bucket with the Peach Silk (or whatever your color scheme may be), but be sure you use the Americana Multi-Surface Paints. They can literally paint on just about any surface so all of your wedding DIY projects will color match perfectly. It will take 3-4 coats for good coverage, but the paint dries quickly so you can reapply fresh coats within 10-15 minutes.
*I suggest setting up an assembly line of the items to be painted. That way you can work your way down the line. When you get done with the last item, the first item should be ready for the next coat. You'll be done in no time!
Once the peach is dry, paint add your gold accents with the Yellow Gold. I painted the inside of the bucket, the edges, and along the middle where the ridges are. Again, it will take 3-4 coats for all but the middle of the buckets. I just did a simple quick swipe of the brush there for a hint of gold.
Cardstock
Paint a light coat of the Yellow Gold on one side of the cardstock. Do not let the paint get too heavy or the paper will get wavy. Cut the cardstock into 2"x2.5" pieces and write the table number on the front of the cardstock with the gold marker. You can also trace along the edge of the paper with the marker to give the front a little more detail.
Paper straws
Paint each end of the paper straws with Peach Silk. Depending on the color your straw start out to be will probably determine how many coats you will need to paint. With these light gray straw I was able to get good coverage in 3 coats.
Cut the straws in half then cut a slit on each side of one end of the straw, approximately ½" long.
 Tuck moss into the bucket. Slip a number card into the slit in the straw then tuck it into the moss.
If you're worried about the bucket being knocked over you can weigh it down by placing a few pebbles inside before adding the moss.
 Add your table number to a simple but elegant centerpiece and you are set! Here I paired the table number with a small, inexpensive scallop-edged plate topped with a ball of hydrangeas, a tea light wrapped with gold washi tape, and a scattering of gold sequins.
DIYing your wedding can be done and on a budget, too!


It's super cute! I love DIY weddings. It is so nice when couple invest time and energy to make their guests feel good during wedding celebrations 🙂
I hope you will join us for the Idea Box Party this week:
http://milaslittlethings.com/2015/05/idea-box-thursday-link-party-9.html
xx
Mila
Such a cute idea. Love your color combo. Thank you so much for sharing at Share It One MOre Time. Cathy
This is so cute! Thank you for sharing at the Thursday Favorite Things blog hop . Watch for your feature on Monday xo
These are so cute and lovely. Thanks for sharing your creative talent with Small Victories Sunday Linkup and hope you found some other inspiring posts. Pinning to our linkup board and hope you join us again this weekend, new linkup starts at 8pm EST.
So, so pretty, Michele! I love the gold and peach together!
Such a cute idea. I've helped with a few handmade / diy weddings. They are so much fun even with all the work. Pinned for later.
Such a cute idea for a Spring wedding!