
How to Install a Rain Barrel

One of the features I'm most excited about with my new patio is the installation of a rain barrel!
It feels great to be recycling rainwater and putting less of a strain on our own water bill.
But also, because of the location of the patio, its much easier to water the plants there with a watering can than dragging a hose over.
If you've ever considered using a rain barrel, I'm here to show you how simple the installation can be!

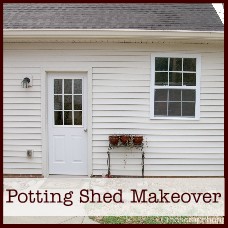
This is the "before" photo of the exterior of my potting shed. Sad, right? Well, it was the end of winter when I took the picture which is usually a pretty sad time for anything outdoors.
But do you see that sad barrel sitting off to the right? That's my rain barrel. I won't even embarrass myself and tell you how long ago I purchased it and left it sitting unattended in the yard. Let's just say installing it was long overdue.
I purchased my rain barrel from Wayfair.com but there is a similar one here (affiliate link). You can find rain barrels at most home improvement stores. If you can your hands on regular barrel, you can convert it to a rain barrel with a rain barrel kit (affiliate link).

Although I purposely selected a relatively nondescript rain barrel, I did not want it to be super noticeable when deciding where to place it. It also needed to be placed somewhere where it would be useful and easy to get the water inside to the plants that needed it.
When planning the dimensions of the brick patio I allotted a small bricked space around the side of the potting shed. This is where I planned to put the rain barrel. Mostly out of sight, but right next to all of the flowers that would need its water.

The main problem with the location I wanted for the rain barrel was that it was on the wrong side of potting shed from the gutter. The gutter would need to be diverted to the side of the potting shed.

To divert the gutter to the top of the rain barrel we used a vinyl Flex-A-Spout found at Lowe's. It was the perfect solution to transfer the water in the gutter to the rain barrel.
We used a hacksaw to cut off the metal gutter ~7 ft from the ground. The spout fit over the end of the gutter, and we secured it with ⅛" rivets. The rain barrel comes with a screen where the water enters to prevent a lot of gunk from getting into the water and clogging the system up. You can secure the end of the flex spout on top of the screen or, as we did, cut a hole in the screen and have it keep the end of the spout in place. We did this because we already have gutter guards on the gutters so it is mainly just water running through the spout minus all of the gunk that can get in them.

Rain barrels come with the spout located low on the barrels. Obviously this is so you can get most of the water back out of the barrel. But this also creates a problem of getting your watering can or bucket under spout.
To solve this problem we simply constructed a platform for the rain barrel to sit on. We made it out of 4x4 pre-treated lumber we had leftover from building our fence (so, in other words, no extra cost to us!).

By stacking 3-high, the spout is now ~10-11 inches off the ground. This is plenty of space to fit most watering cans under.

Believe it or not, I actually look forward to the rainy days now that the rain barrel is installed!
That's just that much more FREE water I can use to water my plants and gardens.
Now that you see how easy installing a rain barrel can be, I do hope you'll give it a try!
Rain barrels can be an investment, but you'll make your money back over time by saving on your water bill.

>> See where I party! <<
Be sure to check out:


Installing a rain barrel is a fantastic way to make your patio more sustainable and eco-friendly! It not only helps collect rainwater for watering plants but also reduces runoff and conserves water. The process can be quite straightforward—just make sure to position the barrel under a downspout, secure it properly, and ensure there’s a spigot for easy access to the collected water. Plus, rain barrels can come in various designs, so they can be a stylish addition to your outdoor space too. Can’t wait to see how it enhances your new patio!
What a great idea and it came out so nice! Thanks for linking up to Best of the Weekend! Your post was one of my features this week. I will be pinning and adding to Instagram stories this weekend. Stop by my blog tomorrow to see your feature and to link up any recent projects. Enjoy your weekend!
Shelley
Never seen one of these before, thought it was a wine barrel. Great project
I like that you put the rain-barrel on platform so you can easily fill your watering can.
Happy summer,
Kippi
Michele, this is something I've intended to do for many years, so I had to chuckle when I read how long you'd been procrastinating on the installation! 🙂 Pinned for future (near future, I hope!) reference. #MakeItPrettyMonday
Genius! I pinned this as I plan to make one for my gardens!
Thank you for sharing at Share it One More Time....
Thanks for sharing this post on Sunday's Best. I've been wanting to install a rain barrel to water my vegetable garden. You make installing one seem so easy. Now to find a barrel that won't break the bank.
I have always wanted to know how to do this. I am pinning this one for sure! Thanks for linking up to Small Victories Sunday Linkup!
That's so nifty! I want a rain barrel so i can so on water. I think it's ridiculous I have to pay for water when it's something we need to survive. This is a frugal way around that. Thanks! I found your post at Small Victories Sunday Linkup.
I love your rain barrel, but I'm wondering what happens if you don't use the water as fast as the rain fills it up? Does it have an automatic overflow system, or do you just keep an eye on it so that doesn't happen? I definitely would like to give this a try because untreated water is supposed to be so much better for plants. Thanks!
I have been wanting to do this since we moved into our house last year. We are usually in a drought by end of summer and our neighborhood is strict with yard and garden watering. Thank you for sharing this. Hopefully, I can get mine done this month!
This is so awesome! I am really loving all the work you did on this little shed! I am so pinning this for when I have my own place!
I LOVE your rain barrel! Great job Michele!
gail
I actually bought a Suncast rain barrel at Lowes or Target a while back, and it's been sitting on the back patio for an embarrassingly long time. This post inspired to finally get it installed for my garden this summer. Maybe. 😉