
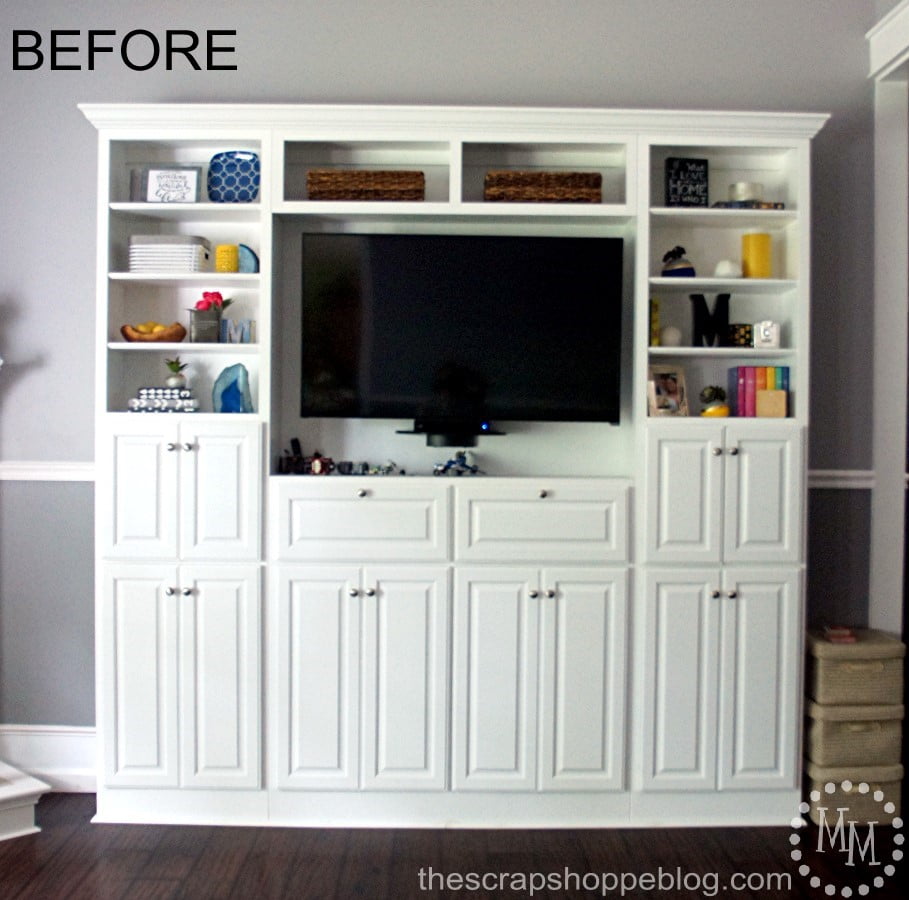
Media Center Vinyl Backboard
Create a home decor project using only adhesive vinyl like this media center vinyl backboard entertainment center.
This is a sponsored post on behalf of Expressions Vinyl. As always, all opinions and ideas are my own.

A few years ago I began a campaign within our home to "take back the fireplace mantel."
It was where our television resided in our living room. Blech!
It made it so hard to decorate for the holidays.
It also made it appear as though the television was the main feature of the room.
That is definitely something I did not want.
So I petitioned for a "built in" media center and a little over a year ago I got my wish!
Ever since then I've been debating with myself whether or not to add my own touch to it.
And of course I had to, right??
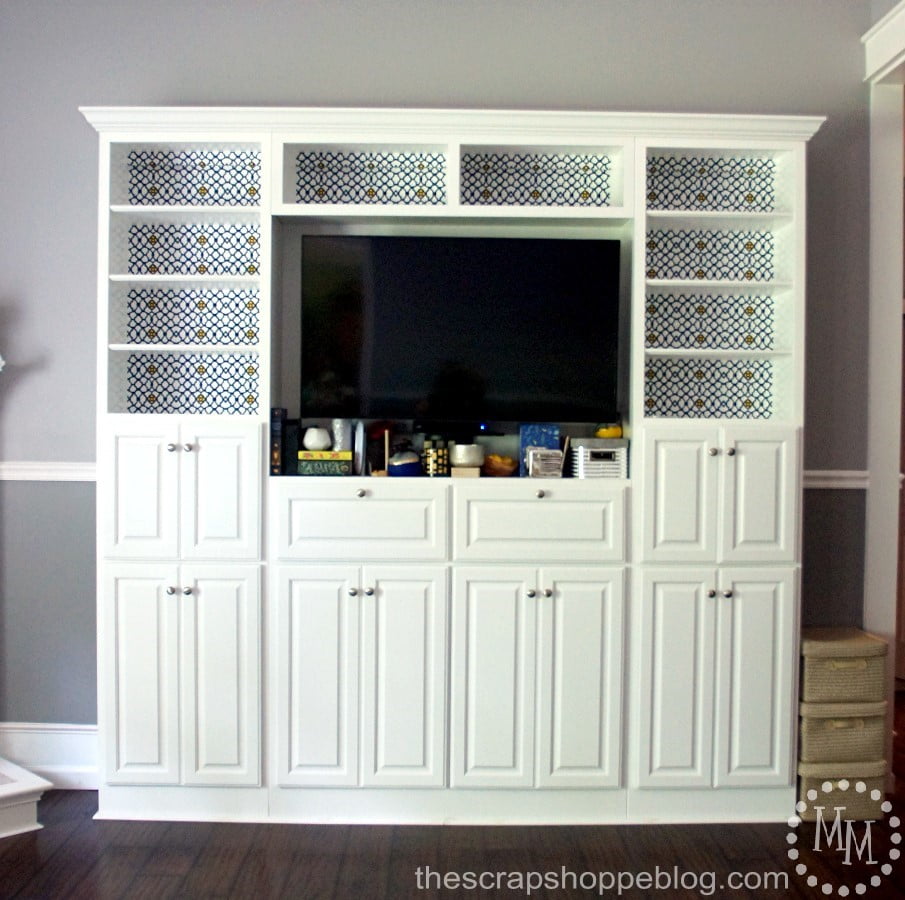
I applied adhesive vinyl from Expressions Vinyl to the backing on the shelves to create my media center vinyl backboard, and I am so in love with how it all turned out!
I want to state that my husband, though doubtful of his own skills, is a great DIYer and can build just about anything I ask of him if I give him plans for it.
However, he had heavy doubts about this project so, for the sake of our marriage, we sought an outside source to custom build our media center.
We designed it, and our guy built it for us.
And my husband and I lived happily ever after!
My main concern for the media center was that it offer plenty of storage.
We had practically zero of that in this room before.
It definitely delivered!
Then I went a little crazy collecting knickknacks for the shelves.
I am no interior designer so they are just placed haphazardly on the shelves.
And the entire thing felt a little unfinished.
Don't you think all that white is just begging for something to be done to it?

Media Center Vinyl Backboard Design
I downloaded the image "large fancy gate" from the Silhouette library to use as my backer.
It is a square image so I simply attached two more side by side to make a rectangular pattern.
Before welding the images together to get one long cut file, I ungrouped each square then welded only the large background file and not all of the little images inside the larger image.
Then it was simply a matter of resizing the image to match the size of the backing on the media center shelves.
I removed part of the image so I could cut it in a contrasting vinyl color.
The large pattern is cut on Dark Blue adhesive vinyl, size 12" x 24".
The small pattern is cut on Sunshine Yellow adhesive vinyl, size 12" x 12".


Media Center Vinyl Backboard Design Transfer
I chose 12" x 24" clear transfer tape sheets to work with because,
1) a sheet would be easier to work with that a roll (I didn't want to worry about curling), and
2) I want to be able to see exactly what I was doing so the clear tape was a must.
I used small pieces of the transfer tape to place the yellow vinyl on the blue by eyeballing each image in place.

Since I wanted the transfer tape to match up exactly with the pattern (I won't have a lot of flexibility working in the shelves for excess tape), I overlaid the tape on the pattern and traced the edges and cut off the excess.
You can use this excess to apply the yellow images!
To apply the tape to the pattern, start at one short end.
Apply a couple of inches of the tape to the pattern then slowly add the remaining tape by simultaneously removing the backing and sliding a ruler over the exposed tape.
Once done, rub tape firmly with a vinyl applicator tool.

Media Center Vinyl Backboard Application
Working one shelf at a time, I added the vinyl.
The clear transfer tape is VERY sticky so it was a slow process to get it removed, but it was totally worth the extra effort to be able to SEE that I had each pattern perfectly lined up in place.
You can see the cut pattern is slightly smaller than the shelf backing.
I did this to be sure that I would be able to get to each corner easily.
From a distant you do not even notice the extra space.
At this point I started to have doubts of the project.
It was so busy!
I thought it might be too much.
I comforted myself by knowing I could easily remove it if I needed to.

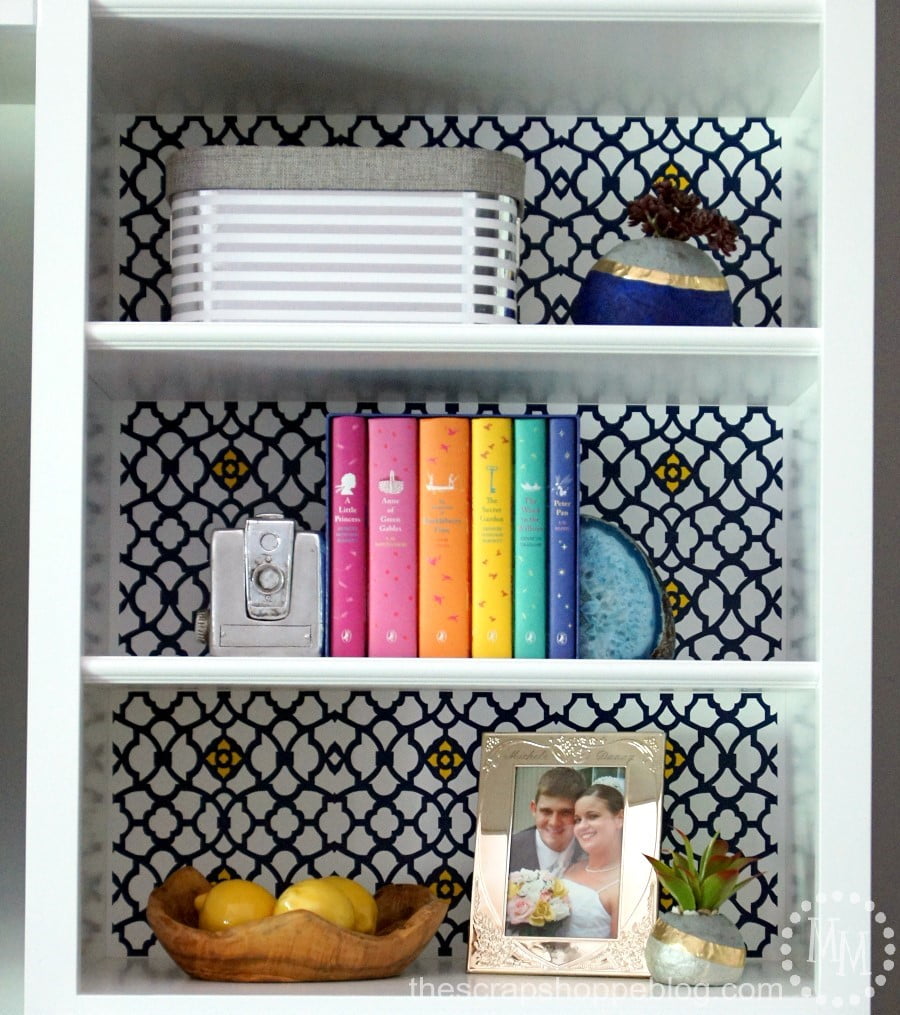
I started adding my knickknacks and treasures to the shelves, trying hard to make it appealing to the eye and remembering the rule of 3's and all that interior design stuff that people go on about.
And then something magical happened...

I started to love how it was all looking!
With all of my items back on the shelves it took away just enough of the pattern not to look so busy anymore.
The entire unit started to feel more mine!

Isn't it such a fun makeover??
Granted, it was a bit of work but at the end of the day I love how it tuned out.
I also added some storage in plain sight.
Those basket at the top center?
They hold our family's collection of Christmas LEGOS.
That wood drawer under the tv?
It's a great place to stash remotes when company is over.
Do you think this is something you would try??

>> See where I party! <<


Fabulous results. Neat idea and wow the results are so pretty.
So pretty! It really gives it the WOW factor! I love it!
I love this idea.. now I'm looking at all our old bookcases with a new eye! Pinned.
What a difference adding the vinyl makes. Thank you for sharing at Snickerdoodle Create Bake Make Link Party.
It looks so awesome! Love it! We'd love for you to come link up at Wall to Wall DIY Wednesday over at R&R at home!
Wow great idea, I am new for vinyl projects. , the vinyl really adds a lot of style to the media center.
I love this idea. I wish I had a media center like yours. Pretty!! Thanks for sharing at this week's Inspiration Spotlight party. See you again soon. Pinned & shared.
It turned out great! I love it!! Thanks for sharing at Throwback Thursday!
Mollie
Wow, the vinyl really adds a lot of style to the media center. Definitely worth the effort, it looks awesome. Thank you for linking up at the #HomeMattersParty this week!
Seems off balance to me. Like the doors want a pop of black to anchor them now.
Your media centre looks amazing 🙂
The vinyl backboard really adds such a nice splash of color! Thanks for the idea. Pinning to share.
We appreciate you sharing with us at Snickerdoodle Create-Bake-Make Link Party!
~Laurie
This is gorgeous! Who would have thought that something so easy could have such a huge impact? Thanks for the awesome new idea!
What a change! It totally pops now. Yours is the best project. Visiting from Bouquet of Talent Party.
So beautiful! I absolutely love the way it turned out!