
Notebook Paper Pencil Pouch
This notebook paper pencil pouch is the perfect personalized accessory for students to keep up with their school supplies this school year.
This is a sponsored post for DecoArt for whom I am a Core Blogger. As always, all ideas and opinions are 100% my own.

School is almost back in session!
Send your student back in style with a custom pencil pouch that will never get mistaken for someone else's.
It's a lot easier to make than you might think!
And I think you'll love this technique for using fabric paint.

Items Needed:
SoSoft Paint 1oz - Ocean Blue
SoSoft Paint 1oz - Cadmium Orange
SoSoft Paint 1oz - Lamp Black
fabric
zipper
sewing machine
Determine the size of the pouch you want to create.
This one is 9 inches wide, because I used a 9 inch zipper, by 5 inches long.
Account for a ¼" seam and cut fabric 9 ½" x 5 ½".
You will need 4 pieces of fabric total: 2 for the outside of the pouch and 2 for the inside.
I used a natural cotton for the outside because I just really liked the look of it.
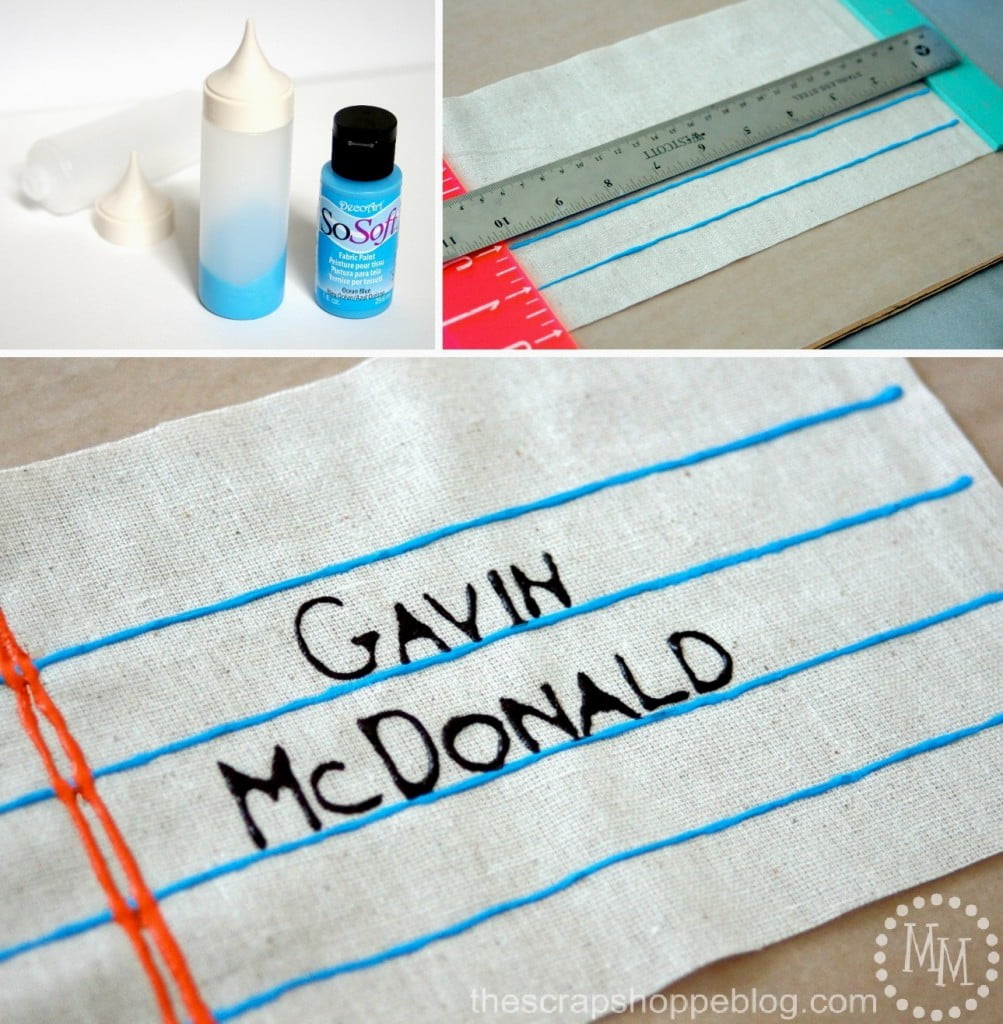
You can find empty paint writer bottles at your local craft store.
Add a small about of each paint color to a bottle.
You can now "write" with the paint instead of simply painting with it!
First, draw the blue notebook paper lines across the width of the outer fabric.
Draw one every inch starting from the bottom of the fabric.
Use rulers to keep your lines straight.
Allow the paint to dry for a couple of hours then go back and draw two orange lined down the left side of the fabric.
Don't let the lines get too close or the paint may run together.
Finally, write your child's name (or whatever you choose) to the middle of the fabric.
Allow to dry at least 48 hours.
The paint takes a while to dry when used this way.
It may feel tacky to the touch.
If it feels that way after 48 hours, allow it to dry a bit longer.
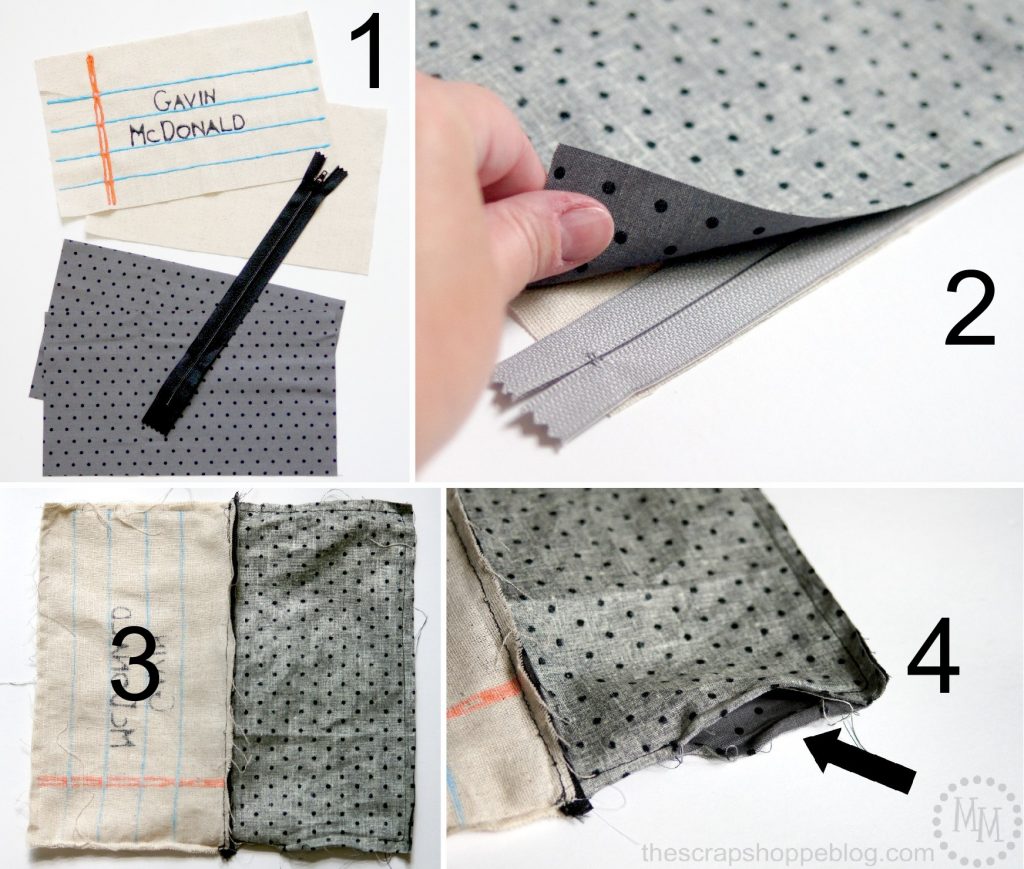
1. To sew the pouch, gather your 4 pieces of fabric and zipper.
2. To add the zipper, place painted fabric right side up on your work surface.
Line up zipper along the top edge of the fabric, face down.
Place liner fabric face down along the top edge of the zipper.
Sew along the zipper.
Repeat with other side of zipper with the two remaining pieces of fabric.
3. Once all of the fabric has been sewn to the zipper, sew a ¼" seam along the edge of the outer fabric (the pieces should be right sides facing one another)
Unzip the zipper a few inches then also sew a ¼" seam along the edge of the outer fabric, but leave a 2" gap of unsewn fabric.
4. From the unsewn hole in the liner fabric, pull the entire pouch right side out.
Now hand stitch closed the hole in the liner fabric.

Iron out any wrinkles that may have popped up from turning the pouch right side out.
Be careful not to apply the iron directly to the paint.

Now it's ready to be filled up with school supplies!
This will be so handy during the school year.

There is no doubt who this pencil pouch belongs to!
This Notebook Paper Pencil Pouch would make fun personalized teacher gifts, too.

>> See where I party! <<
This post was originally shared September, 2015.


This is really cute and kids just love having their name in print! LOL! Nicely done 🙂
Such a cute pouch! I have an obsession with pencil and paper themed crafts! This is a wonderful back to school creation. I can't believe my kids have their first day back to school next week! Anyhoo... I've selected this pouch as one of my features at this week's Snickerdoodle Create Bake Make Link Party!
This is really cute! Thanks for sharing at the Weekend Blog Hop at My Flagstaff Home! --Jennifer
What a cute idea. I'll be putting backpacks together with the grandchildren this month. This will be a fun project. I'll be Pinning your post. Thanks for sharing on Sunday's Best.
I wasn't aware they had special bottles for writing with paint. Given my new obsession with hand lettering, this opens up a lot of new possibilities!
Love it to bits!!!!
This is so wonderful!! I want one!!! I love the dimensional paint writing also. Very nice. Your friend, Linda @Crafts a la mode
Adorable. Such a great idea to use fabric paint.
Super amazing gift for teacher. Thank you so much for sharing it 🙂
I'm a teacher so I especially love this one! So cute!
This is too cute! love it