
Shaped Peppermint Bark
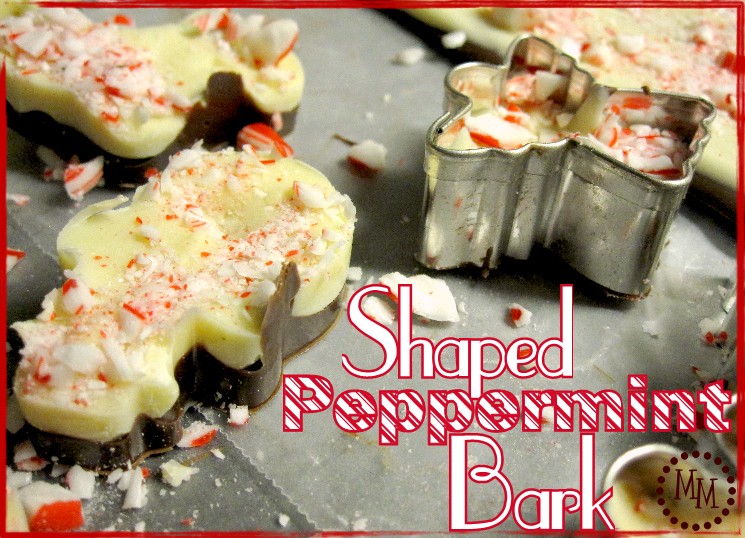
I've been wanting to try my hand at peppermint bark for a while so I decided to give it a go this year as part of the Christmas treats I send to daycare to thank all of the teachers for taking such great care of my boys.
And because I like to make things hard try different things, I decided to make some of my bark inside mini Christmas cookie cutters I had purchased on sale at Hobby Lobby.
And thus Shaped Peppermint Bark was born!

I covered a large baking sheet (that isn't warped and lays perfectly flat) with wax paper then spread out my mini cookie cutters on one side of the sheet.
I melted one 12 oz bag of semi-sweet chocolate morsels in the microwave (cook for 1 minute, stir, cook for 30 more seconds). Using a spoon and toothpick, I drizzled the chocolate into the cookie cutters and made sure to push it into all the nooks and crannies. This is were its really important to have a nice flat baking sheet! You don't want chocolate oozing out from under your cookie cutters.
I aimed to have my layer of chocolate ~¼ inch thick.
Spread the remaining chocolate in a thin layer on the other half of the baking sheet.
I was able to do all of this before the chocolate started to harden, but if it starts to get too thick, nuke it in the microwave for another 30 seconds.
Place the baking sheet in the refrigerator for ~20-30 minutes to allow the chocolate to harden.
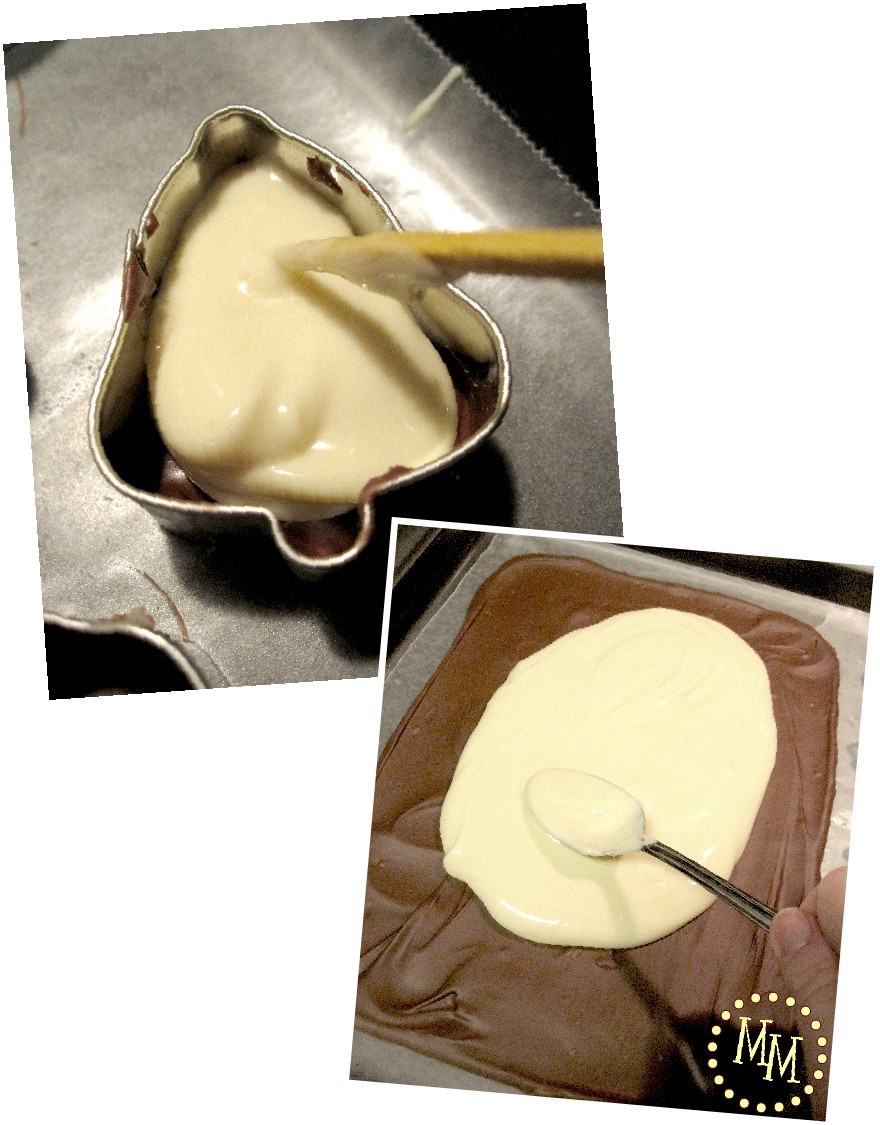
Melt a 12 oz bag of white chocolate morsels following the same steps you did with the semi-sweets. Again, use a spoon and toothpick to spread the chocolate into the cookie cutters. And again, aim for ~¼ inch thickness of chocolate.
Spread the leftover white chocolate on top of the layer of semi-sweets off to the side of the dish.

While your semi-sweet chocolate is hardening in the fridge, chop up some candy canes. I put mine in a Ziploc bag and took a hammer to them.
Before putting your white chocolate into the refrigerator to harden, sprinkle it with the crushed candy canes.
Now you can put the baking sheet back into the fridge!

My husband posed the question of how to get the chocolate out of the cookie cutters...
With sheer willpower.
I actually had thought of this ahead of time, but wasn't sure exactly what to do.
Notice I did not tell you to grease the cookie cutters...
I didn't want that to effect the taste of the chocolate.
Here's what I did:
After the white chocolate had hardened (~20-30 minutes in the refrigerator), I pulled it out and set it on the kitchen counter for 20 minutes. After that, the chocolate had softened just enough for me to push it through the bottom of the cookie cutters. Perfecto!
Break the large piece of chocolate bark into smaller pieces.
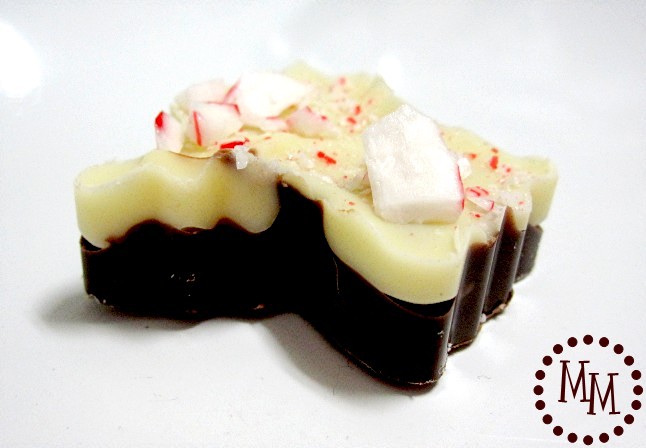
The chocolate did great at keeping the shape of the cookie cutters!
And I love the layers of the different chocolates.
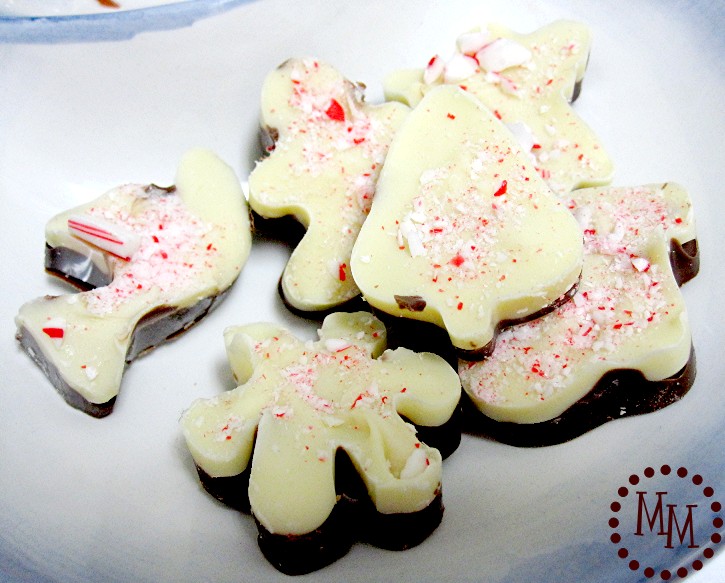
They are almost too cute to eat!
Almost!
I'll be back soon to share the rest of the treats I made our teacher's this year. 🙂
I link to these great parties!


oooh yah! just pinned and will try soon (:
Now why havent I thought of this! Makes a yummy treat even better!! ...and I loooove peppermint bark. I would love for you to share this at my special holiday linky party going on right now! http://everything-underthemoon.blogspot.com/2011/12/12-days-of-christmas-holiday-linky.html
Happy Holidays to you and yours!!
~Nikki ...xoxo
These look so fun! And yummy! My kids will love them!
The shaped bark is fabulous! Who would have thought - besides you - to make it in to shapes! You are so creative and put so much thought into everything you do!
Oh wow Michele!! Those are so super cute!! I love peppermint bark - I would never have thought of putting it in cookie cutters! What a great idea!
ahh these look so good!!!
xo dana
thewonderforest.com
Super cute! I was wondering the same thing "how the heck did she get those lovely little treats out of the cookie cutters?" 🙂 Thanks for the tips and tricks! Super cute! Lucky teachers 😉
Oh Michele I love this! I saw a shaped peppermint bark kit at JoAnn's and the idea has intrigued me ever since and your tutorial is fantastic. I am definitely doing shapes next year!!