
Superhero Backlit Canvas Art

If your home is anything like mine, then projects get tossed around like dirty laundry.
Case in point:
My son's superhero room has been in process for months.
My living room makeover is mostly in my head, but paint has been purchased. We do have new flooring!
My jewelry is all in a pile because I keep "meaning" to get more organized.
The list really goes on and on.
Projects get bounced around, but things are slowly getting accomplished around here.
Right now I'm itching to finish up my oldest son's room, and that means getting some superhero art on his wall!
My backlit canvas art is my 2nd most popular post ever and is still totally rocking my house. Its an inexpensive way to add fun, unique artwork to a space.
I also though it would make for fun art for my little guy's room. And since we're on the superheroes theme, that's where we went with this artwork!

The canvas art I'm making is 10"x10". The canvas is 10x10 so I cut my cardstock to 10x10.
I also created some superhero logo templates that would fit the 10x10 paper.
1. After printing and cutting the superhero logo template, trace it face down on the back of your cardstock.
2. Use a swivel X-acto knife to cut out the image, being sure not to create continuous cuts. Leave short ½" spaces along the image that are not cut because you want the logo to stay attached to the paper.
(see my other backlit canvas art project for more info)
3. Flip the cardstock over so it is face up. Gently pull the paper up where it is cut and fold slightly so that it stays but try not to crease the paper. This gives the paper a 3-D look which acts as double-duty:
During the day, you can still see the subtle image of the superhero logo.
During the night, when the canvas is lit, these areas allow the light to shine through and outline the logo.

For these projects I added an extra step from my previous backlit canvas art. I added some tissue paper to the back of the cardstock to give the back-lighting a different color (rather than purchasing different-colored lights).
4. Cut the tissue paper into 9.5x9.5 sheets. How many sheets you use is up to you for the coloring you want, but I used 4 sheets and stapled the corners together.
5. Use a dry adhesive, such as Glue Dots, to adhere the tissue paper to the back of the cardstock.
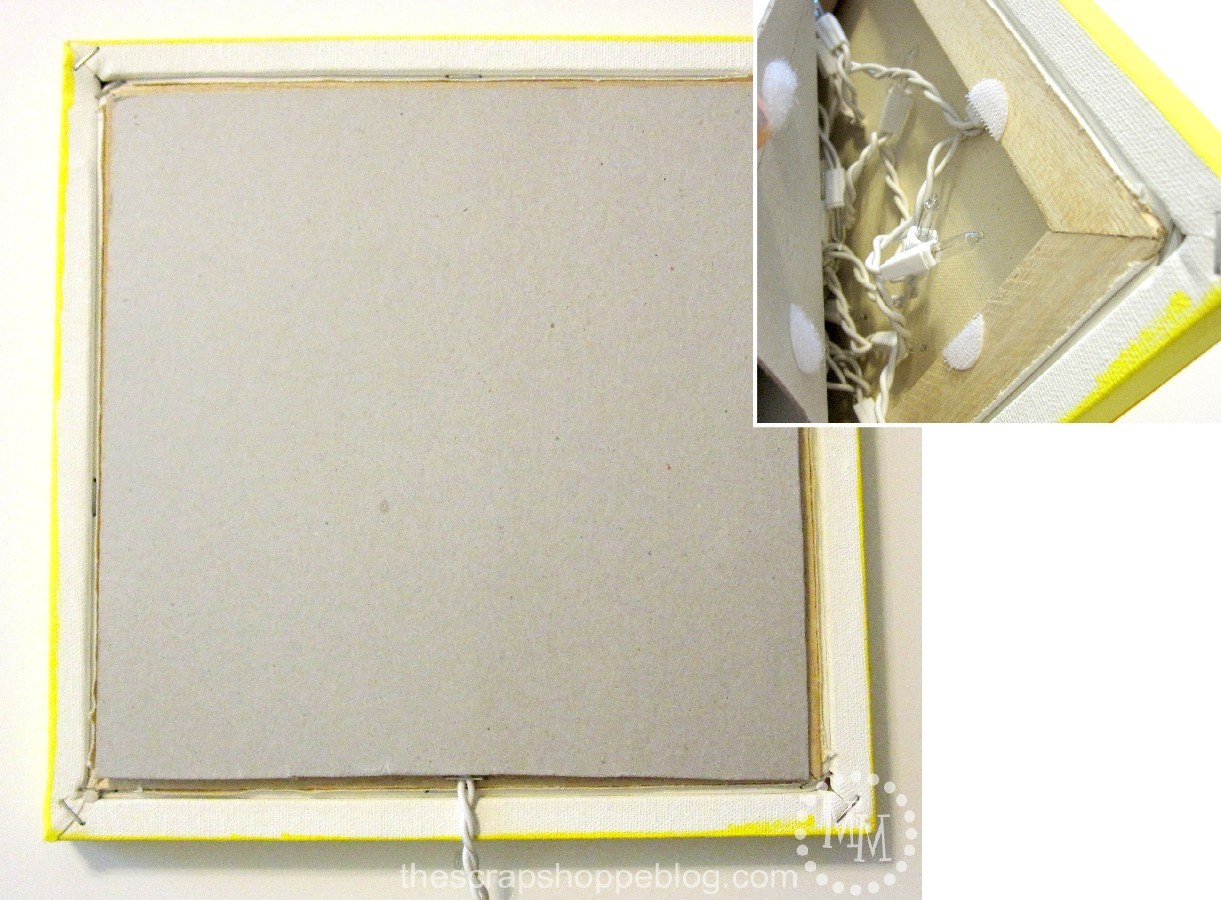
6. Use a very tacky adhesive, wet or dry, to adhere the cardstock to the canvas. I used Super Sticky Tape (that's really what its called!). Its amazingly sticky!
7. Gently press the cardstock onto the canvas. I started by stretching the bottom two corners and pressing down, then finished with the top two corners by stretching the papers again then pressing down. This will ensure the cardstock is flush with the canvas.

See the hint of red? So fun!
Prior to mounting the cardstock to the canvas I painted the edges of the canvas to match the color of the cardstock I would be using. It gives a more seamless look so you don't notice as much that the front of the canvas is paper.
I have more detailed directions here for adding the mini Christmas lights to the back of the canvas.

What do you think? I think they turned out pretty awesome!!
Its not super "in your face" superhero decor. Just something subtle and fun.
These 4 guys are my little guy's favorite heroes.

Next step: Hang them on the wall! I'm still trying to figure out the perfect place for them,
but I'm thinking they will make an excellent faux headboard!
Linking up to Flamingo Toes, Skip to My Lou, Today's Creative Blog, The Shabby Creek Cottage, Tidymom, 504 Main, Serenity Now, Whipperberry, My Repurposed Life, 30 Days, Tatertots & Jello, Positively Splendid, and other great parties found on my party page.


Very cool! Thanks for sharing at To Grandma's House We Go DIY, Crafts, Recipes and more Link Party. I pinned this! Hope to have you join us again next week.
Hi, So while looking online for an idea for my grandsons friends birthday gift I saw this. I tried to do the captain America one using my cricut .. ya didn't go so well. could you message me how to make these. I looked to see if you had a video on them but sadly there is none. and I think he would have gotten a kick out of it. Thanks for sharing .
Hey i was wondering if the tissue paper makes the light shine through as that color? I cant really really in the picture
Hi Lainey! Yes, the tissue paper does help color the lighting. Not as well as colored lights, but the next best thing. 🙂
Pinned. Linda @Crafts a la mode
These are so cool! What a great, fun idea. Thanks for linking up with us at the #HomeMattersParty too!
These are amazing, what a fun idea. My son is a bit of a Batman and Marvel nut so he would love this.
How cool! We are a superhero-loving family, too...of course, we can't blame it on kids, though because it's just the hubby and me. 😉 Happy-almost-September and thank you for swinging by Snickerdoodle Sunday! Hope to see you again this weekend.
Sarah (Sadie Seasongoods)
My 3 sons and my husband are all nuts for superheroes, this would go perfectly in our family room/movie room! Thanks for sharing with Small Victories Sunday Linkup. Pinning to our linkup board and hope you found some great posts to visit this week!
My son would love this... thanks for the share! (ps found you via The Chicken Chick!)
Oh that's a really neat concept! And such a fun thing to add to a child's room!
I am co-hosting the #HomeMattersParty link party this month and would love to have you stop by for a visit. The door is open through Monday night. http://alaynascreations.co/2015/08/21/home-matters-liny-party-51/
What a great kids room idea! Easy too!
Wow! That is totally cool! Thanks for the tutorial!
very creative Michele! You're such a great mom!
love the backlit canvas art!
gail
Those are so so cool, and as a head board I think they will be amazing! I can't wait to do a big boy room for my little one.
Adorable idea! I'd love if you'd link up to The DIY'ers: http://homecomingmn.blogspot.com/2013/08/the-diyers-and-our-country-weekend.html
Michele these are SUPER projects J. Great idea and beautiful tutorial!
Those are awesome!
I SO need to make these for my son's room! He would LOVE it!
These are awesome Michele!! I love the superhero logos and I think it was genius to add the different color tissue paper to the back so it would shine through! So fun!!
These are awesome!!! I just painted a canvas with a superhero comic feel for a friend and it made me want to redo my boys' room in superheros. If I go through with it they will need these!
Very Cool! I may need to make one now for my "grown" daughter!