

I found that long, tube socks or knee-high type socks worked best.
I also used a few fold down socks.
If you are amazing at laundry and don’t loose socks- you’re my hero! But you can buy them at most dollar stores.
1. Fold your sock so that the heel is facing up.
2. Snip off a 1 inch piece from the toe of the sock.
3. Cut the open end of the sock into two strips.
Stop cutting 1 inch before you reach the heel.
4. Round the ends to shape your bunny ears.
(Ignore the water spots on my picture, my 3yr old tried to bring me a drink!)
1. Tuck the two cut strips up and through the sock body, pulling them out through the hole you cut in the toe. Pull them up until the bottom edge is just below the heel.
2. Add a little bit of stuffing into the heel section of the sock. Using a small piece of ribbon, tie off the stuffed heel to form the bunny’s tail.
3. Add a few handfuls of beans to the sock through the hole in the toe section of the sock.
Be sure to put some in front and behind the ears so it will sit up straight!
(I added enough beans to fill the bottom 1/3 of the sock.)
4. Stuff the remainder of the sock with polyfill, again being sure to put some in front and in back of the ears.
Add a dab of hot glue to the hole and pinch it shut.
Tie a cute bow around the ears and your bunny is built!
Now we need to make it cute…

1. Add the cheeks with a bit of powdered blush.
2. Add in all the painted details next-
dot the eyes, drawn on the mouth,
dot white eye and cheek highlights.
3. Glue the whiskers into place.
*I used craft wire but thread, yarn, or embroidery floss would work!
4. Cut a small triangle nose from a scrap piece of fabric and glue into place.
5. Add any additional embellishments you wish.
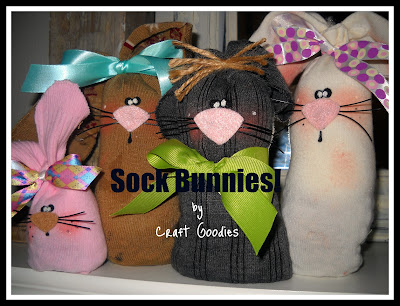
I made one by sewing on the face details with a double strand of black thread and used seed beads for the eyes. (The tall gal in back).
So there you go!
Your own little sock bunny to love and adore. My girls have carried these around like babies-so funny! And hey, at the rate we loose socks around here, these babies are going to multiple like…well, RABBITS!
Thanks again, Michele for letting me stop by and play.
(Enjoy every moment you can with your little one!)
And please jump on over and visit me anytime!
The more the merrier! Happy Crafting…


Rebekah★All Thingz Related★
Wednesday 27th of April 2011
I love those bunnies!!!
Alison@Oopsey Daisy
Saturday 23rd of April 2011
WOW! Those sock bunnies are just plain adorable!! Love them!
Stef
Friday 22nd of April 2011
Another awesome project Wendy! Thanks for all the fun ideas you share ;)Stefitsallinmyheadstefsblog.blogspot.com