
Pottery Barn Knock-Off Pillows

I have a fun pillow makeover to share with you today!
Back in the spring I found the most amazing ginormous pillow at Rugged Wearhouse for only $5. It was a blank canvas just waiting to be transformed. I scoured Pottery Barn for inspiration pillows and stumbled across two that would look great in my living room: the poppy pillow and the lavendar monogram pillow.

Both of these pillows are embroidered and, if you've ever visited my blog, you know that I DO NOT sew. But that's okay. I had other plans to get these looks!

I used colors that would match my living room (red, olive, and gold) for each side of the pillow.
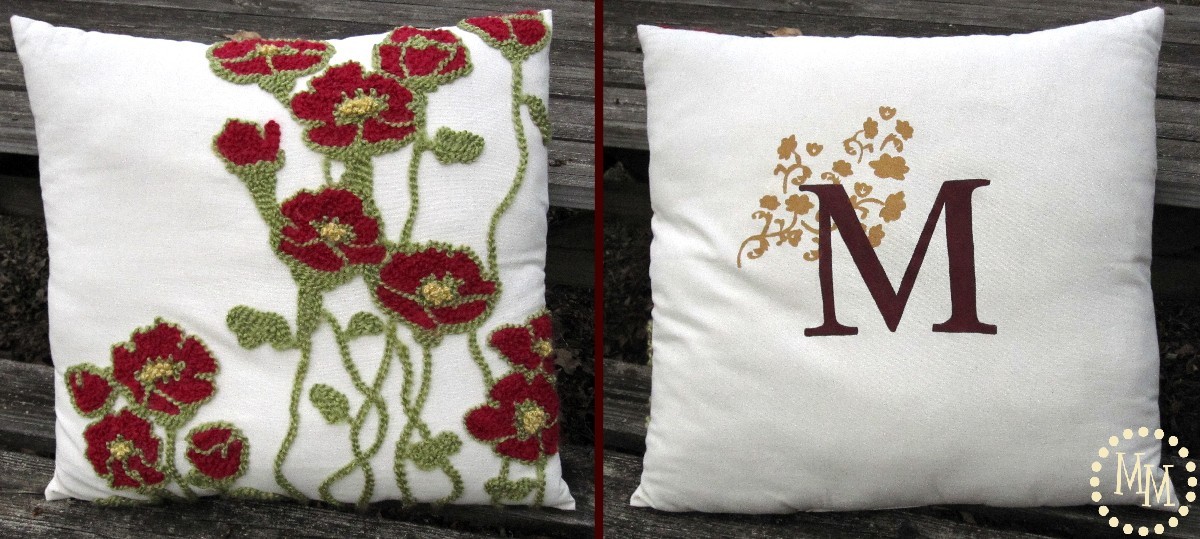
(Yes, in case you didn't realize, I put both of these designs on the same pillow. I love reversible projects!)

Let's start off with the pillow itself. Like I said, its ginormous! 2 ft x 2 ft. Seriously!

Next up, let's talk about the poppy side of the pillow.
I remember (way back in the day) in high school doing a very fun project in my Spanish class involving Huichol yarn art. Its a technique of creating a design using yarn and moving the yarn in such a fashion as to give your artwork movement. I loved it! And thought it would be perfect for this project.
I scoured several stores looking for the "right" yarn. I tried to find some that looked crocheted to match the Pottery Barn pillow better, but ended up finding this fun ribbed yarn in all of the right colors.

I printed off a full 8.5" x 11" image of the pillow to use as a guide, found a starting point on my pillow, and proceeded to draw out my first poppy.
I drew one poppy at a time, filling each in with yarn befor moving on to the next because adding the yarn actually made the image slightly larger than the original drawing. I didn't want to mess up my spacing and wind up overlapping my images!
Also, I only drew the outline of the red part of the poppy because I knew it would eventually be completely covered with yarn in the end and the marker would never be seen.
I adhered all of my yarn with my favorite fabric adhesive, Fabri-Tac from Beacon.
(This stuff is seriously amazing. Better than a glue gun!! I swear!)
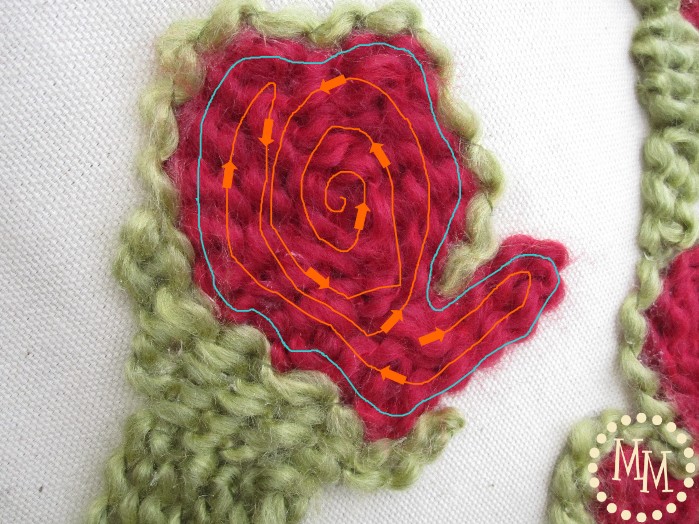
The turquoise line in the above photo represents the outline of the flower (where I drew it with the marker). I always did the outline of the flower first with the yarn then went back and filled it in the rest.
The orange line with arrows represents how I filled in my yarn. There was no specific technique. I just wanted to create movement by keeping the yarn in what would look like a swirly manner.
After finishing a flower with the red yarn, I went back and outlined it with the green yarn. I saved the stems and leaves until the end so I would not overlap them with any of the flowers I had yet to create.

I stopped periodically to compare my version to the Pottery Barn printout and check out my progress.
I was really starting to see it come together!

After finishing with the red and green yarn, I went back to fill in the centers of the fabric with the gold yarn. I tied a knot in the yarn then, to thicken it, tied two more knots on top of the original knot. I trimmed off the knots and layered them in the centers of some of the flowers.

I love the texture the yarn adds to the pillow.

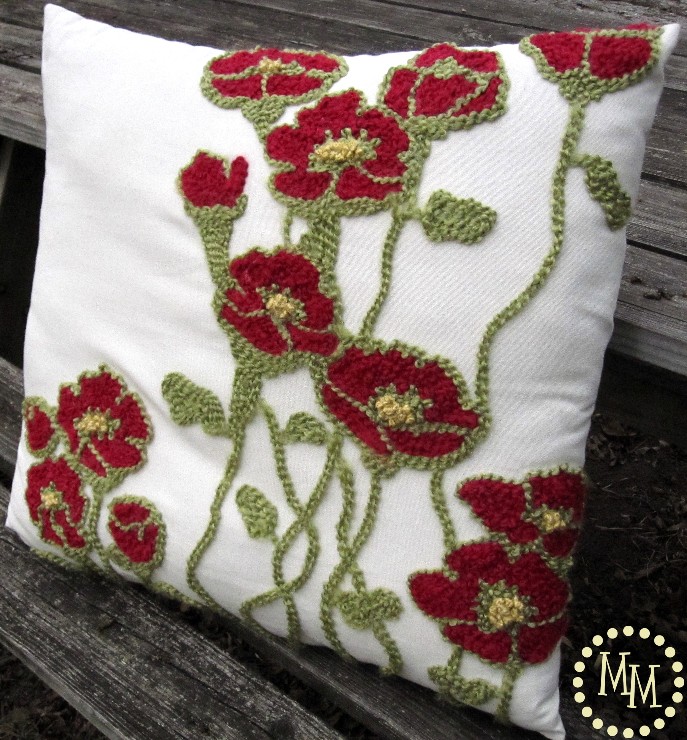
I ended up leaving off the little flowers that Pottery Barn scattered around the pillow.
I really like the extra white space and the asymmetric look.

For the monogram side of the pillow, I took some liberties from the Pottery Barn version and instead of using a lavendar plant, I used a poppy floral design to help tie it into the reverse side of the pillow.
I created the design on my computer then separated the images into two so I could cut them out using my Silhouette.


I cut my images out on freezer paper to iron on and use as a stencil. I ironed down the floral design first. The little detail images in the poppies were so tiny that I just left them off. I did, however, keep the detail images in the smaller flowers.
I still had all of my acrylic paint from my Custom Wall Art project from last year which is also in my living room so I already had on hand the paint colors I would need. I mixed the paint with some acrylic paint fabric medium and went to work.
Once the floral design was dry, I went back and ironed on the M freezer paper stencil and painted it also.
This side of the pillow literally only took a couple of hours to complete, including drying time. Whereas the poppy side of the pillow took a good 6 hours or so!


Can you see that I traced around the M with a fabric pen?
Since my pillow was prestuffed with no way of getting the stuffing out without ripping out threads and resewing, I just painted on a stuffed pillow. Probably not the greatest for freezer paper stenciling, but it worked okay. I just used the fabric pen to tidy up the edges of my monogram.

So let's do a tally!
Pottery Barn Poppy Pillow: $49
Pottery Barn Lavendar Pillow: $29
Total: $78
--------
Pillow: $5
Yarn: ~$4 each so $12
Glue: $5
Paint and Medium: $4
Freezer Paper: $5
Fabric Pen: $4
Total: $35
I had the paint, freezer paper, and fabric pen on hand already so really my total could be ~$22!
Not bad, especially considering it is completely customized to match my living room!
Note: I do not let my children near this pillow. Just in case, you know? 🙂


Gorgeous!!! 🙂
My friend also raves about that fabri-tac stuff.
That is extremely amazing. The poppy pillow is gorgeous. I am in awe. Thanks for sharing your technique!
Fantastic pillows! Especially love the poppy pillow!
Love love love the poppy pillow! It's fabulous!!
LOVE these. Too bad I can't even sew on a button:(
Michele these are STUNNING!! GREAT job!!
Amazing job! They are gorgeous!
{Rebekah}
Michele,
I featured your super awesome pillow on a special Crush of the Week post - here's the link: http://www.flamingotoes.com/2010/11/crush-of-the-week-25/
You did a great job!!
woa...they look just like the pottery barn ones...thats crazy. good job...
Oh how beautiful these turned out. I must be on the lookout fot those pillows, or anything similar. You just gave such a fabulous tutorial, I really think I can do it. I LOVE the poppies, just lovely. I host a weekly party too, and would be so stinkin happy if you shared these on there. For that matter, seems like most anything you decide to share will be awesome, but I really do love these. Thanks a TON, and hope to see you there. Bella 🙂
This is totally amazing! I am in love! Thanks for linking to the party so i could see it! I wanted to let you know that we are planning on featuring it on our blog 11/9 @ 7:00 AM. We hope that you get a bunch of new visitors. If there is any chance that you could post about being featured on Remodelaholic with a link back to your post on our site, we would really appreciate it.
http://www.remodelaholic.com
Lovely pillows. I love that you made it work in a medium you were comfortable with. I need to make something similar soon, if I can only score the pillows like that!
Your poppy pillow is fabulous. It has to be one of the best and most creative pillows ever. I like yours way better than PB. I am in awe.
Hey, Michele! I featured this pillow over at Crafts & Sutch today. Come take a peek when you can and grab a featured button! 🙂
Erin
So great! I love those pb pillows, in fact I have one! Oh how I wish I had the time...
Hi Michelle, Congratulations! Simply gorgeous! Thanks so much for linking to the Sunday Showcase Party! I greatly appreciate it! I'll be featuring this today - stop by and grab a feature button if you like. Hope you are enjoying your week! ~ Stephanie Lynn
Those are amazing...especially the poppy one!
Wow! Wow! WOW!!!
Great job!! I have been looking for embroidered fabric to knock it off myself... this is WAY better!!
Very Creative.
that is ab fab! I cant belive you tacked the yard on the pillow, i would have never known! what a great technique!! thanks for sharing
Absolutely beautiful!!!! I would never have known that you glued it. I am so going to make a pillow using this technique. Thank you for sharing, such an inspiration!
I love pottery barn pillows - but never can commit to spending the money. I am definitely going to try this for my living room!!
Question: I have 2 little kids (and a husband) who will undoubtedly abuse any pillows I put in the living room. Do you feel like the yarn is really secure - and can be tossed around without being ruined? Or are these strictly decorative, and shouldn't be man-handled:)?
Thanks!
lindsayronae@gmail.com
Love these - sharing on my FB page!! Fantastic tutorial!
Those are gorgeous! Esp the poppie side!!!
I totally guessed this was yours! I did NOT guess that it was reversible - genious!
I absolutely LOVE this. LOVE!!!!!!
Very ingenious! Never thought to wrap yarn that way!! Well done. Stop over to enter a giveaway!
Found your blog through links! Hey if you would ever like to be featured for either a project you have done or any recipes you have than please come one over to our site.Thanks for letting me visit
I love the poppy pillow! I would have never thought to do it that way!
WOW! I'm not a sewer either (not even close!) but I'm not sure I could pull this off. You did an amazing job!
If you get a chance, I'd love for you to stop by and post this on my Not "Baaad" Sundays linky. There is a weekly contest for Best in Show 🙂
Really really beautiful. DEFINITELY more beautiful than the original.
That is absolutely fabulous! You did such a great job! I'd say it looks better than the inspiration pillow. 🙂
Lauren
http://31diy.blogspot.com
Oh my gosh these are gorgeous!!
I just scrolled down and saw that you didn't get enough votes to go to round two. I'm shocked because to me, this was clearly the best project.
This is the project that I voted for, now I know who created it. I am amazed at your technique and really love what you've created. Good luck this week!
Simply fantastic! I love the colors 😀
Your pillows are amazing. I haven't tried too many pillow projects but this may get the ball rolling for me!
Speechless! I LOVE this more than words can say. I think that yarn poppy pillow is an awesome technique!
Your pillow is incredible! I love it! It's way better than the original!
Hi Michele! Featured this on Craft Gossip 🙂 Love it!
I love that flower pillow so... cute!
That is one gorgeous pillow! I love that technique that you used and that yarn has so much texture to it. It is all just so beautiful! I think it is better than the PB one 🙂
Wow wow wow!! I'm even more impressed now that I've seen it up close! I have 3 huge pillows in my room that have been sitting there all blank and boring. I've just been inspired. Seriously - both sides look so great! 🙂
I wondered how you did it with the yarn! I'm glad you gave us a close-up. Way impressive!
I like your poppy pillow more than the original. I never knew you could glue yarn on something that got use.
Kathy
WOW!!! My friend, my friend. I can't believe you used YARN on your pillow and that you used fabri-tac to glue it on!!! This is superduper impressive, and there endless possibilities to this technique!! I love your monogrammed pillow, too, I've always wanted one of those! But I am just struck by the flowers. Great texture, pattern, color, everything!
wow, that's a lot of stitching! love this!
I told you before and I am going to say it again, I think these are just incredible. I LOVE LOVE LOVE them!
Holy cow! These are amazing! I'd never thought of gluing on the yarn...what a great idea. I might make some cute Christmas pillows like this. Thanks for the idea!
Holy moly, Michele! I mean - WOWZA girl! The poppy technique has seriously KNOCKED my socks off!!
These are amazing. But here's my question: I made some of your fabulous silk/satin roses for my halloween wreath, and I ended up with glue everywhere all stuck to my fingers (then, of course the fabric stuck to my fingers). If I tried to glue yarn to a pillow, I'd have it glue'd all over. How do you keep the glue off your fingers, and the fabric from gluing, well, to you?
OMGosh, Michele! This is too stinkin' cool! I love the poppy one! The up close images are fantastic! I'm so making one...I already have the red yarn.