
Teenage Mutant Ninja Turtle Costumes
Your little ones will love these DIY Teenage Mutant Ninja Turtle costumes made from a simple sweatpants and sweatshirt!
This post contains affiliate links.

You guys, I am SO excited to show you the Halloween costumes for my boys this year!
They are both completely obsessed with Teenage Mutant Ninja Turtles (did you catch my 5 year old's TMNT birthday party last month?) so it was a no brainer what they dress up as.
And luckily they both like different turtles!
Normally I am a last minute type of gal getting these sorts of projects done.
This year my friend Amber, with Lotus Blossom Photography, was offering up mini photo shoots for children wearing their Halloween costumes.
I couldn't pass it up!!
Normally Amber only shoots weddings, so when she offers to do family or kid shoots I JUMP on it! She's awesome!
But the kicker?
The costumes had to be ready by October 5th!
Dude, I was so on that.
Ready for the tutorial for these Teenage Mutant Ninja Turtle Costumes?
Be warned! This post is very photo heavy.
DIY Teenage Mutant Ninja Turtle Costumes

My boys love to watch the old TMNT cartoons that we have on DVD, so these costumes reflect those turtles, not the new version on television now.
I like the old school turtles better.
They are more colorful, and more reminiscent of my childhood.
I remember my brother being obsessed with them when we were little!
These were pretty much a cinch to make, even for a novice seamstress such as myself!
If you have any sewing experience at all you will be able to knock these out in no time.
Little to no sewing experience?
It will take you a little longer but I promise, if I can do it you can, too!
DIY Teenage Mutant Ninja Turtle Costumes Supplies:
yellow flannel
bandanna
roasting pan
brown spray paint
brown ribbon
cardstock
VELCRO® Brand Sticky Back fasteners
needle & thread

DIY Teenage Mutant Ninja Turtle Costumes: Green Sweats
Unfortunately for me, green sweats in toddler sizes don't seem to exist.
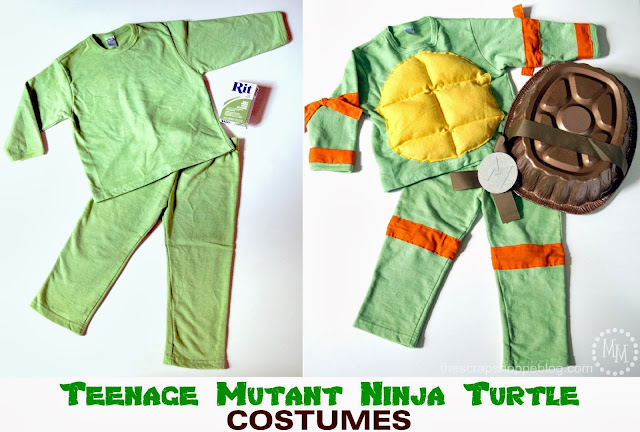
Sooooo... I purchased some white ones and dyed them green with Rit Dye!
It was my first time using Rit Dye, but I loved it.
I used Kelly Green.
I should have left the sweats in the dye a bit longer as the color wasn't as green as I'd hoped for, but they still came out great!
Be sure to follow all directions on the box.

DIY Teenage Mutant Ninja Turtle Costumes: Shirt

Let's start off with that muscle shirt, shall we?
You can't have Teenage Mutant Ninja Turtle costumes without some muscles, and most of them seem to be on the chest!

You will need to make an oval out of the yellow flannel.
The size will be dependent on the size of your sweatshirt.
Measure the front of the sweatshirt to determine the size of the oval.
To cut the oval, fold the flannel in half lengthwise, draw the corners of the oval on the material with a disappearing ink pen, then cut the material to create the oval.

Note: You can hem the edges of the flannel at this point, but I chose not to since this is a costume and not something that will be worn under close scrutiny. 😉
Center the oval on the front of the sweatshirt and pin it in place.
Stitch three lines on the flannel: one up the center, and two horizontally across the length of the material.
This will create 6 "pockets" in the flannel and create the look of the turtle's chest.

Stuff the "pockets" with polyfill.
Not too much, just enough to puff up the flannel.
Pin down the pockets and stitch around the oval.
Bam! Chest muscles for our turtles!
Next up, let's look at the arm and leg bands.
I stitched these on so I wouldn't have to manually tie them on every time the boys want to wear the costumes.
Because, let's face it, these are going to be worn a TON for play, not just one day for Halloween!

DIY Teenage Mutant Ninja Turtle Costumes: Pants
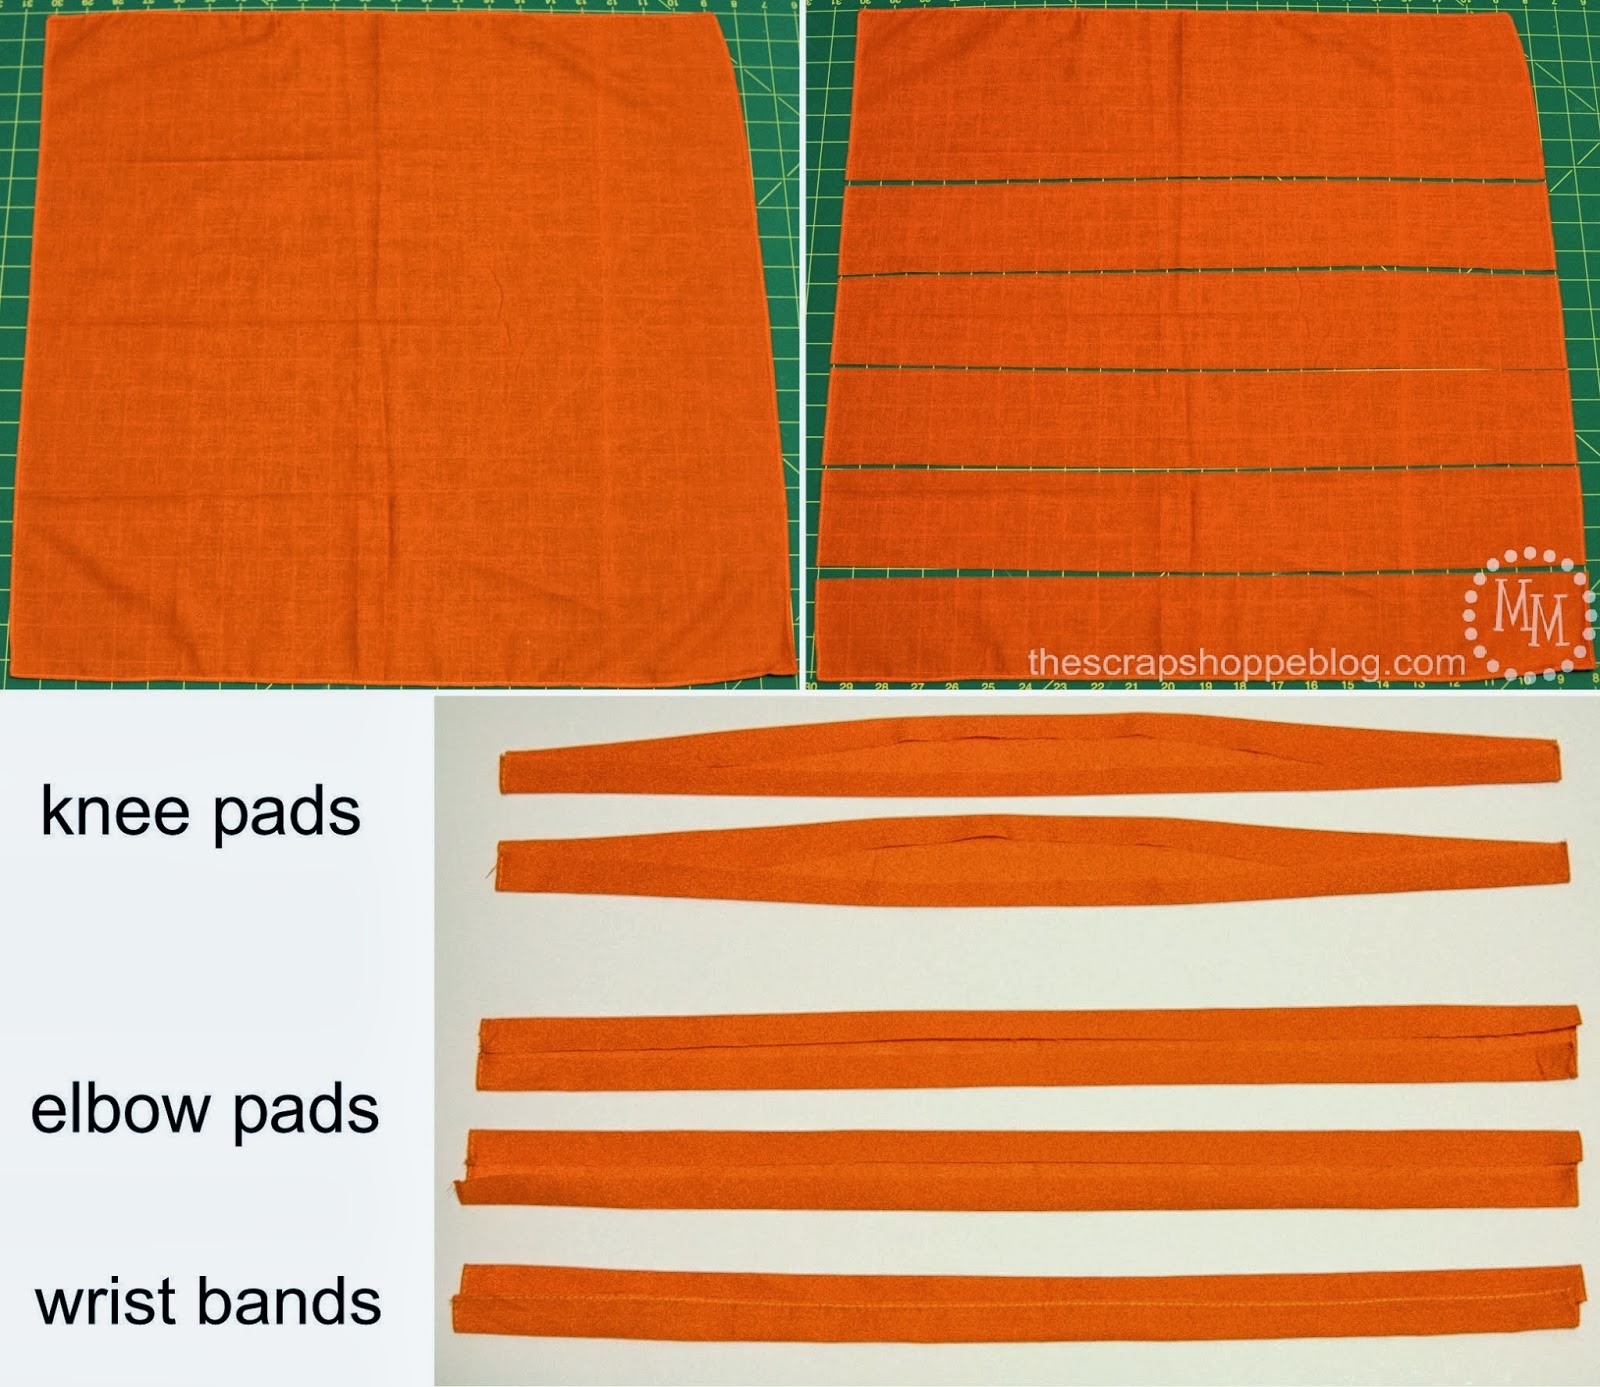
I was able to use 1 bandanna to create ALL of the arm and leg bands for one turtle.
There is plenty left over to make a mask if you need to!
Cut 5 3-inch strips from the bandanna.
Fold over the edges to make faux hems.
Iron them down so they stay in place.
For the knee pads, make the center of the strip slightly wider than the ends.

Knee pads: Pin the bandanna strip to the sweatpants approximately where the knee would be when worn.
Sew the bandanna to the sweats, leaving a 2 inch gap in the back that is not sewn down.
Tie the excess material into a knot.
Elbow pads: Attach these bandanna strips exactly as you did the knee pads in the approximate area that your child's elbows will be in the shirt.
Wrist bands: You will be able to use 1 strip of the bandanna to make both of the wrist bands.
Sew them on just above the hemline on the wrists of the sweatshirt.
I only stitched once around the base of the hemline.
DIY Teenage Mutant Ninja Turtle Costumes: Turtle Shells

Finally, you cannot be a turtle, much less a Ninja Turtle, without a turtle shell!
Lucky for me, I already had one done because I had used it as a prop for the TMNT birthday party.
I found a 2nd smaller roasting pan for my little Michelangelo to use.
As I stated in the party post, I first painted the pans with green acrylic paint followed by brown spray paint.
The application of the acrylic paint allows the better adhesion of the spray paint.
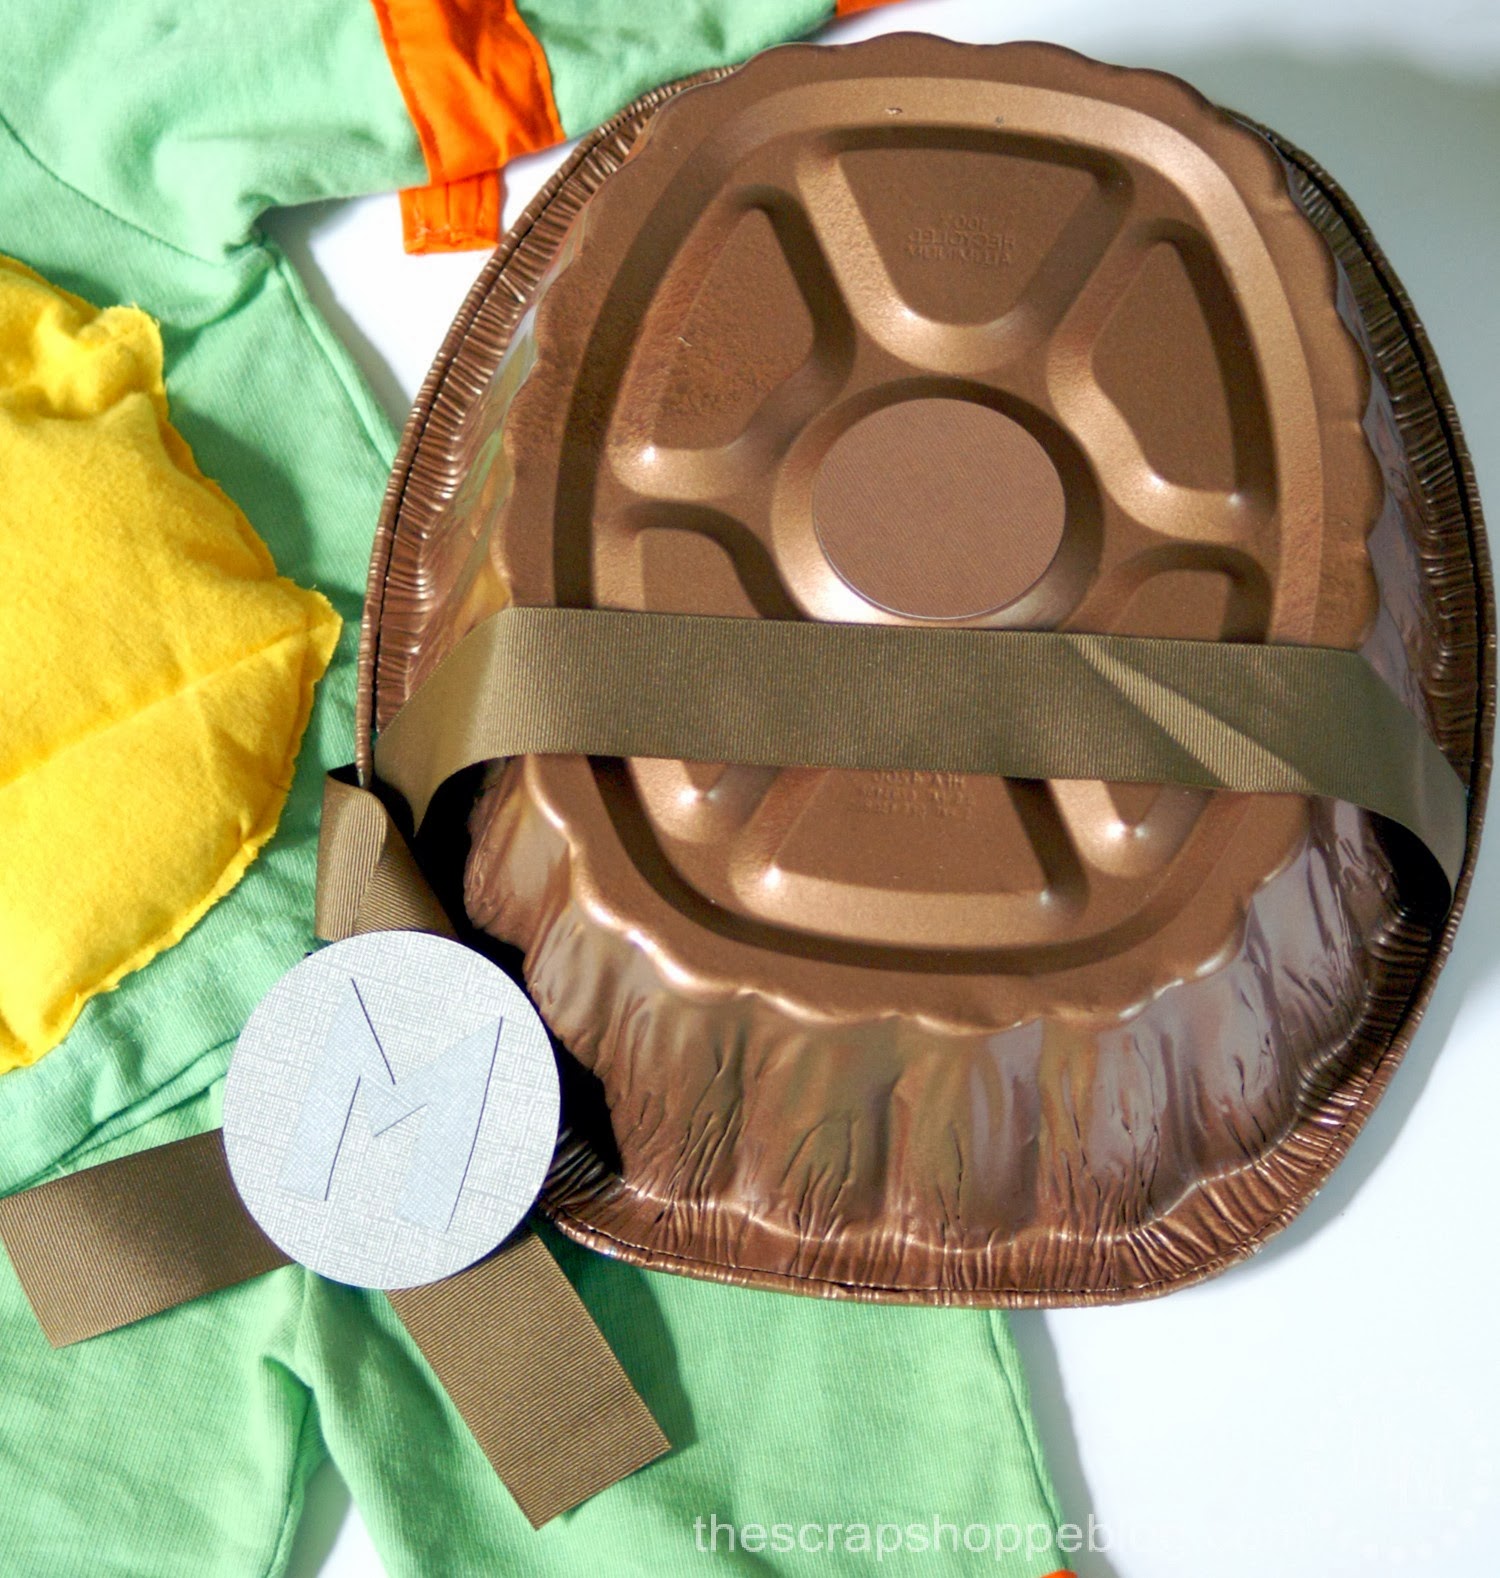
Now we need to make a belt.
I chose a wide brown ribbon to use.
It's not flashy and seemed turtle-ish...
Using an X-Acto knife, I cut slits on either side of the shell about where a belt would go.
I made the slit just inside the rim and the same width as the ribbon.
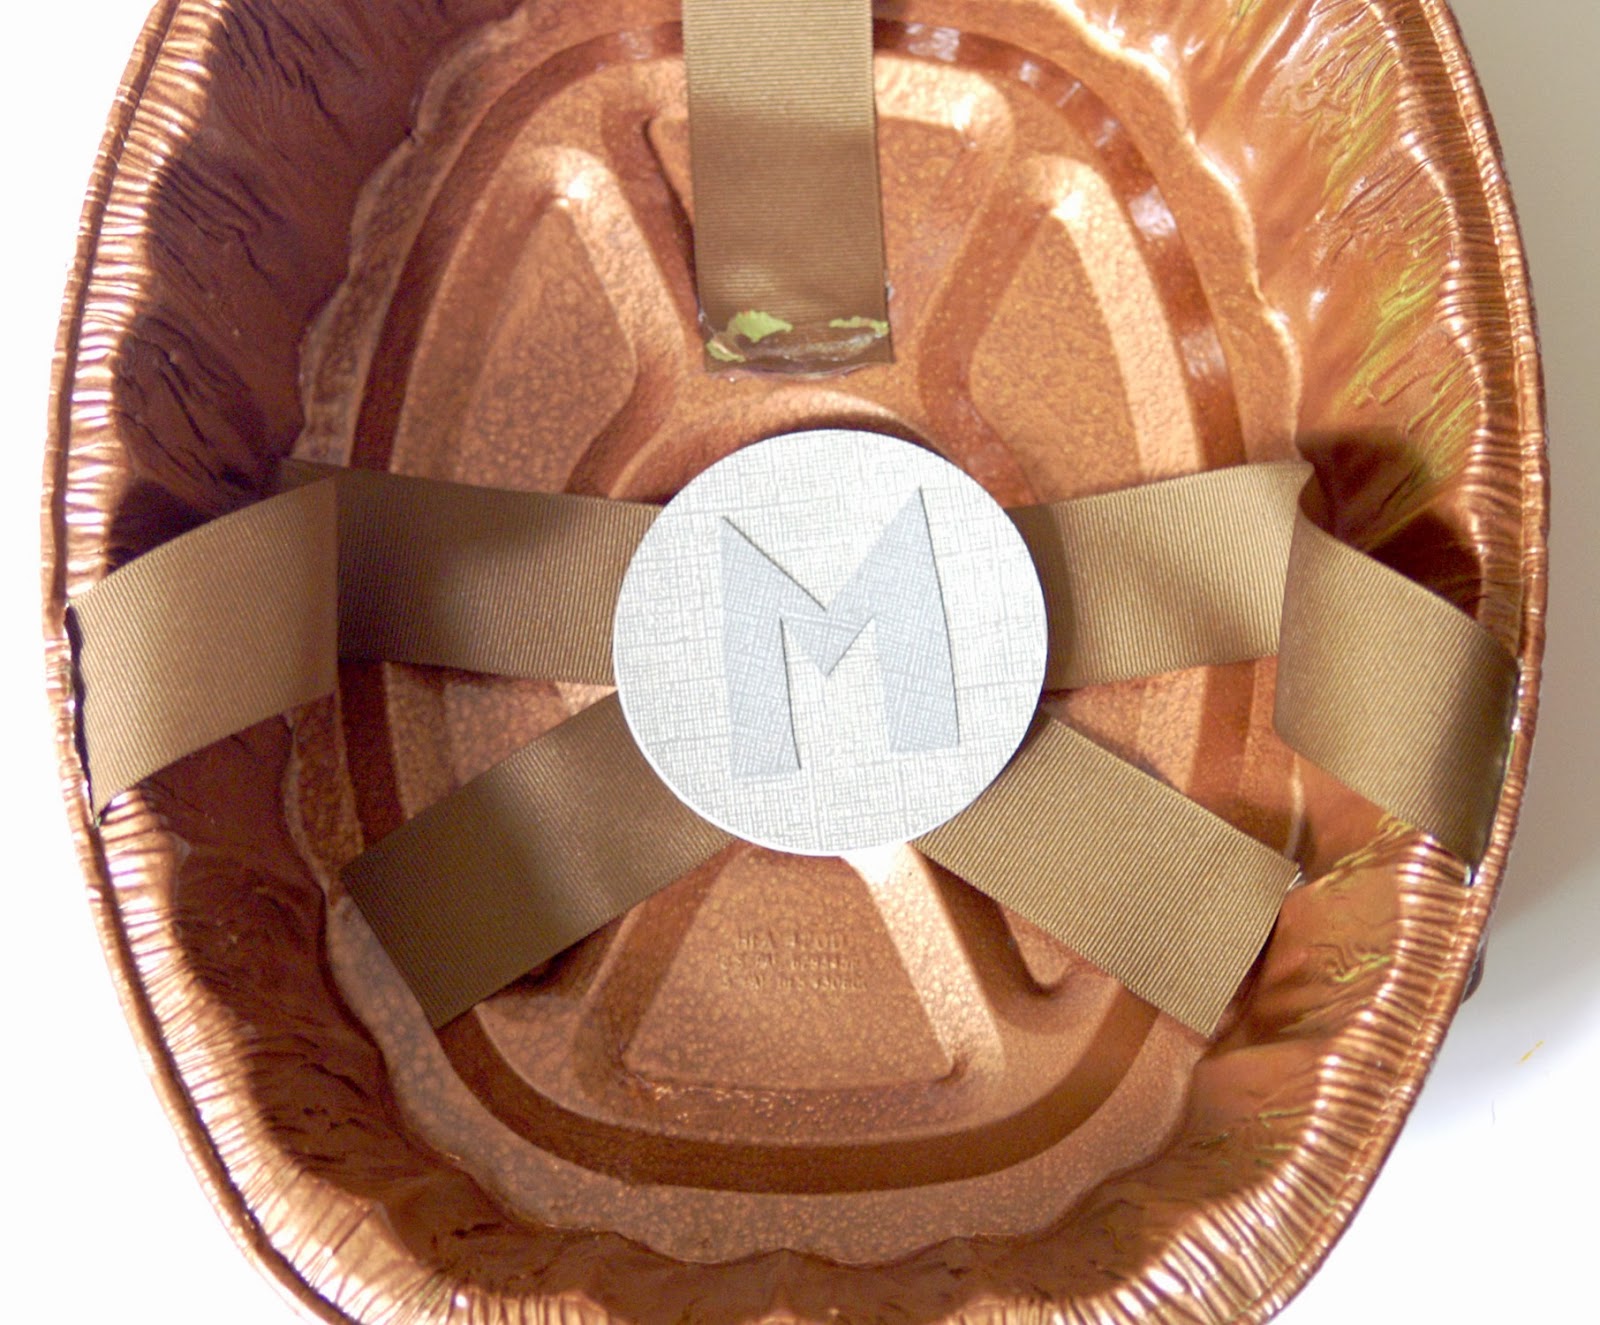
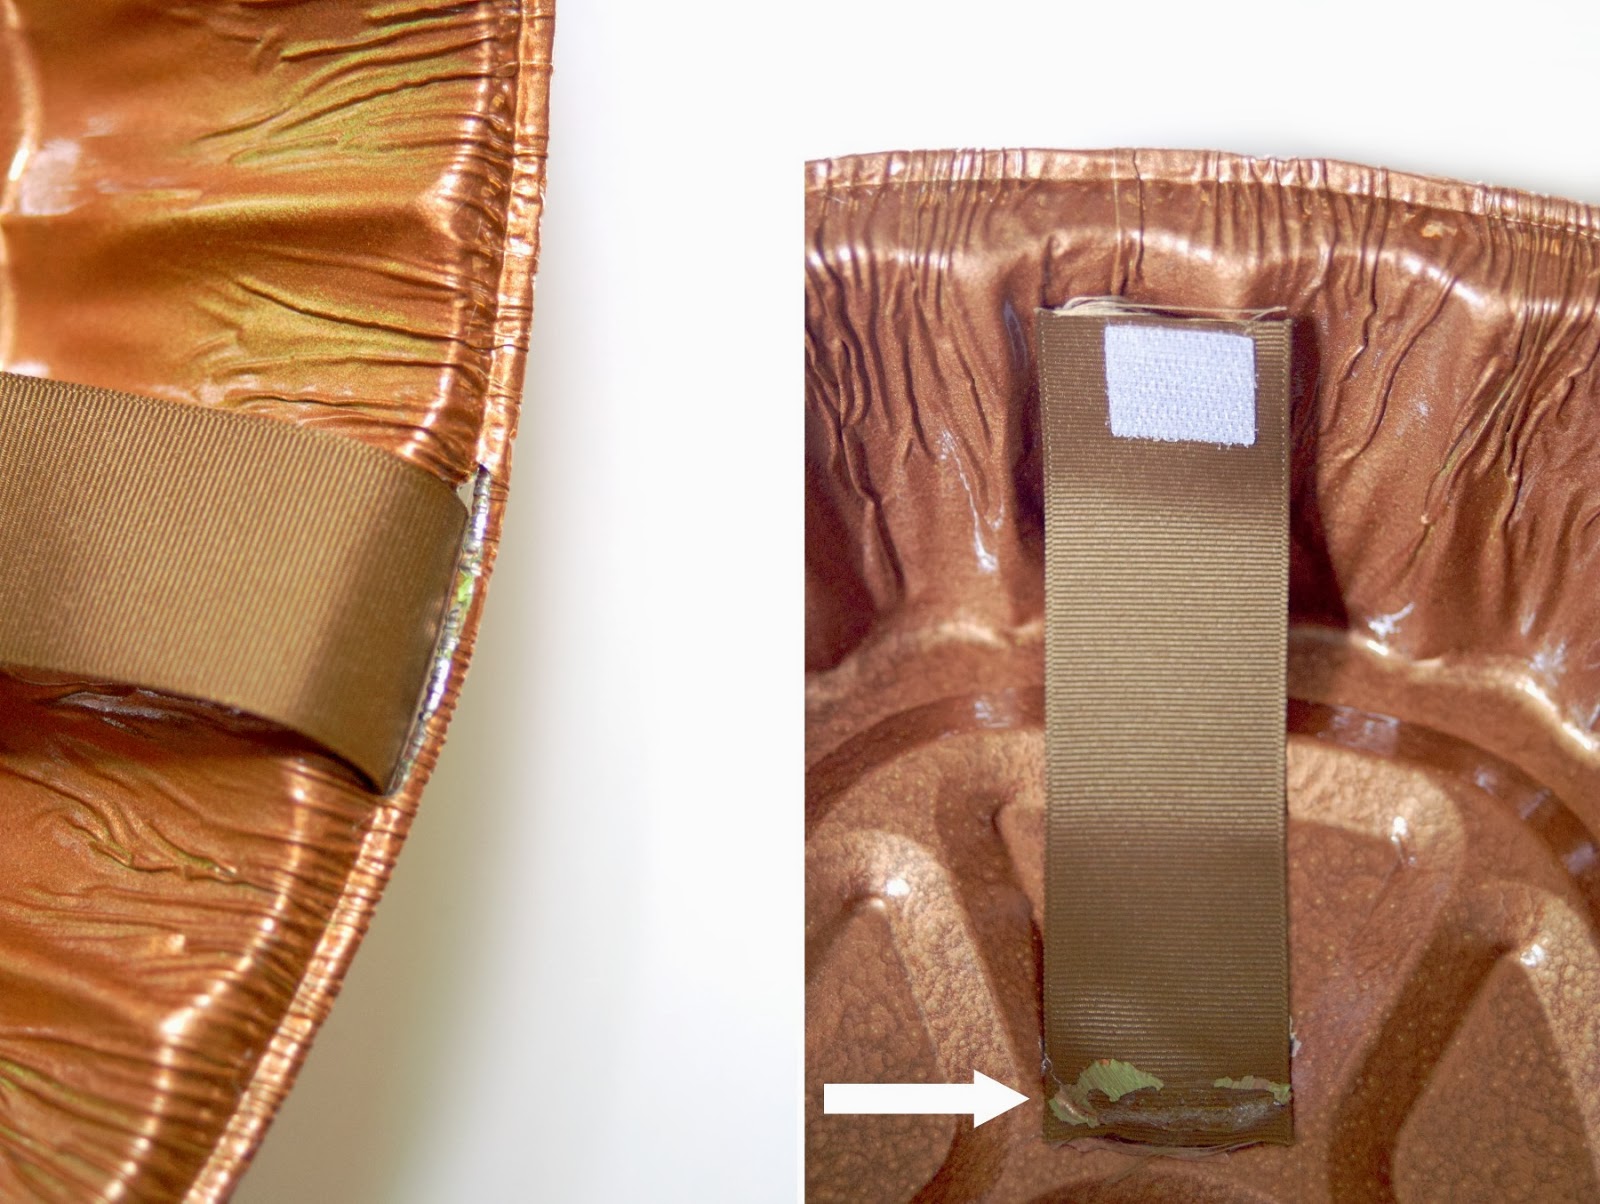
Run the ribbon through the slits and around the outside of the roasting pan.
I also cut ~ 4 inches of ribbon and glued it near the top-inside of the roasting pan with hot glue.
I added a VELCRO® Brand strip to the top of the ribbon.
The matching VELCRO® Brand strip goes on the back of the sweatshirt.
This will keep the turtle shell from drooping while on.
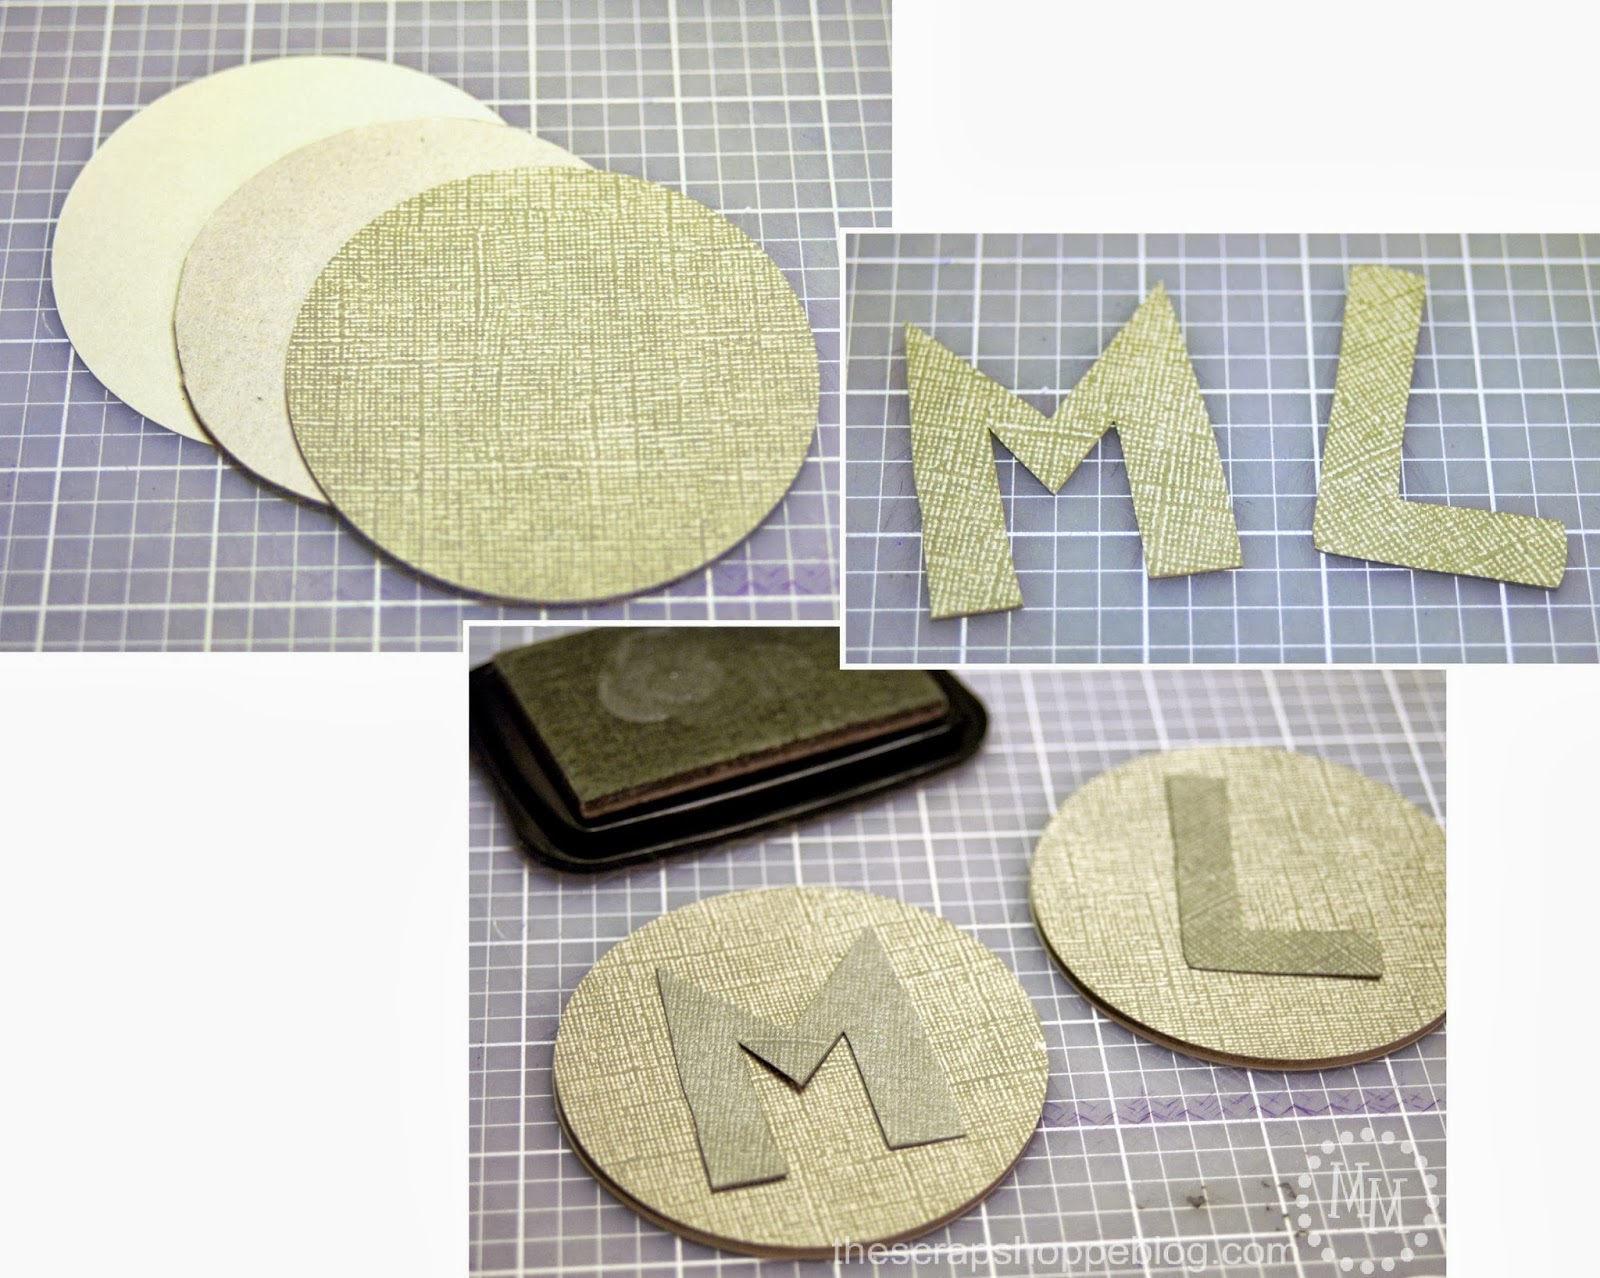
Time for the belt buckle!
I cut two pieces of gray cardstock in a 3 inch circle.
also cut a piece of scrap cardboard in a 3 inch circle.
Make a cardboard sandwich and glue the 3 pieces together.
While that dries, cut out the initial of the turtle you are creating.
I used the same gray cardstock as the belt buckle.
I inked the initial with gray ink to make it just a shade darker.
Glue it to the front of the belt buckle.
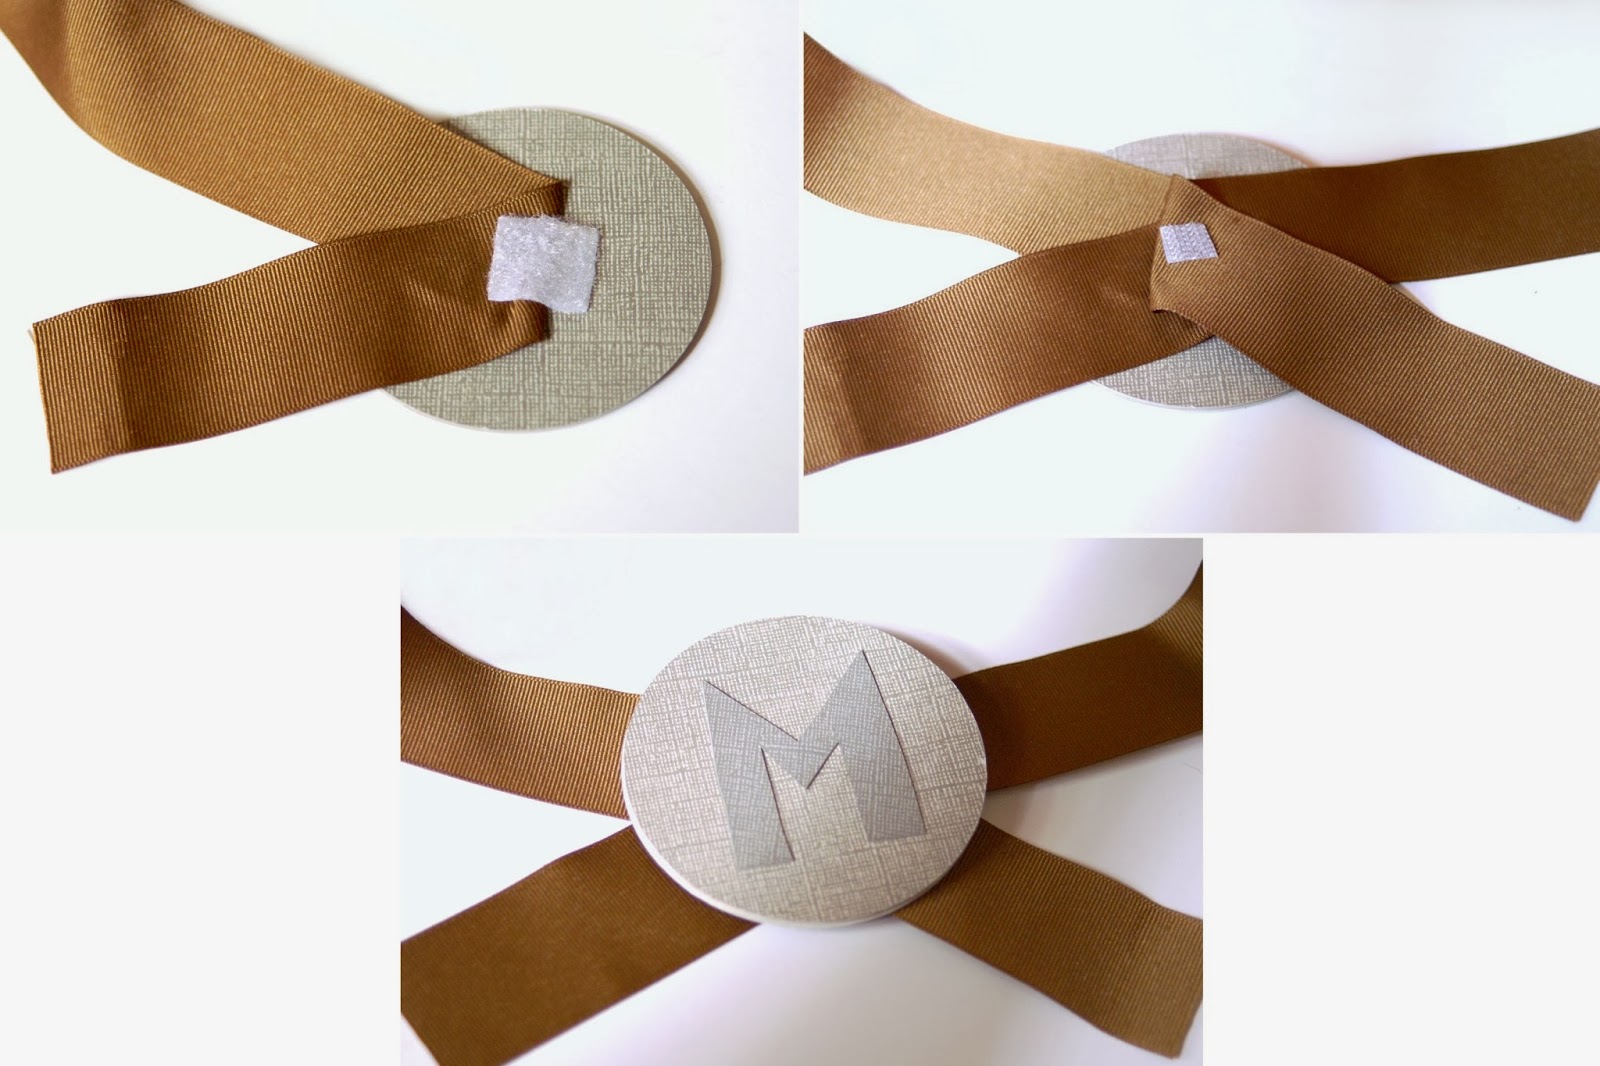
Time to attach the belt to the buckle!
Fold one end of the ribbon over on itself and glue it together then glue it to the back of the belt buckle.
Add a VELCRO® Brand strip on top of the ribbon you just glued down.
Take the other end of the belt, fold it over and glue it together.
Add the other side of the VELCRO® Brand strip to the ribbon so that it fits with the first VELCRO® Brand strip.
Add a small VELCRO® Brand strip to the back of all of the ribbon.
The matching VELCRO® Brand strip will go on your Ninja Turtles belly so that the belt won't droop while on.
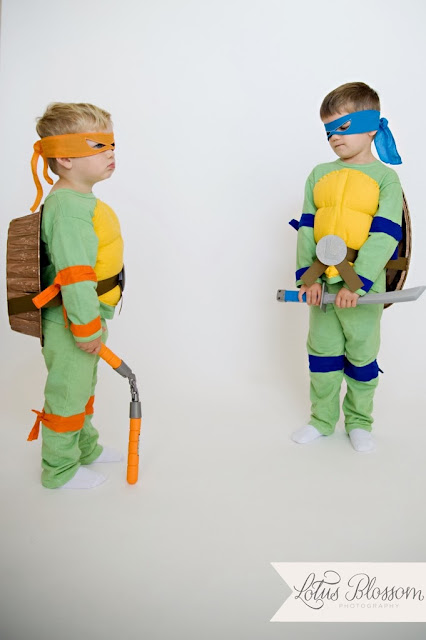
And now we have our turtle shell and belt!
It's nice and lightweight and won't weigh our little turtles down.
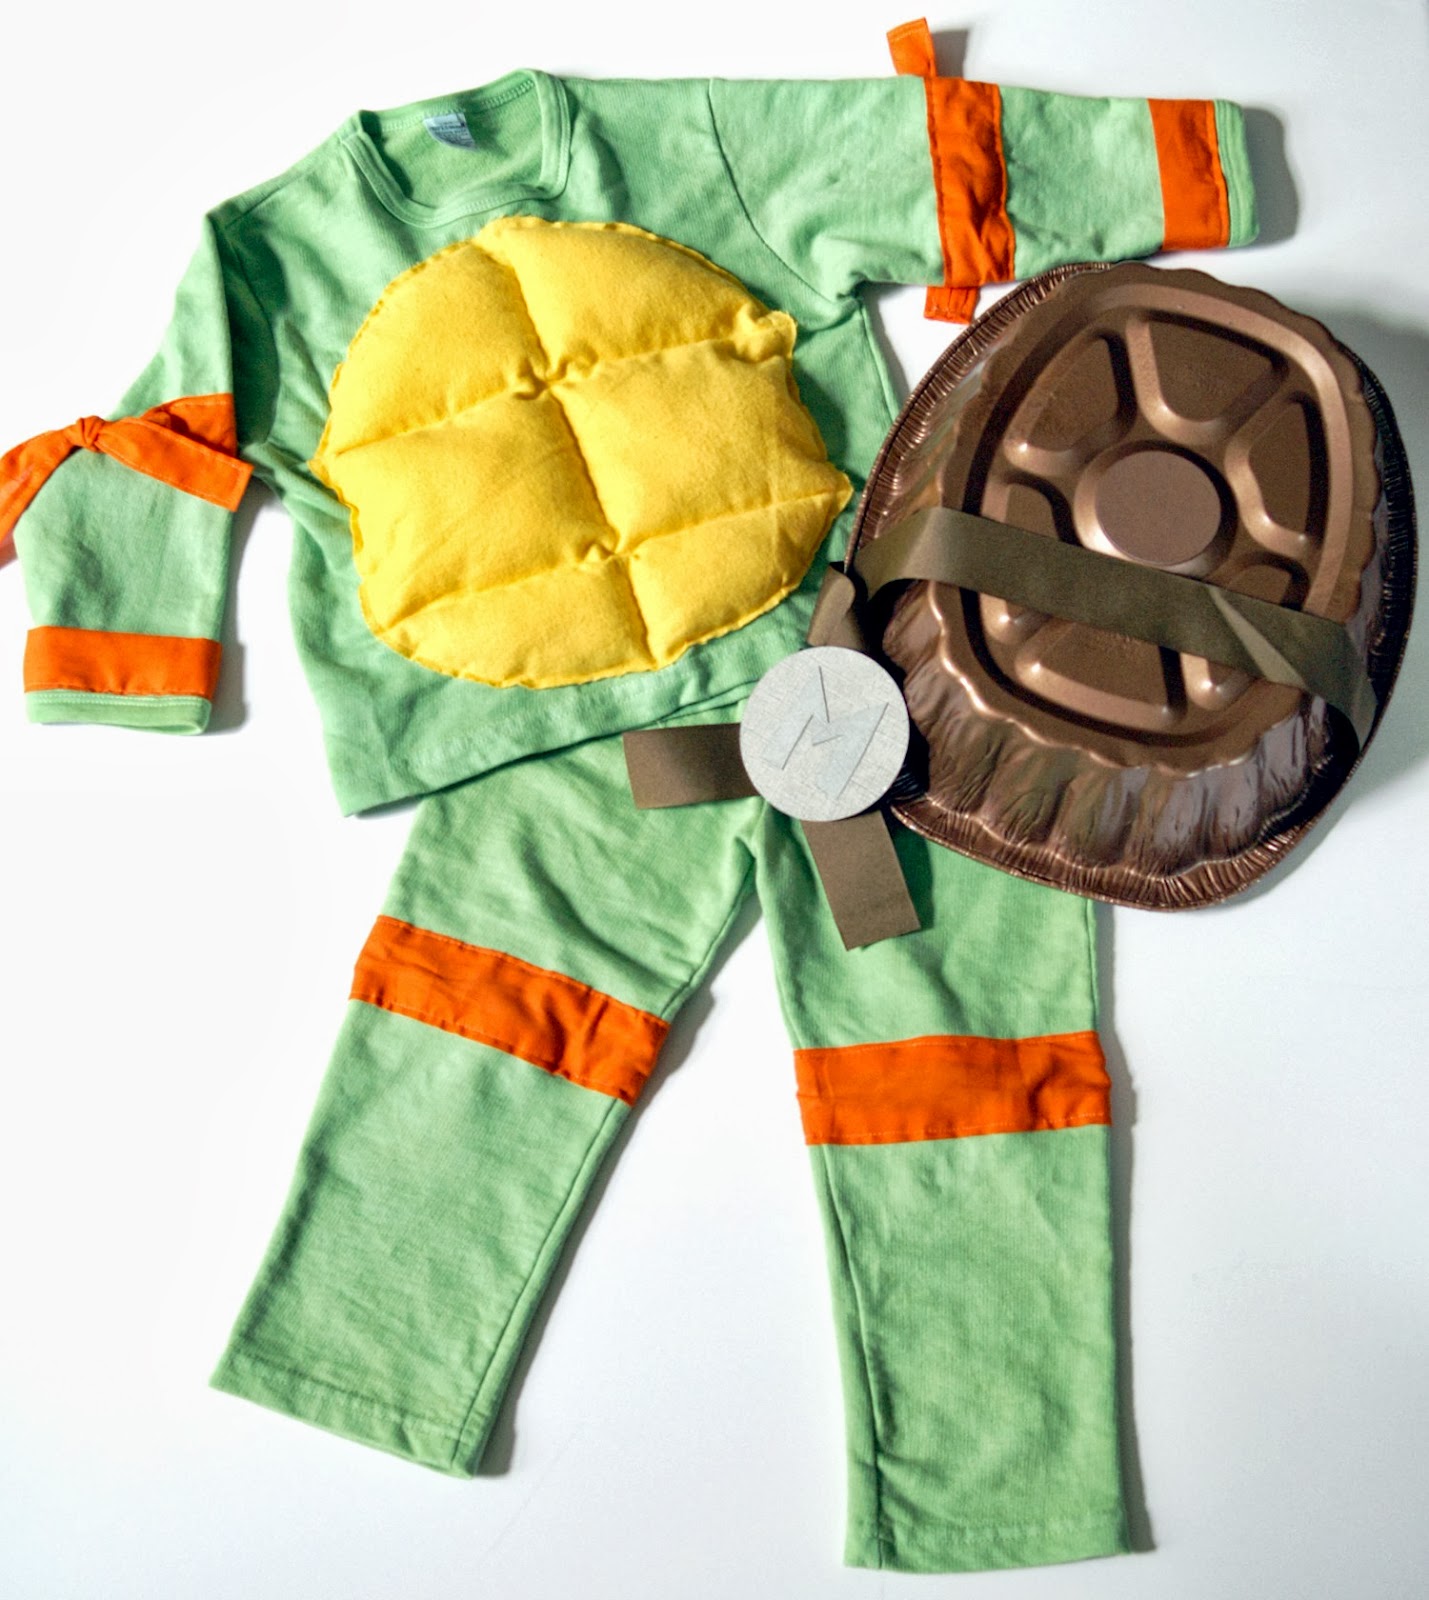
I would say, depending on how much the sweats cost, you can make this outfit for ~$15 which is definitely cheaper than you can purchase the costume.
We did already have the masks and weapons since my son received them as birthday gifts last month.

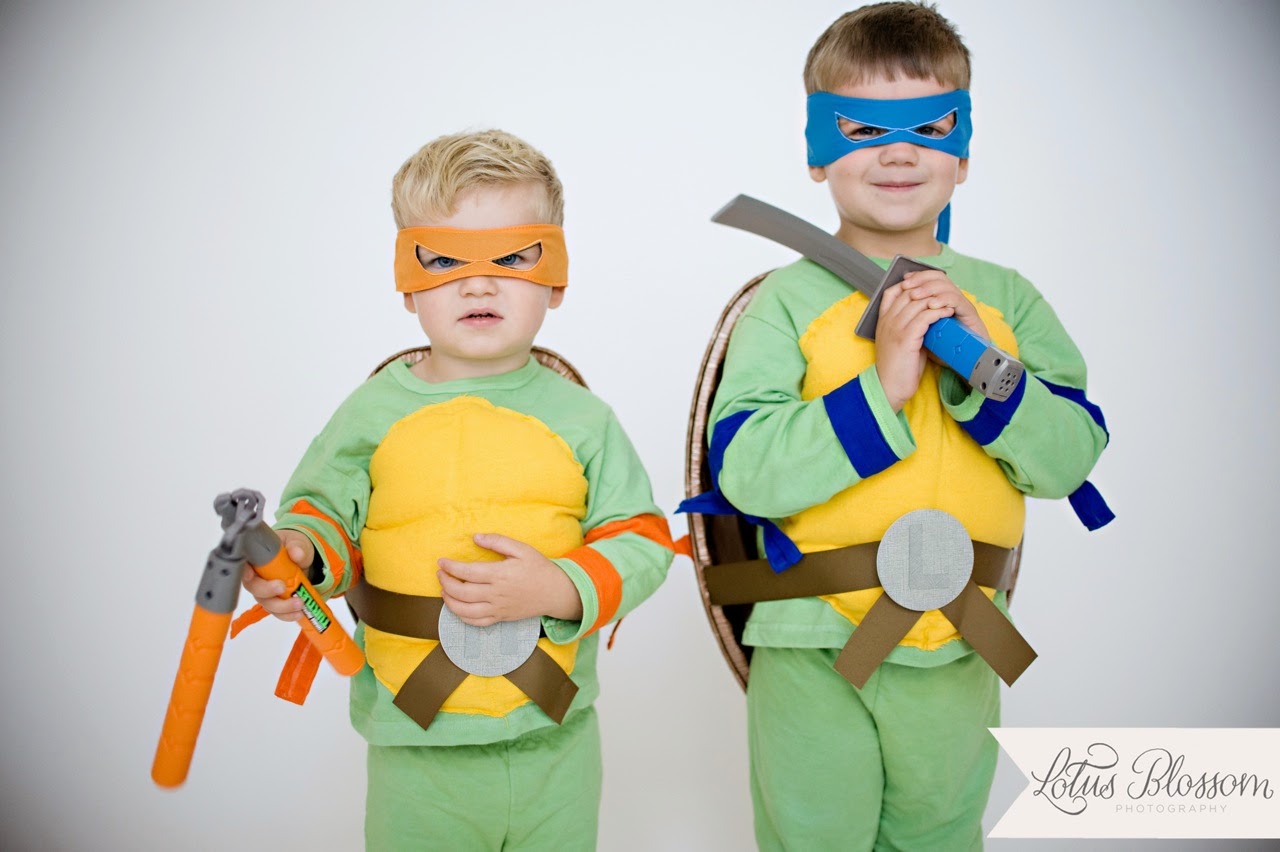
The Teenage Mutant Ninja Turtle costumes could not have turned out any cuter!
My Leonardo is in love with his costume.
My Michelangelo would rather play with his Michelangelo toy than dress up like him, but I think the outfit is growing on him.
Hopefully by Halloween he'll be ready to wear it for more than 20 minutes!
But either way, do they not look absolutely adorable together??
A HUGE thank you to Amber and Lotus Blossom Photography for allowing me to use these fantastic images of my boys in their costumes!
If you live in the Nashville area and are planning to get married, be sure to look her up!
Check out these other great kid costume ideas!
Dice Costumes | Werewolf, Vampire, & Mummy | Skeletons
Mummy Costumes | Ms. Frizzle | Princess Poppy
Elmo | Star Trek | Unicorn | Bumble Bee | Plants vs Zombies

>> See where I party! <<

Where did you get the green sweats from?
I couldn't find green sweats in toddler sizes so I dyed some white ones. Details are in the blog post.
This is absolutely adorable! My 4-year-old grandson would be utterly amazed and envious of this ninja costume! Amazing!
They are so cool and cute🙂🙂
These are so cute! Included in my round up this week for Dream Create Inspire. Thanks for linking up with us!
I love this costume. My granddaughter loves the Ninja Turtles. Ralph is her favorite. I may try to make this. The mask makes me nervous, but I think I could handle the rest. Thanks for sharing on Sunday's Best.
Great idea for props,especially the roasting pan one. Thank you for sharing with us at #HomeMattersparty. We would love to have you again next week.
fabulous, love the roasting pan! thanks for sharing on craft schooling Sunday!
Did you hand stitch the arm bands or use a sewing machine. I'm definitely a beginner and am struggling with sewing the arm bands (without stitching the arm together) and tips?
Hi Rachel! I used the sewing machine. Part of the end of my machine pops off to make the arm of the machine much narrower. That made it easier to sew the bands on. It would have been impossible otherwise! Check and see if yours will pop off (mine was meant to, and I had forgotten it would do that until I started fiddling with it from frustration).
This is so cute! I'm making a TMNT costume for my son this Halloween and this has been very helpful. I found a website that has dye-able sweats but they are pretty pricey. Do you remember what site you got yours from....or can anyone else tell me what website they used?
Unfortunately I don't remember the name of the website. But I did recently have someone tell me they found some sweats on a website called Fleece Farm. 🙂
I'm stressing about using rit dye 🙂 what did you dye them in? I don't want to use my new washing machine and I have a porcelains sink so I'm afraid if I rinse them in there it will stain it. Any advice?
Hi Morgan! I was also hesitant to use the washing machine so I dyed the clothes in our black kitchen sink. It was unlikely to show stain. You might buy one of the those inexpensive 5-gallon buckets at Home Depot and dye in that? They are only ~$3 so not too bad of an investment, and definitely worth saving your sink and washing machine from possible staining!!
Where did you find the sweats?
Hi Hannah! I can't remember the website, but I Googled white sweats for toddlers to find a place.
Those are AWESOME!!
How long did you leave the sweats in the dye and how much dye did you use? I'm only doing 2 regular long sleeve tshirts (size 3T & S) instead of sweats and my MIL is making my boys their pants from fleece.
Cute costume! I had the same problem finding green sweats for my son's Robin costume... we went with short - it's still warm in AZ anyway... but what gives with the lack of green sweats! 😉
We are beyond TMNT...but dang these are cute kiddos and you did an amazing job on the costumes!
I love your little Turtles! Darling costumes!
Oh my gosh the cuteness!! I adore these. They look so fierce - but adorable. 😉 The way you sewed the costumes was so great and I love that they can be used for playtime too! Fabulous job my friend!!
Using a roasting pan as the shell is genius! These turned out so cute.