
Tutorial - How to Make a Light Box
More and more of us are opening Etsy stores, and one of the biggest keys to selling on Etsy (or any other online store) is taking good pictures of our products. One of the best ways to take a great photo to highlight our items is to use a light box. You can find them around, but you can also make one for less than $5!
I'm going to give you a step-by-step tutorial on how to make a small light box, but you can apply this tutorial to any size box you choose.
Items needed:
cardboard box
lightweight white material
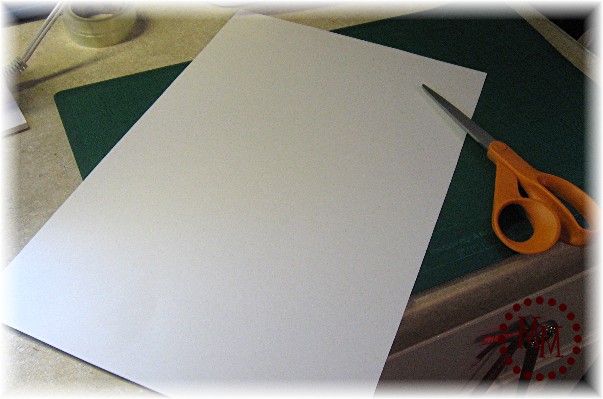
white poster-size cardstock
stapler
adhesive

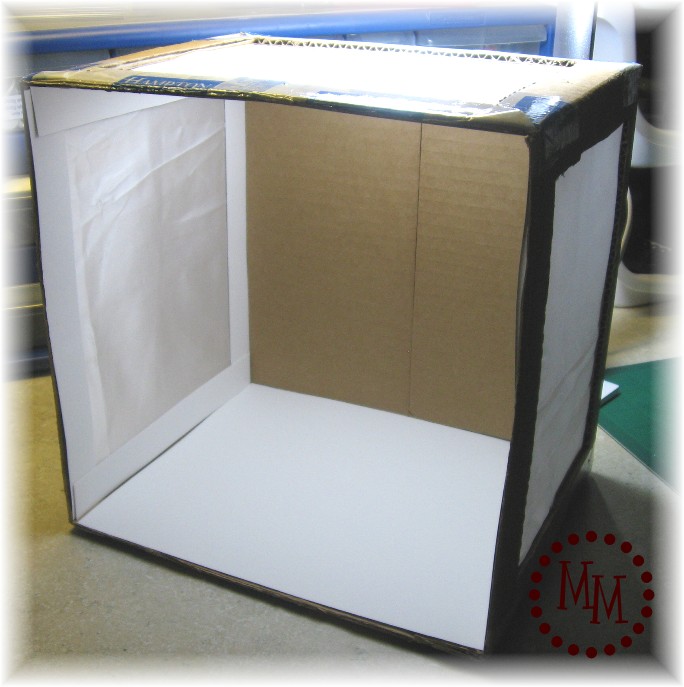
1. Get a box! Just about any sturdy cardboard box will do. Not expecting any packages any time soon? Any gorcery store would be happy to give you one of theirs.
I went for a relatively square box, but a rectangular box will do, too.

2. Cut off the flaps on the lid of your box.
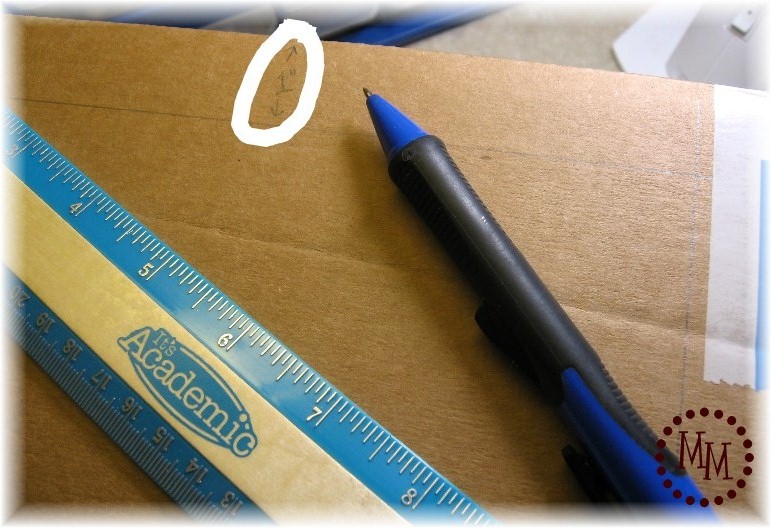
3. Draw a smaller square (or rectangle if your box is rectangular) around the inside of one side of the box approximately 1 inch from the edges. Do this on 3 sides of the box.

4. Using a box cutter, cut out the squares you just drew on the 3 sides of the box. It should now look like the box above.
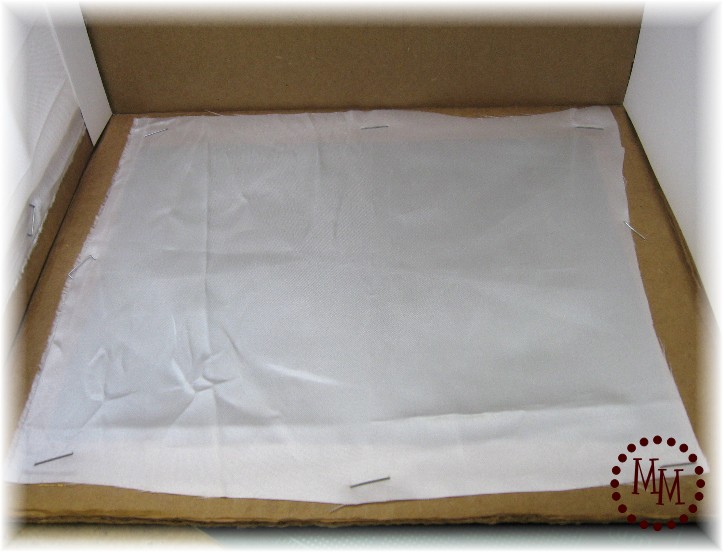
5. Cut your white material (as you can tell, I didn't even bother to iron mine!) so that it slightly larger than the squares you cut out of your box. Staple the material to the box. Alternatively you can use a hot glue gun to attach the material to the box.
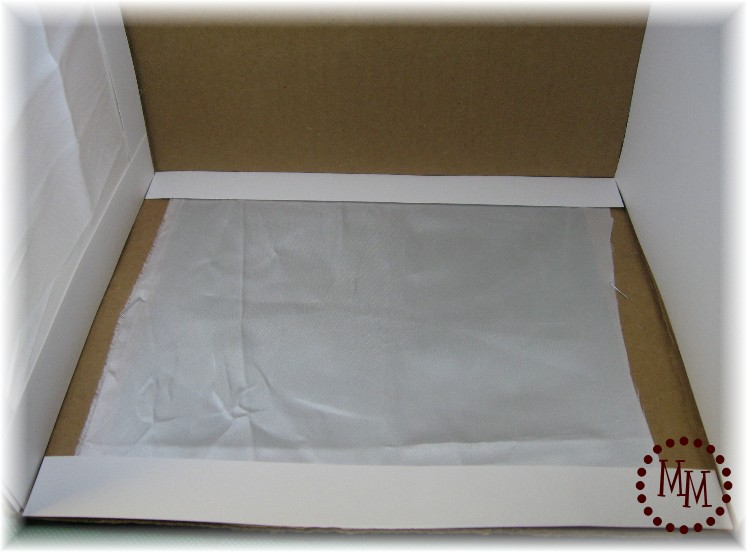
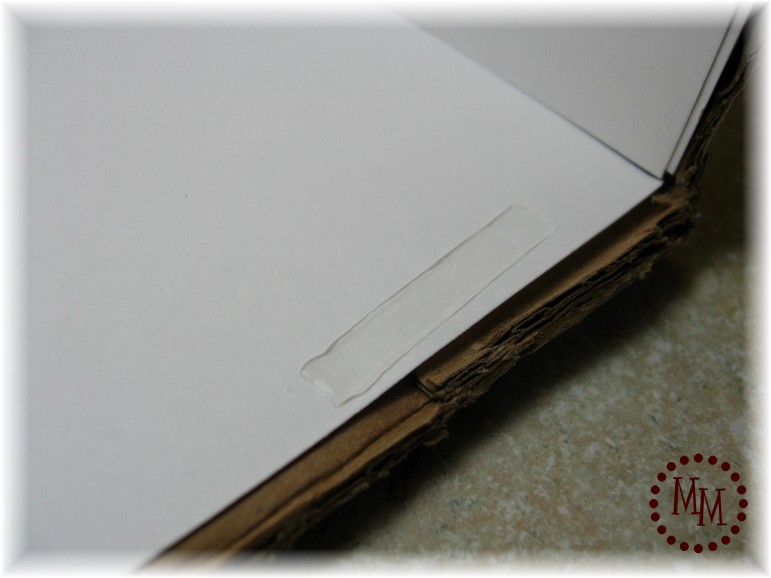
6. Cut one inch strips of the cardstock and glue it to the insides of the box to cover the exposed cardboard and edges of fabric.
7. Continue to cover all of the edges of the exposed cardboard with the white cardstock.
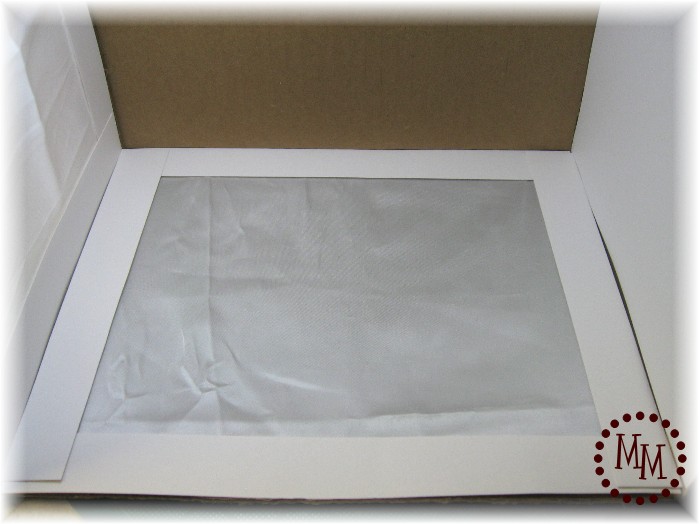
8. The top of your box is now the front of your box. Cover the new "bottom" of your box (the 4th side that you did not cut a square out of) with a piece of the white cardstock.
9. To get the look of the background going on to infinity you need a long rectangular piece of white cardstock. Cut it the width of your box and twice as long.
10. Put some adhesive (I used Glue Lines) along the front edge of the bottom of your box. Attach one end of the rectangular piece of cardstock to the adhesive.
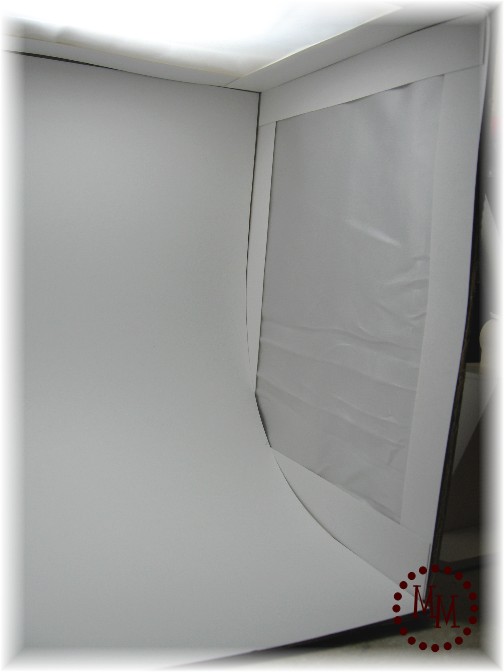
11. Without creasing the cardstock, push the top of it into the top back side of the box. You want the cardstock to be curved. This helps give the illusion that the background goes on forever.

12. Shine a lamp through the top, the sides, or all three positions and you're ready to start snapping pictures of your products! I prefer to use an Ott Light for my photo taking. It provides a more natural light.
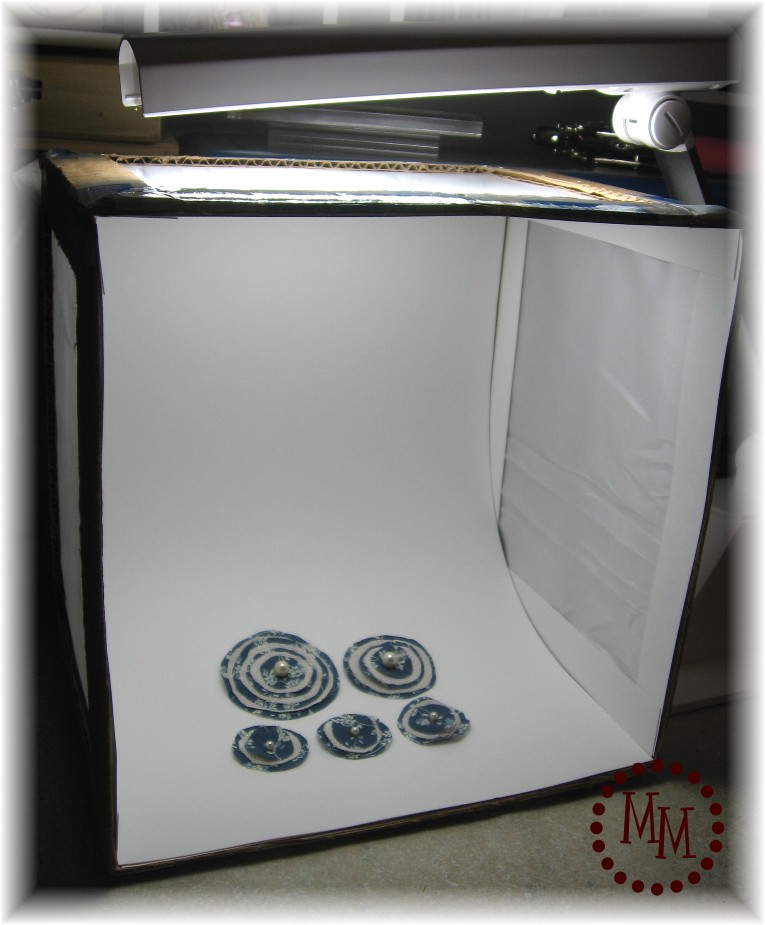

Now you can take photos of your products any time of day or night. 😉
----------------------------------
Linking this up to


what a great tutorial love it . came here via a girl and her craf box and so glad i did x will be making this real soon x tfs your new follower
xmaggiex
Wow! Dear, It´s a great idea! Thanks for this!
I´ll follow you.
Kisses....
I just wanted to thank you for this genius tutorial! I made my own light box and it works wonderfully. I've posted it on my blog (at the link below) and mentioned your tutorial. Thanks again!
http://craftanyway.blogspot.com/2011/08/make-your-own-light-box.html
I can't wait to make one of these...with 2 in diapers I have plenty of diaper boxes!
I wanta make one. ( =
Wonder where I can find thin white paper that size? I was thinking tracing paper... but i can't find any that size. Wonder if wax paper would work?
oh my gosh!! brilliant!!!! i got this link from a girl and a glue gun and it couldn't be better timing...got a big cardboard box to go out into the trash tomorrow. Thank you so much for sharing this!!
This is just the tutorial I've been looking for. Found you on Girl with a Glue Gun.
Thanks for sharing...your newest follower, Jessica @ http://myworldmadebyhand.blogspot.com
What a great tutorial thank you for posting this.I have been wondering how to take better pictures of my projects.
Thanks for the great tutorial! I linked to it from my blog.
http://happybabydesigns.blogspot.com/2010/11/light-box-love.html
Love the tutorial! Need to make one of these ASAP... especially for photographing food! Found you via Fireflies & Jellybeans.
This is on my favs list.
You are so creative, you need to look at our list of sponsor--plus we are adding more--and enter the DIY Club inc competition. The give-a-way was $200 last month and it is going to be even bigger for AUG.
If you have any previous posts that you would like to enter you may or you can create something brand new—just follow the 3 guidelines.
USE 1 of our Sponsors products
TAKE a picture of the product and add it to your post
ADD our button to your post or on your side bar
That’s it-super easy and you could win the Huge grand prize.
Cheri
great idea
link it up to our tutorial party so our readers can find you:
http://www.finecraftguild.com/diy-tutorial-linky-party-6/
thanks for the post. it's an encouragement to make one of these gadgets! this is definitely needed in our household as I still use the 12 noon = photo time method which is limiting...
rose
I made one of these a while ago to help with my photography - I love it, it's brilliant. Easy to follow tute btw 🙂 x
Thank you for sharing! I hate waiting for the light to be just right to take pictures, this is great!
Stopping by from tickled pink! Love this idea! I have things I sell on ebay and the pictures just don't show the detail that is needed and I wanted to make something that would work better. Awesome! Thanks!
What a fantastic tutorial! Your pictures are fabulous as usual. Thanks for sharing this great tip! Hope you have a wonderful weekend! ~ Stephanie Lynn
Thanks for such a brilliant tutorial! Especially helpful for those of us who craft into the wee hours of the night and then want the immediate gratification of taking great pics without having to wait for daylight. Thank you, thank you!
This is great! Saw a tutorial for light umbrella's not too long ago too and it looked super easy too. Love that you shared this, thanks!
Here from Tidy Mom, come visit me if you get the chance.
Happy Friday!
Visiting via the Weekend wrapup. This is a great idea and tutorial. Projects look so much better when shot in the right light. Thanks for posting this.
Great idea...it seems like late at night is my best shot at getting anything done, so photography is always a problem. Plus, with this, the background clutter wouldn't be in the photo!
Great tutorial and anyone could do this. Now I know how everyone gets the white background pics.
So glad I found your tutorial! My sister was trying to explain to me how to make a light box, but it was pretty confusing...until I saw your tutorial! Thanks!
THANK YOU for sharing! I LOVE this! I am going to make one!
Ok girlie this is the answer to my huge problem of being a night owl crafter! I owe you big time for this fabulous idea and tutorial! Thanks so much for linking up to Hoo's got talent!
Great tute, and pretty simple too! Thanks so much for sharing.
Visiting from New Friend Friday. What a great idea. Thanks for sharing.
This is great! I thought it would be forever until I could afford a light box. What a genius idea!
What a brilliant Idea Ms. Smarty Pants!! I love it!! Thanks so much for thinking of it and sharing it!
Thanks for sharing. I just opened my etsy shop, and this will help.
Fantastic! Thank you so much for sharing this tutorial. I am going to make one this week!
~Amanda
I keep seeing these around, I'm eventually going to get talked into making one! Thanks for the great tute!
Thank you so much for sharing this! What a great idea! No need to order those pricey ones!
wow, this is great! i've been having trouble taking pics and getting the best lighting! now, all i need is a box..
My husband and I are getting ready to build a light box...boy was this helpful!! Thanks!
That's pretty cool!! I could definitely use one of these!!! Thanks for sharing, visiting from justsewsassy.com
I was thinking about buying a light box but now I don't have to! Thanks for the tute!
Love it! I have been thinking about this but didn't want to spend the cash to buy one. Very creative. my blog pictures will look soooo much better.
Oh wow! Might have to try this out! Thanks for helping us have another great Anything Related! ~Bridgette
What a great idea thanks so much for shareing!
Definitely need one of these! Thanks for the tute!
I wish I would have had this tutorial a couple of years ago before I actually bought one 😉 Great tutorial!
A great tutorial! Thank you!!!
This is so perfect for me! I am always complaining about my lighting when I take pictures. So THANK YOU!!
Thanks for posting this tutorial!! It's exactly what I've been looking for!
Tammy
Thank you it is so hard to get a good photo when the light is not right. Great idea!
Debbie
Nice! thank you for reminding me that I need to make one so I can take better shots of my products. 🙂
OK...I really loved this idea and had to share it on my blog!
http://blackberryvine.blogspot.com/2010/07/scrap-shoppe-tutorial-how-to-make-light.html
Thanks again for sharing!
smiles!!
Thank you sooo much for sharing this tutorial...I'm actually going to go do this tonight! I'm your newest follower!
smiles!
http://www.blackberryvine.blogspot.com
Very cool! Thank you
This is totally GENIUS! I love this tutorial! I wonder if a bigger box would allow for an entire 12x12 scrapbook layout? HMMM. Thanks for the tutorial! 🙂