
Backlit Canvas Art
Can you believe this backlit canvas art is made with just plain cardstock and an X-acto knife?

Do you have a project that you've been longing to do, but just haven't found the time yet?
I really seem to rack those up!
This project is one for me.
I call it my Backlit Canvas Art and the inspiration piece has been pinned in my "Crafts to try" Pinterest board for ages.
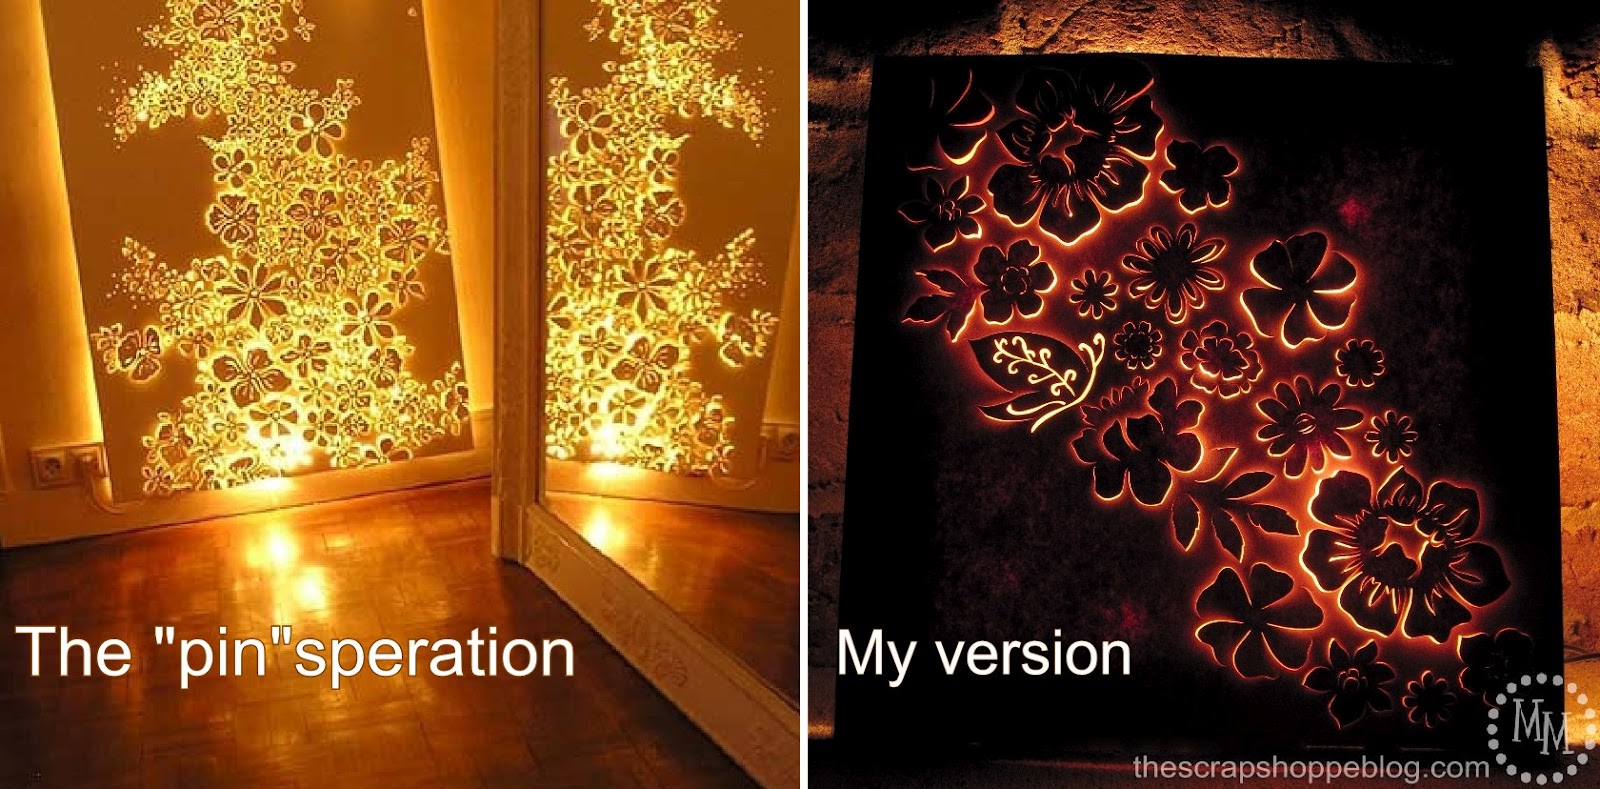
My "pin"speration is an artist's piece made from metal that has hand cut flowers all over it.
It's backlit by Christmas lights, and I pretty much love it!
So I decided to give it a go and create my version.
There are two main differences between the two:
1. The scale. Mine is way smaller!
2. The media. The artist used metal while I used cardstock!
I've put together a video tutorial that quickly shows all the steps to make this piece of artwork.
But you can follow the step-by-step photos below as well.
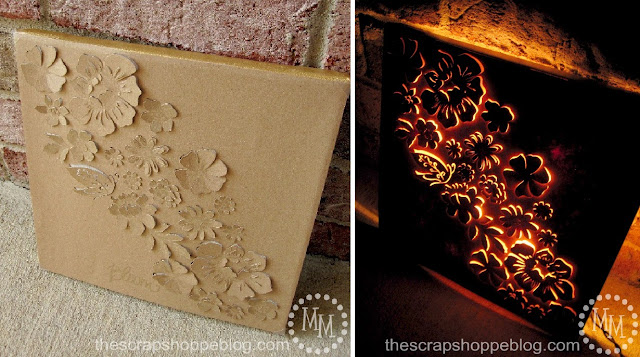
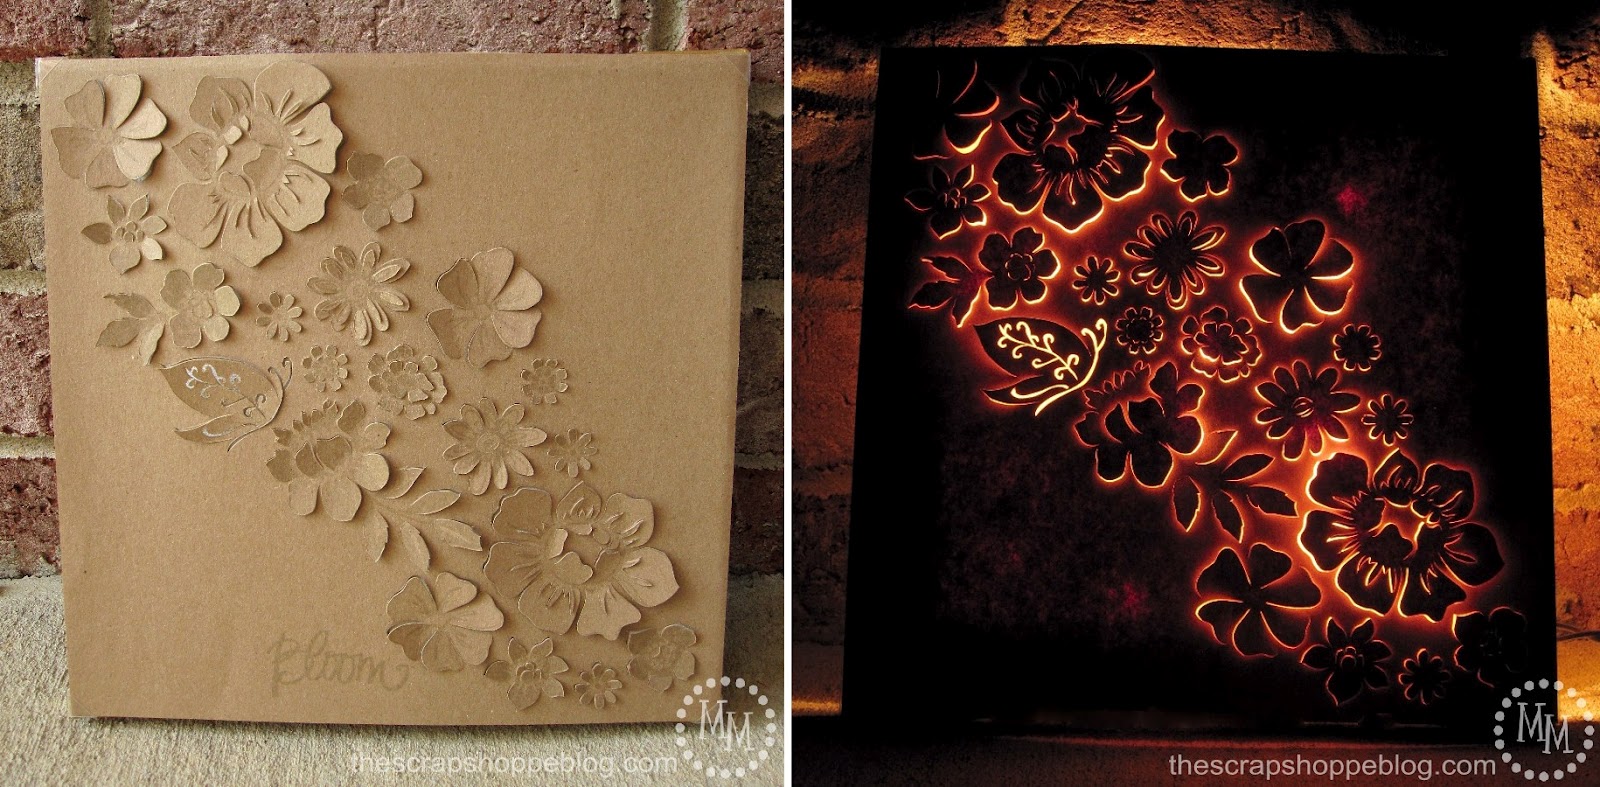
Backlit Canvas Art: Day & Night

The idea of the canvas is that during the day (ie. with the Christmas light off) you have a beautiful sculpture while at night (you guessed it, with the Christmas lights on!) you have a fun and unique piece of art.
How about a tutorial?

Backlit Canvas Art Supplies:
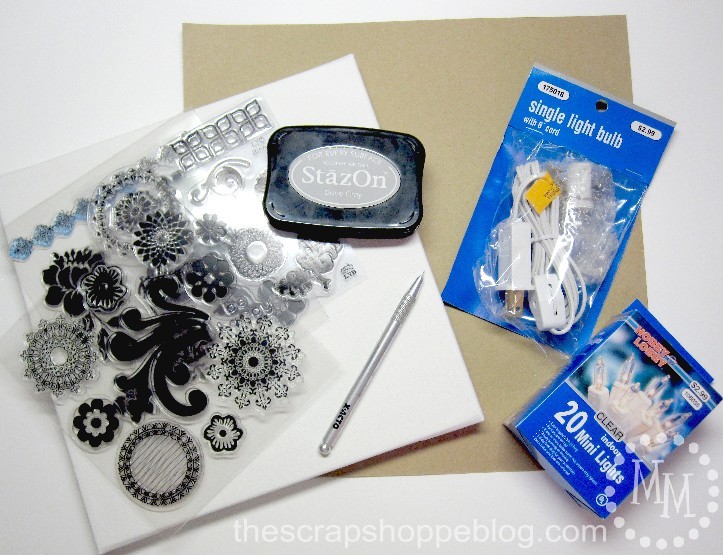
Mounted canvas (mine is 10"x10"
cardstock to fit on your canvas (mine is 12"x12")
stamps
ink pad
X-acto knife
light source*
*I wasn't sure if I wanted to use a single bulb or Christmas lights so that is why both are in the above picture.
Ultimately I was worried that the single bulb could get too hot if left on too long so I went with the Christmas lights.
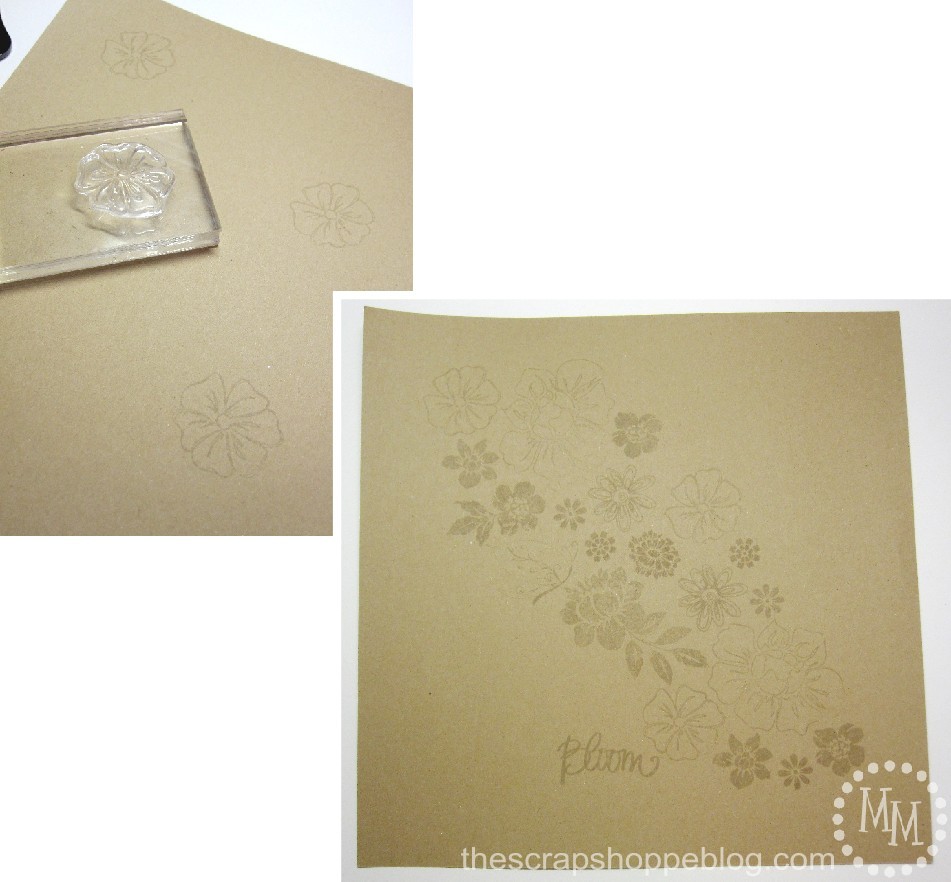
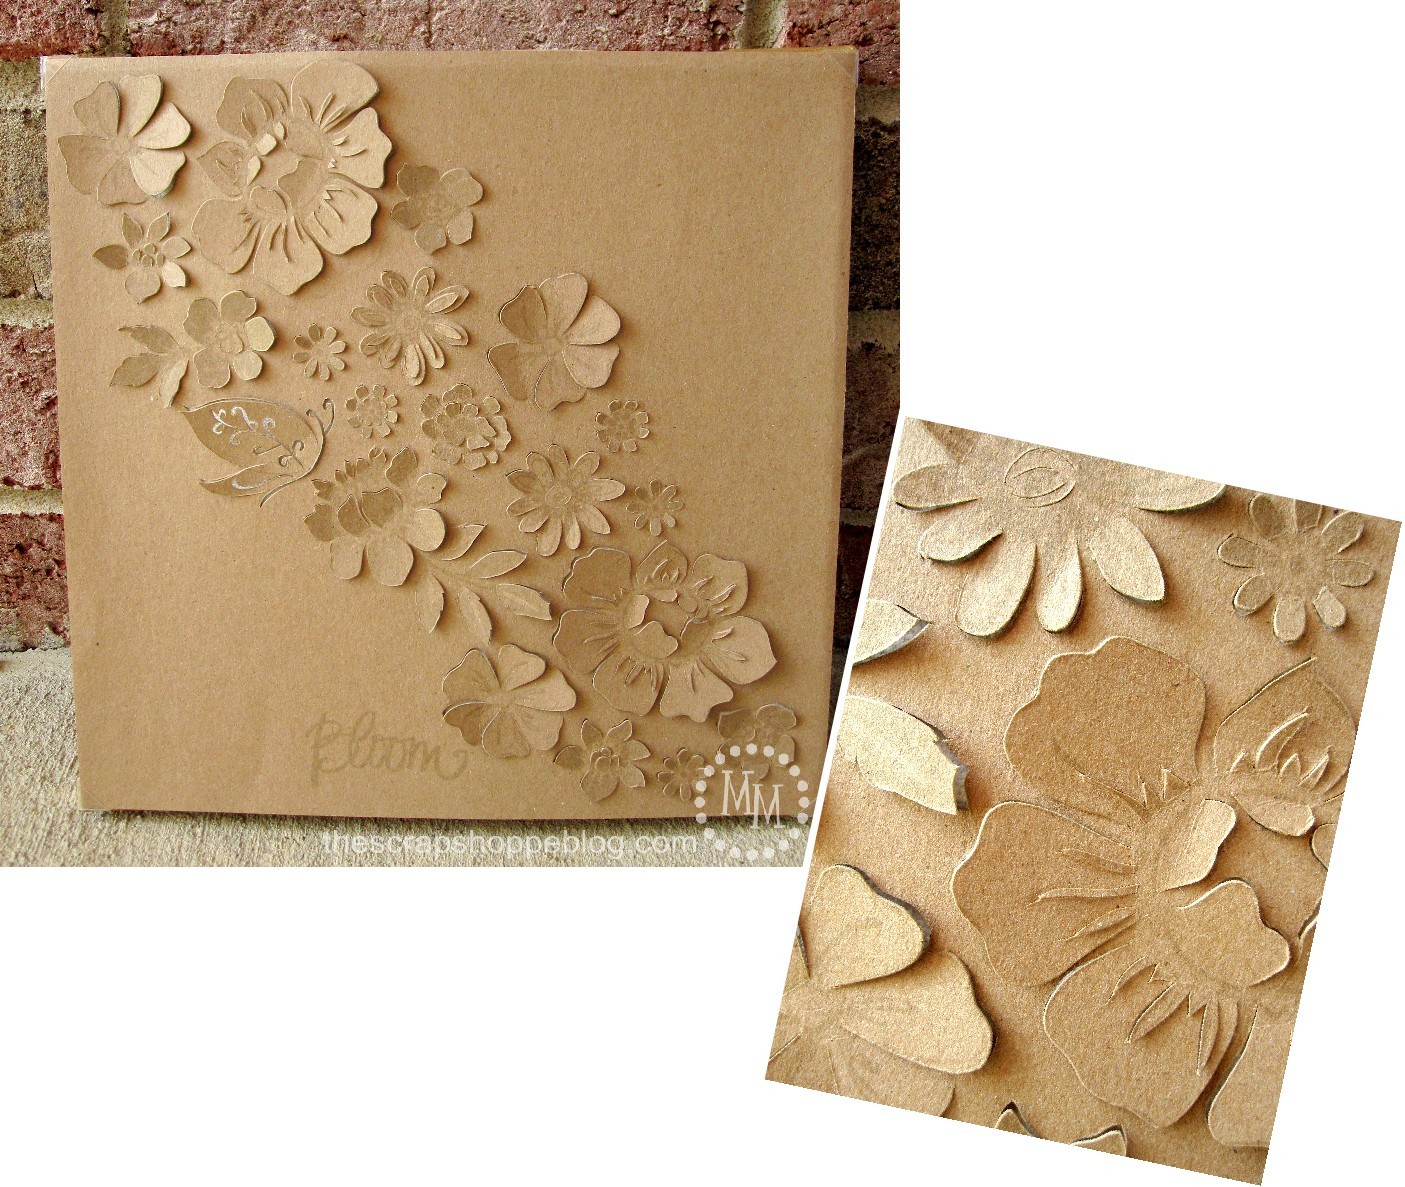
I decided to go with the same flower theme as my inspiration piece.
I randomly stamped various flowers across my cardstock.
I went with gray ink on the brown Kraft paper because I wanted it to be subtle during the daylight hours.
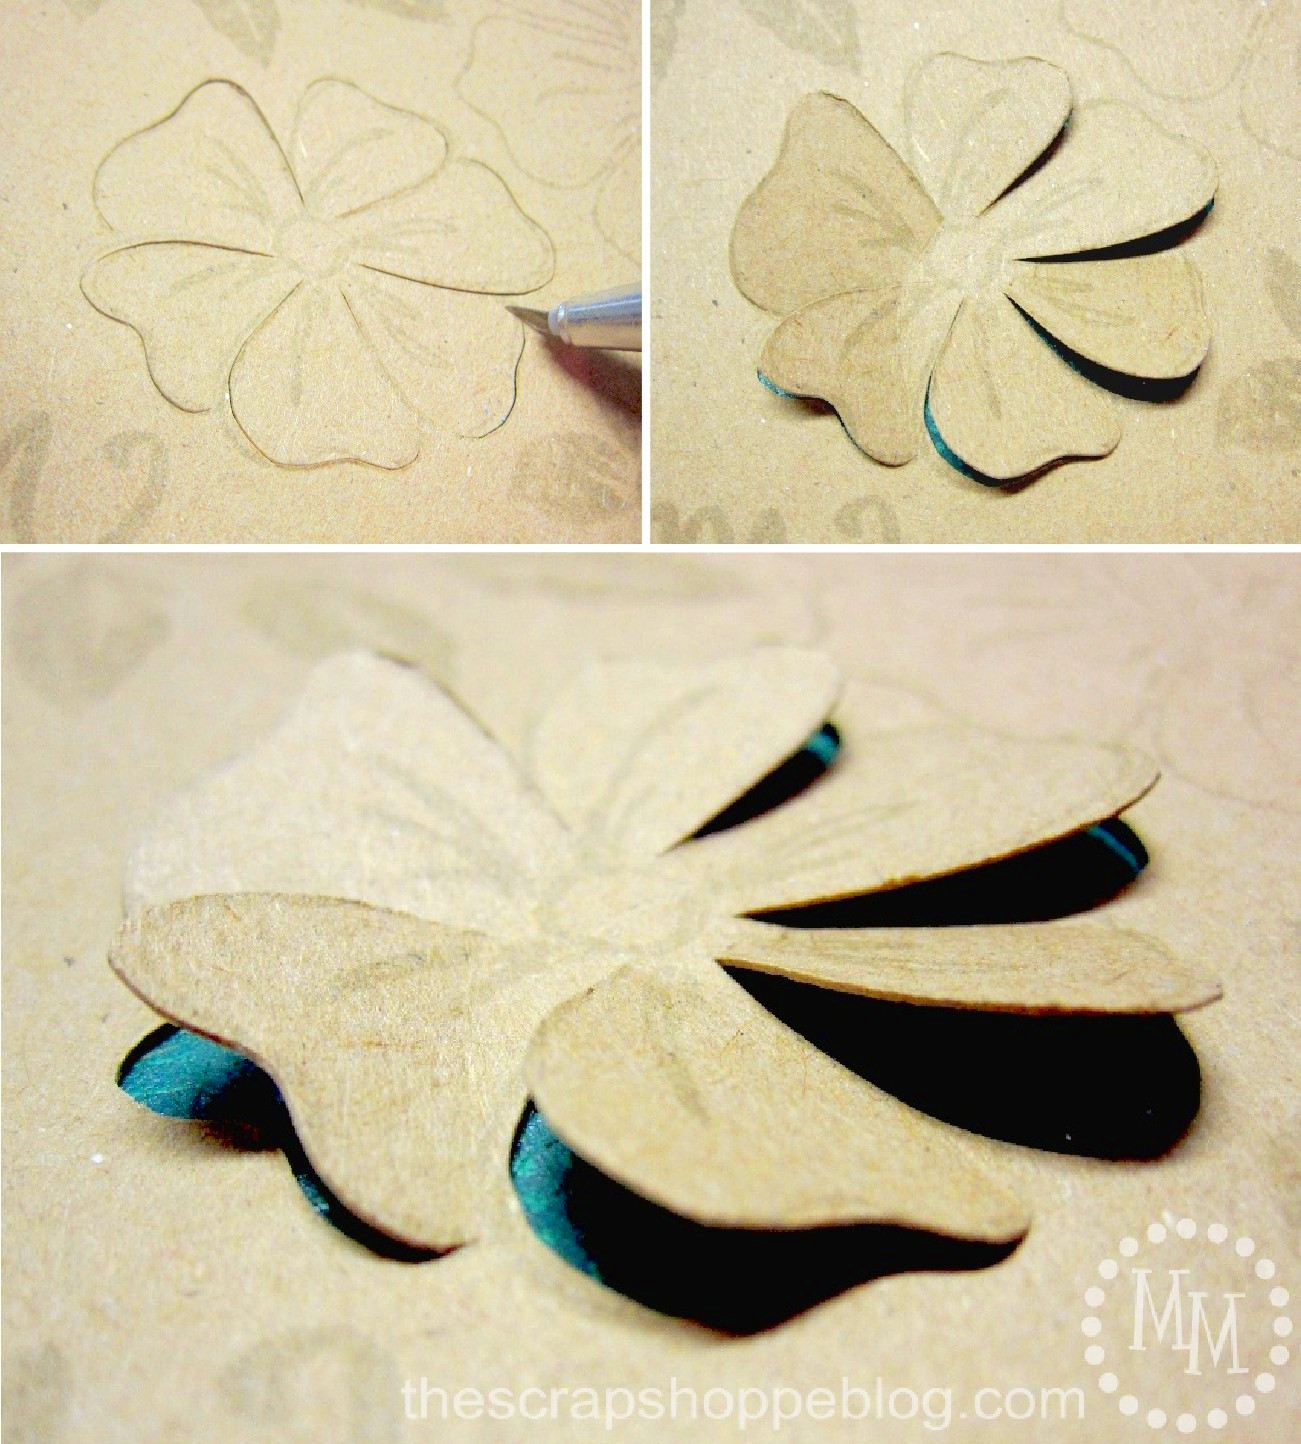
The main thing you want to take care of is not completely cut the flower off of the paper.
Take your time. Look at each flower individually and see what flows.

I cut some of my flowers very literally as they looked stamped.
For others I made different patterns with the petals.
For the butterfly I decided to completely cut out the thin swirls on his wings to let the light shine through.
After you're done cutting (or while you're cutting if you're impatient like me!), from the back of your paper, gently push the paper out so that it "pops" from the front. Be gentle.
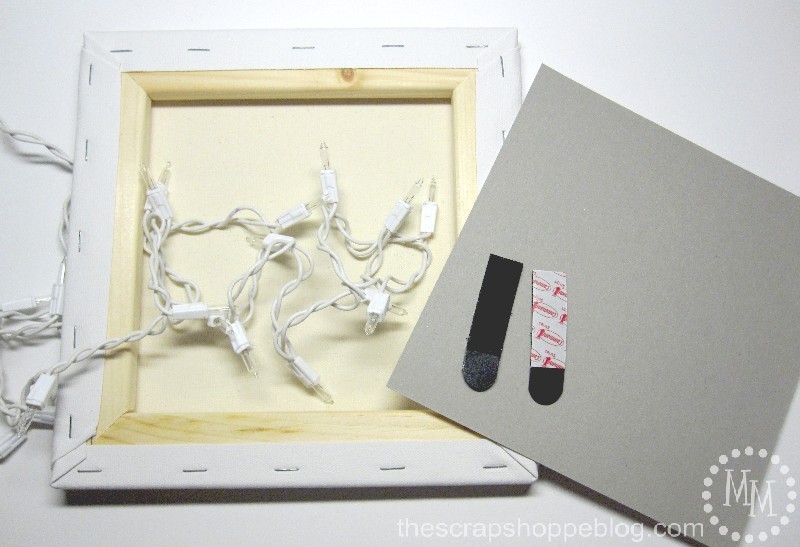
Time for the lights!
I took a scrap piece of cardboard and trimmed it down to fit the back of my canvas.
I also snagged a couple of spare Command strips I keep around for just such an occasion.

I cut the Command strips in half lengthwise to
1) make them go further, and
2) slim them down to fit on the exposed wood frame.
After trimming, I arranged the Command strips where I wanted them to go and adhered them to the canvas
Next I set my cardboard on top of the strips so that everything would be lined up appropriately.

Tuck the Christmas lights between the canvas and the cardboard.
Be sure to spread the lights out so all of your light is not concentrated in one area.
The cord from the lights should easily fit between the canvas and cardboard backing.
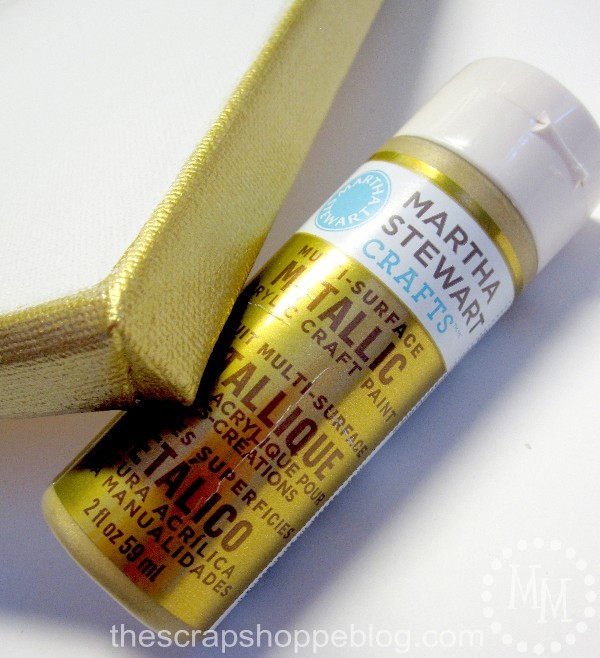
Since my canvas is white and my cardstock is brown, I decided I wanted to paint the sides of the canvas.
I went with a metallic gold from Martha Stewart Crafts.
I feel like it makes the canvas look "framed!"

Its time to trim the cardstock down to size and attach it to the canvas.
If you know me, I like multipurpose projects.
It makes for less storage and seriously just makes me happy!
This flower art was so fun to make that I decided I would definitely be doing it again.
Maybe even holiday pieces!
So I want to be able to use the canvas again and change out the cardstock.
I think this turned out SO fun!
You can literally use any color of paper and any pattern to make a unique piece of art for your home.
I definitely love the way the piece looks during the day.
The subtle shadows created by the cut flowers really draws the eye!
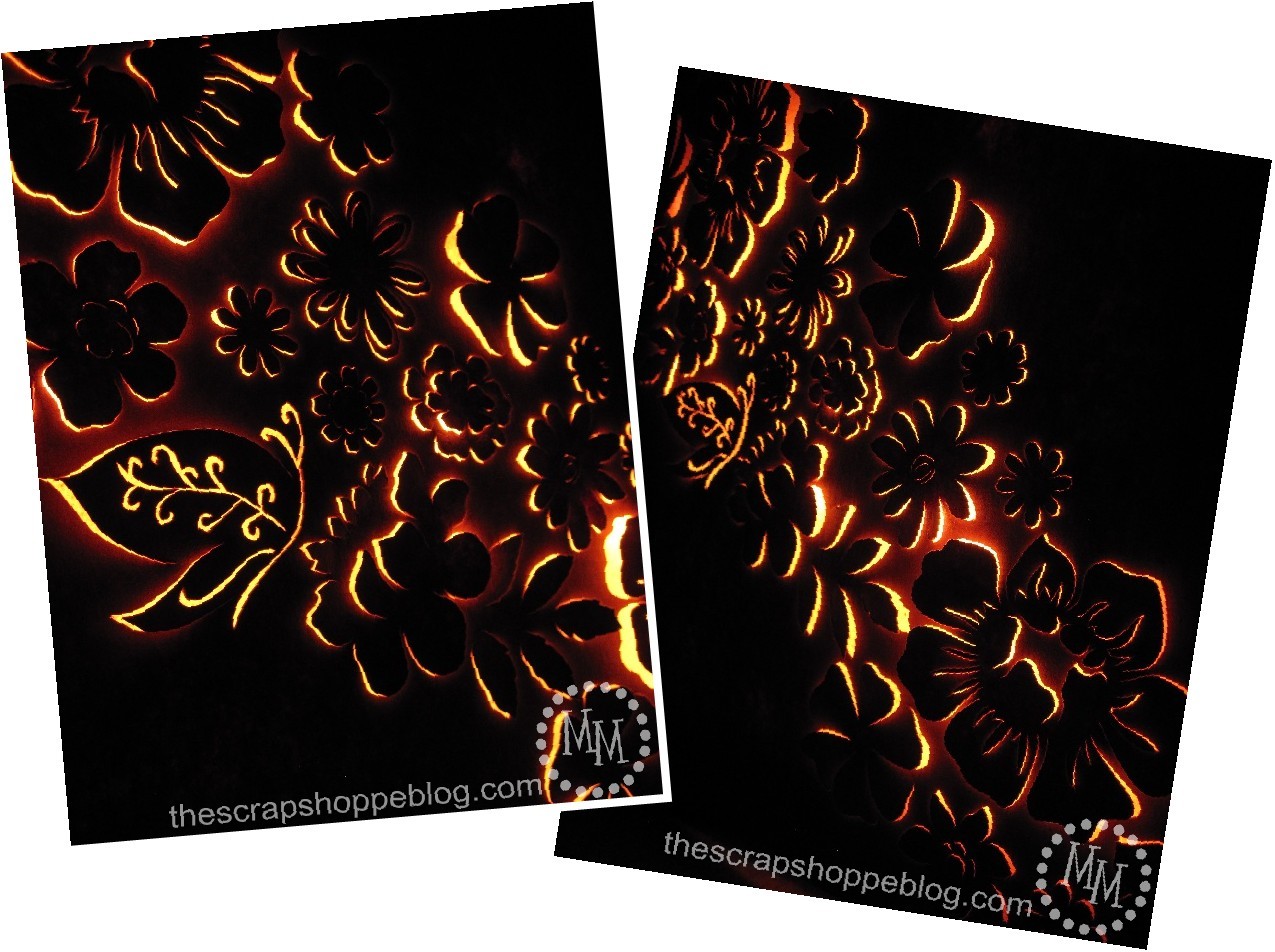
And backlit?
Well its just fun!
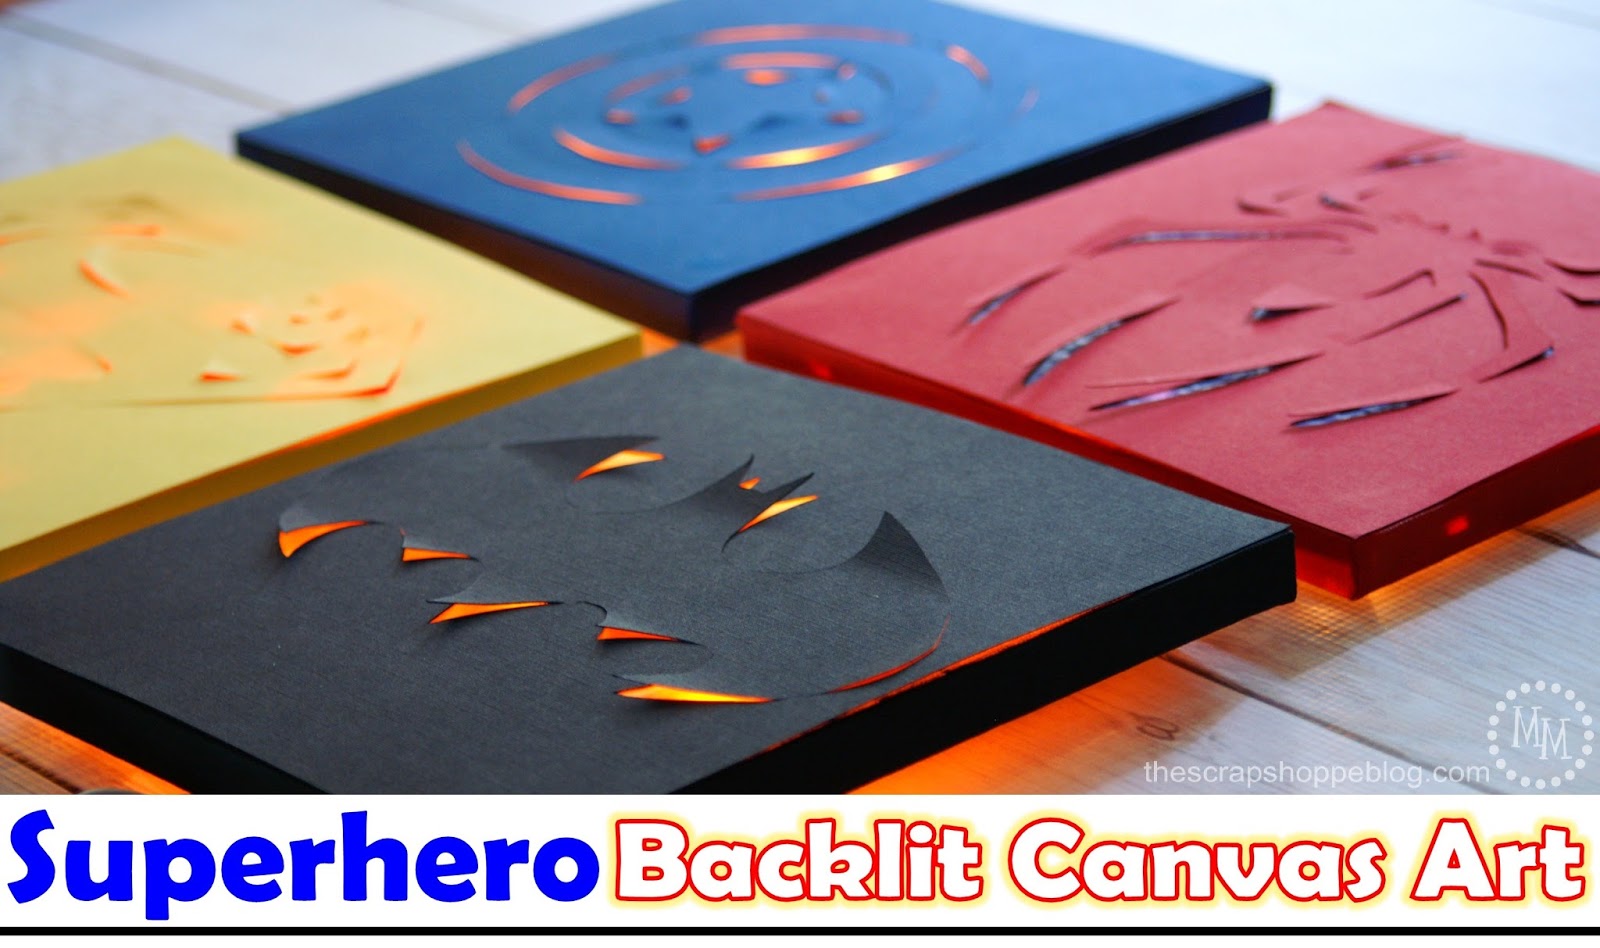
Be sure to check out my superhero backlit canvas art, too!

>> See where I party! <<


Such a Beautiful Art, I really loved it.
Absolutely gorgeous! I love it!
Great Painters depicts their "Expression through their Mindblowing Fine Art ", Great Artwork!!!
Wall Canvas Paintings for Salei!
wow this is awesome. ia have never seen like this before. thanks for sharing this with us 🙂
Is it water proof and may we use for outdoor ..??
This is such a cool idea!! I love it! I will have to put it on my project list!
How would you hide the leftover Christmas lights if you mounted this on a wall?
You would probably need to use battery-operated lights in that case.
BEAUTIFUL! I love doing crafts, unfortunately I am not very creative! I think I can do this, I KNOW I can use this as inspiration to make something cool! I just know it won't be as beautifully artistic as this one!
Also, thank you for the tutorial on how you created it. I would've never thought I could do this without that!
Thank you for the inspiration. This is what I made after being inspired by your post.
https://craftmontage.wordpress.com/2016/03/02/diy-backlit-canvas/
This is a whole new awesome...thank u for sharing...I am excited to try this
i only just discovered it and i am lost for words. this is gorgeous!!!!
Did you do something specific to make the rest of the canvas look so dark or is it just with the addition of card over the canvas thats done it?
Thank you, Rabia! Yes, the cardstock does all the work to hide the light in the areas that are uncut. I did not use anything extra there. 🙂
Oh wow.. This is such brilliant work I can't even tell you. Definitely going to try some cut out art myself.. supper excited yay!!
Thanks for sharing**
This comment has been removed by a blog administrator.
Do you remember where you got your stamps from?
Hi Dalyn! Unfortunately I do not. 🙁 I have had them for so long that these particular ones may not even be available any longer. But you can find plenty of other floral-type stamps on Amazon. http://amzn.to/ZdaujL Or at your local craft store.
AWESOME!!!!!!!!!
Beautiful Create!
Such beautiful work. Thanks for sharing.
http://www.patchworkmountain.com
FANTASTIC CREATIONS, AND THANKS FOR GIVING THE DIRECTIONS FOR CREATING IT.
I apologize if you have already answered this question; is that an xacto swivel knife? I have attempted this project with a regular xacto and I'm finding it hard to do curved lines without lifting the knife and making torn up edges!! I love this idea and love that there are so many different things you could do with it! thanks for sharing!
Yes, Kara, it IS a swivel knife! Probably my favorite tool on my entire craft desk. 🙂
It was just regular old cardstock. Nothing super heavy. I think any weight should work fine.
Very interesting...how heavy was your cardstock?
Wow that is very neat, you did a great job!!
Thank you so much for posting how to do this project!! I loved the "original" I saw on Pintrest and after following many URL's, I want not able to find how it was made. When I stumbled upon your page, I felt a tickle in my brain and now, my living room needs to start making space for the many creations I have been able to make, thanks to you!!
Great job! Love it!
Wow, what a great idea! Really effective.
Wow i love those two craft amazing.
Great idea, love how it looks! You make it look so easy, like even I could do it. Makes me want to try.
I checked out a few links, also the pinterestchallenge.com link, but it seems the site is gone?
If I remember I'll check back later this month to see if it's available again, as it seems like a very inspirational site!
Found you through stumble btw, I love discovering gems like this 🙂
Thank you!
The site should still be up. Try this link.
It looks like its too late to get in on the September challenge, but October will be up the first Monday of the month. 🙂
OMG! Michelle, I have a niche in my kitchen where I removed a built in ironing board and this idea will be perfect! Thanks so much!
Totally AWESOME, Love this.
Hugz
Tonniece
Hi MICHELE!!!
Your "Backlit Canvas Art" was really INSPIRING....
I have seen the original quite some time back and pinned it to do some day,then i stumbled across yours,and gotta much needed push to do it now....
and you know what ...i had finally done it....thanks to you....
have a look at mine....http://designbyshilpi.blogspot.in/
I LOVE the idea that you can change your art on canvas AWESOME!
One question though....i would LOVE to enter in your challenges...
and somehow i have not been able to do it...
plz guide..
Thanks
Regards
Shilpi
This is gorgeous! I love the things I find on pinterest 😉
Awesome Michele....
i hv been dreaming of doing this for ages....
tried flattened tin from soda cans...tried canvas itself....n finally card paper....
yet i hv been wondering what else to give it such a cool look n here i see ur version....simply awesome.....
i'm new at blogging....so i'm learning the ropes as i go....so
my email ID is
designbyshilpi@gmail.com
i read ur profile too....n felt so good....hats off to u to manage all this....
i try but hvn't been able to reach the fine balance of kids,home n work.....
You are great inspiration....
soon enough i hope to achieve the elusive balance that u have,till then i'll follow ur PINs,and get inspired....
Thanks a lot for sharing...
regards
Shilpi