
DIY $1 Manhole Cover
Create a DIY $1 manhole cover for your favorite little Teenage Mutant Ninja Turtle fan!

I know what you're thinking... why would you want to make a manhole cover??
Well, if you've seen my last couple of blog posts you know we recently had a Teenage Mutant Ninja Turtle party for my oldest's 5th birthday.
And with TMNT's comes the need for some manhole covers!
They make for great party decor, and we even used one as a serving tray on the party table.
Today I'm going to show you how to make one of these manhole covers for a mere $1!
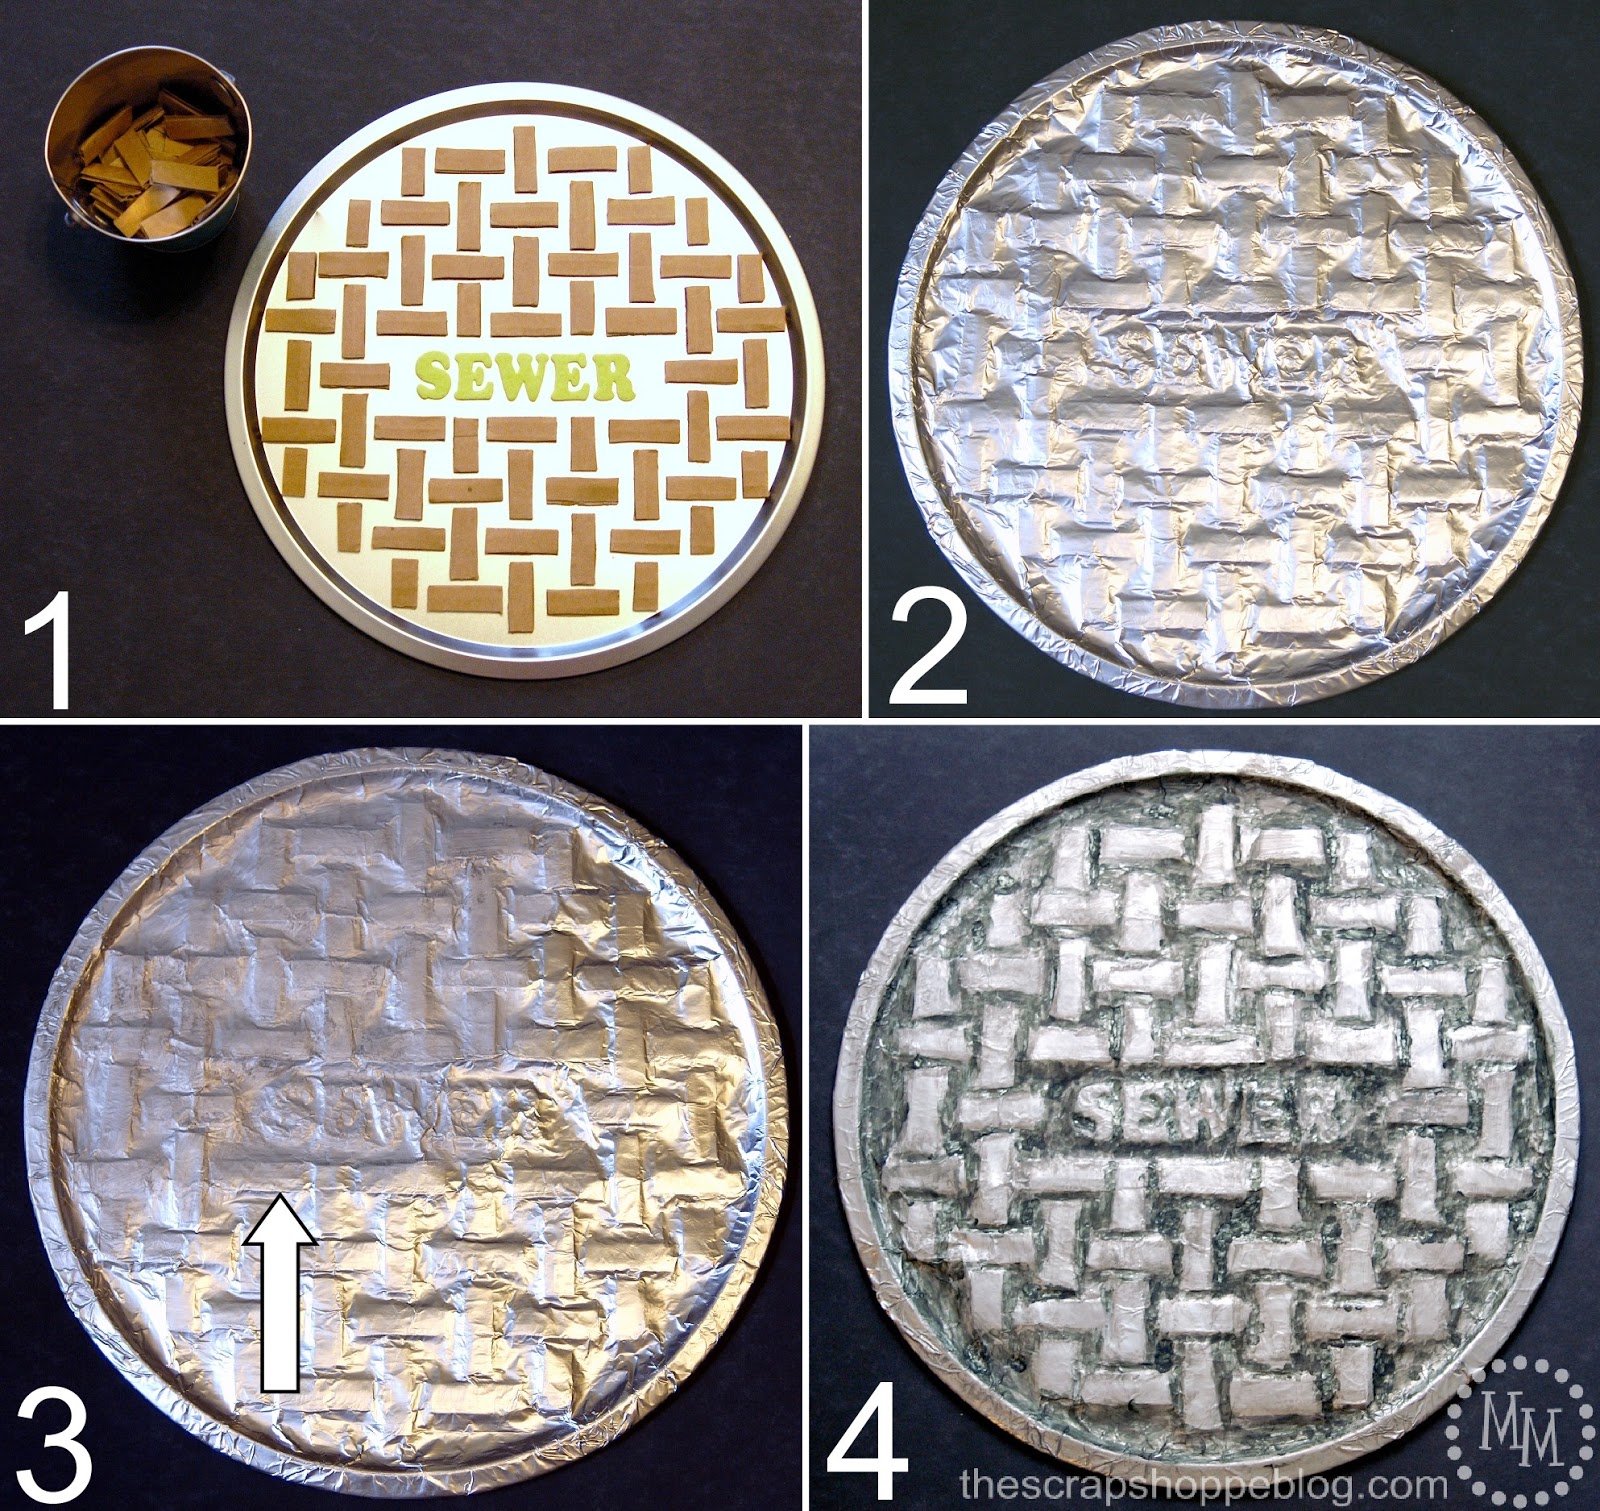
You can create the manhole cover in 4 simple steps.
I will show you how!
I whipped out 2 of them in a couple of hours!

Let's look at the supplies needed to make the manhole cover:
1 pizza pan (Dollar Tree!)
scrap cardboard cut into 1.5" x .5" strips
3-D alpha letters
large-size aluminum foil
two shades of gray paint
paintbrushes
Q-tip
roller (Amazon affiliate link)
I had all of these supplies on hand except for the pizza pan!
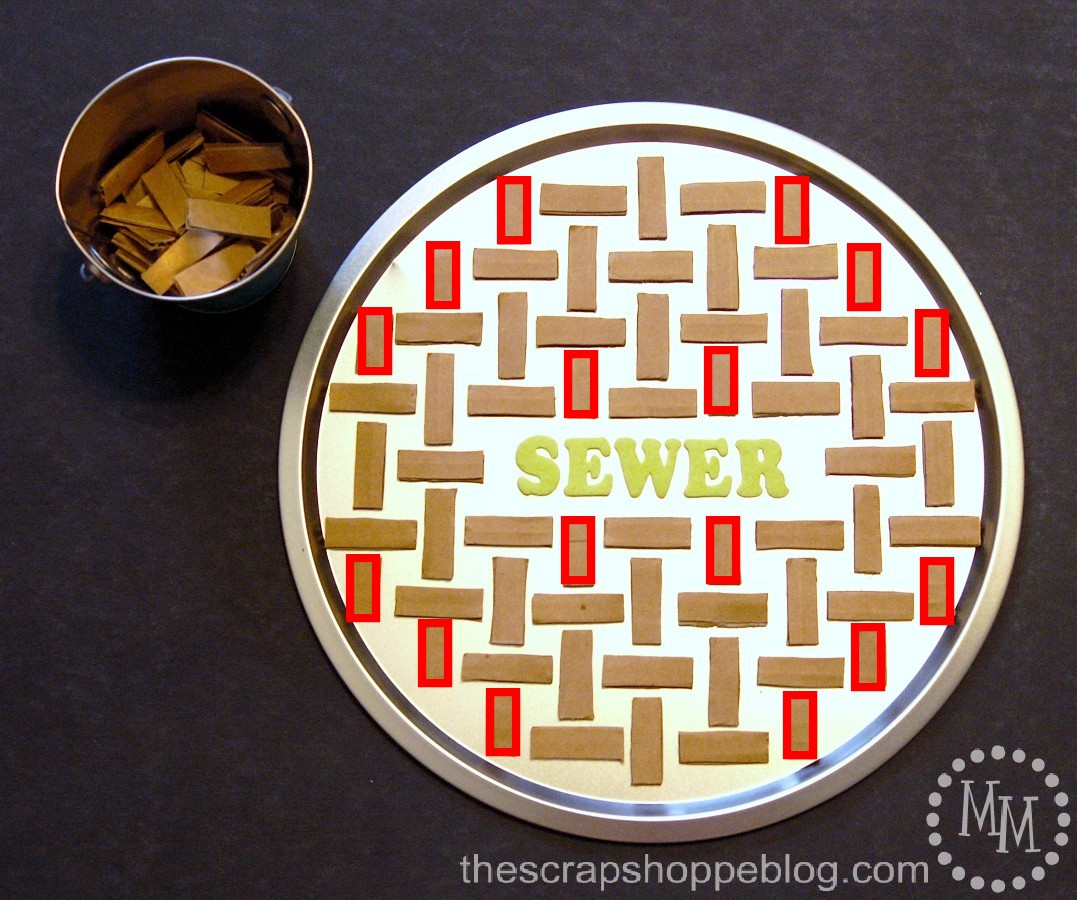
Find the center of the pizza pan and place the 3-D letters there to spell out "sewer."
My letters are self-adhesive and stick in place. Glue yours as needed
Arrange the cardboard strips into a manhole cover-like pattern around the letters.
For the strips shown above outlined in red you will want to trim the strips down to 1" x .5".
Once you have all of the cardboard arranged where you want it, go back and glue the strips to the pizza pan.

Place a piece of the foil over the pizza pan and loosely fold over the edges.
Keep the foil loose so that it is not stretched to breaking when you begin the embossing process.
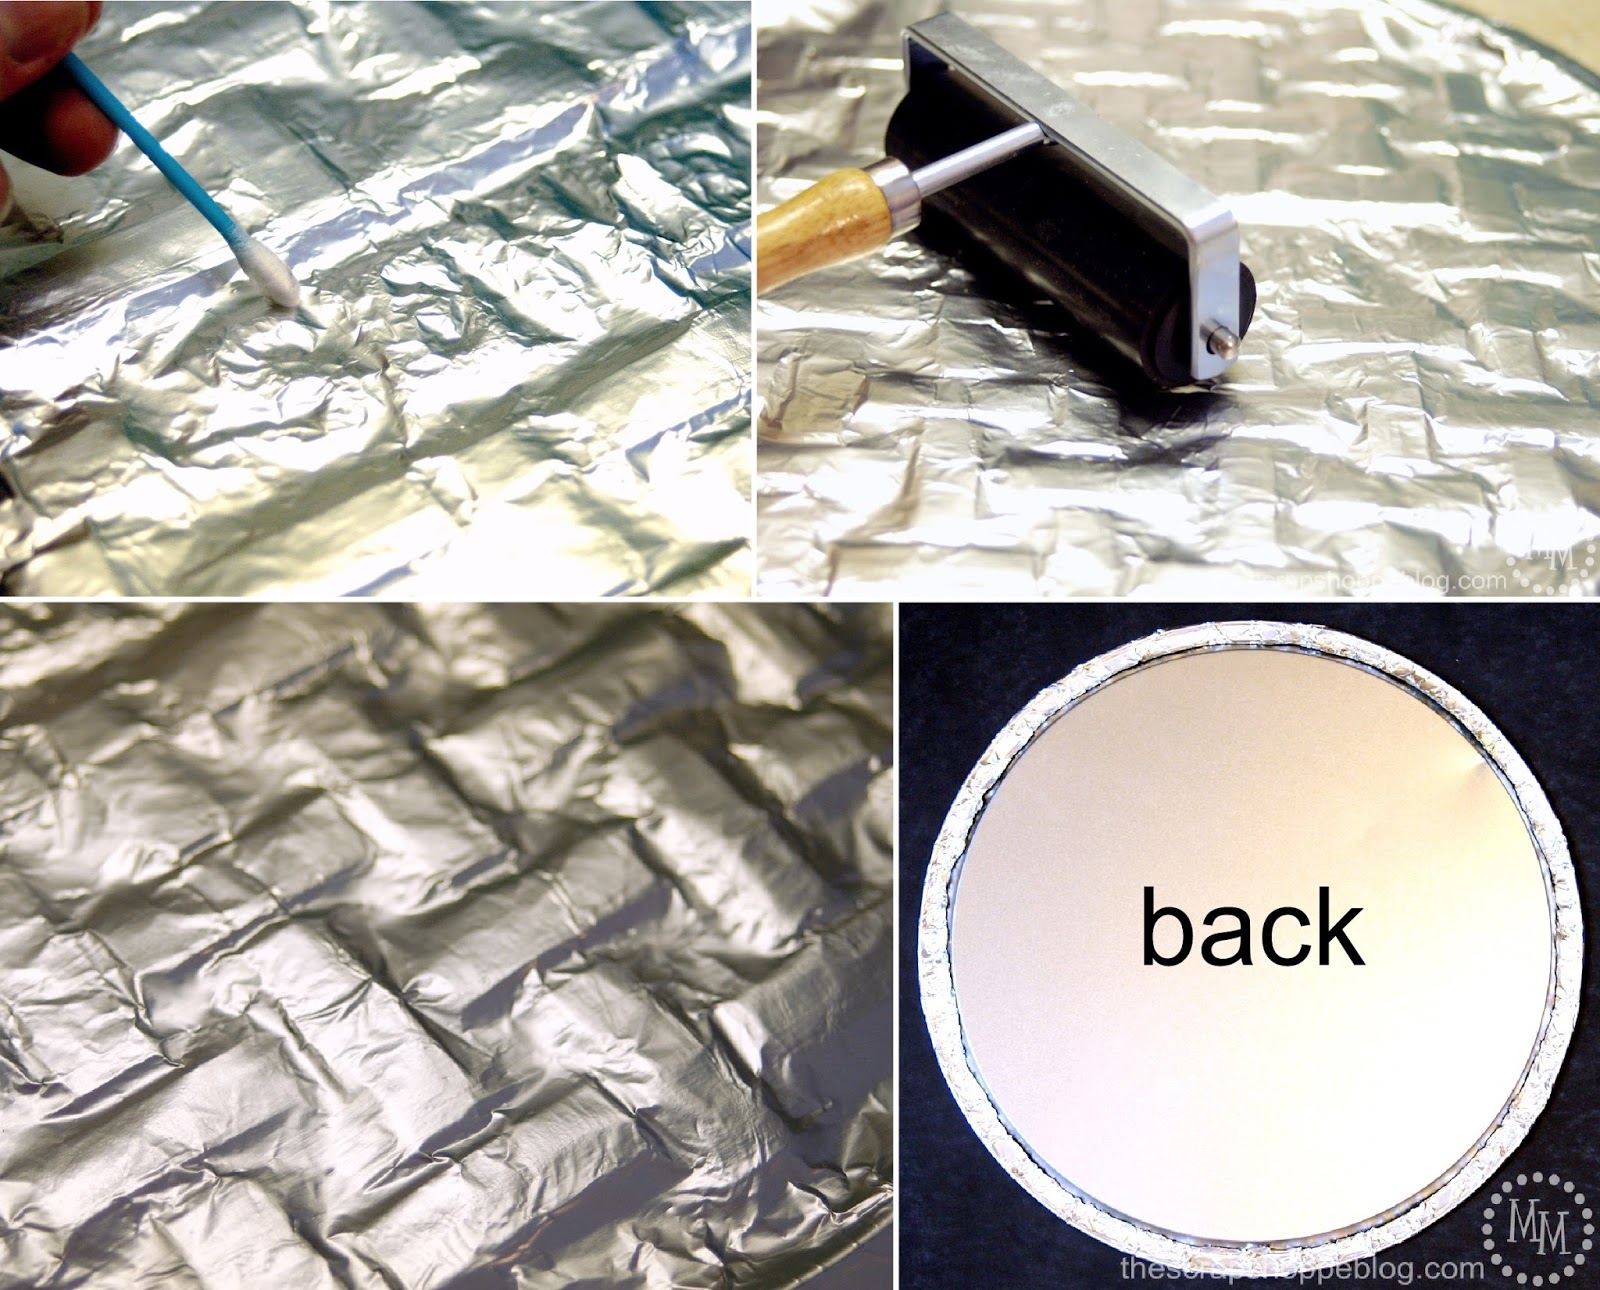
To emboss the foil, use the Q-tip to gently outline the letters.
Use the roller then the Q-tip to bring out the shape of the cardboard strips.
If the foil breaks at any time don't freak out!
Simply place a small piece of the foil under the broken space and keep on working.
You will never see it in the end!
On the back of the pizza pan, trim any excess foil for a nice finish.

The embossing alone isn't enough to truly bring out the look of the manhole cover.
That is where the paint comes in!
Gently brush a coat of the lighter gray paint all over the foil.
The upper left corned of the manhole cover has paint. The rest of the foil is unpainted.
We're already beginning to see the look of the manhole cover coming through, not to mention a more grungy look a manhole cover would have (have you ever seen a super shiny and clean manhole cover?).

After allowing the paint to dry, use the darker gray paint to fill in the deeper areas of the manhole cover.
The paint will not be smooth, but the rough look adds to the grunge effect.
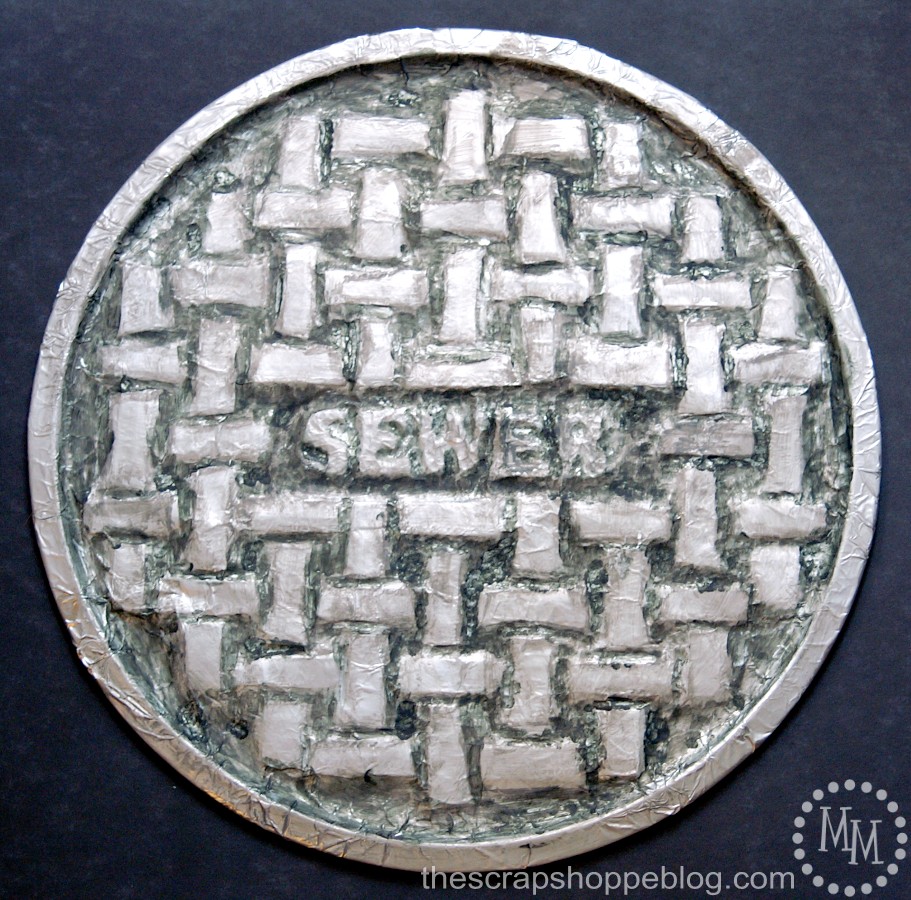
And there you go!
We have a custom manhole cover for your Teenage Mutant Ninja Turtle birthday party or, you know, for whatever!
Not bad for $1.
Would your TMNT fan love this DIY $1 manhole cover?

>> See where I party! <<


This is such an awesome idea! I'm giving it a try for my son's 3rd birthday and this week be such a cool addition. Thank you!!
Doing a TMNT themed kid's bathroom and I'm making this to hang on the wall by drilling 2 tiny holes and attaching string or a picture hanger before the tin foil step, brushing on a thin layer of mod podge over the pan and cardboard, doing the rolling and embossing, then craft glue on the back edges to hold it down, and finally the 2 painting techniques. Thanks so much for the idea and directions...I've been searching for a real man hole cover to purchase for 3 years and this is so much cheaper!
I just happened to see this today and made one for my brother (birthday today) who photographs man-hole covers . . . your direx were great. I did change the painting process by covering the whole surface with the darker gray first - drying it - then
dry-brushing the lighter gray over the relief letters and design. I then dry-brushed a lighter almost white over that. It took me about 5 hours to make the whole thing. Luckily I had the supplies needed . . . didn't have a pizza pan but used a straight edged tray. I have photos that I will post on my flickr page. Thanks again ! https://www.flickr.com/photos/miss_peggy/
This is awesome!!! I'm planning a TMNT birthday party for my son's 3rd bday. Can I pay you to make this for me? I know mine will not come out like yours.
Thanks, Melissa! I wish I could make one for you, but the pizza pan is so large I don't even want to think of what the shipping would be. You can do this!! 🙂
I don't have an embossing tool. How do I keep it laying flat and staying put.
Hi Sara! Once you begin the embossing the foil should start to stay in place. You can do this with just a Q-tip. If you do not have a roller, you can use any smooth cylindrical surface that you may have in the house.
I used a small painting trim roller from Dollar Tree! Worked fabulous and the whole thing turned out great! Thanks so much
All my children are grown and my only grandchild is 3 months old so I have no idea when I will use this- but I LOVE it! My 28 year old son was part of the original TMNT crowd in the 80's!
Where are the 3d letters from? Foam? Wood? This is great!
Hi Summer! These letters are actually felt, but you could use foam or wood. Anything to give the 3-D effect. Hobby Lobby has a huge selection of 3-D alphas in their sticker section. Other craft stores should carry them, too. 🙂
Michelle, This is awesome! Can wait to make some for my son's party!
Thank you so much! Made three for my son's bday party in two weeks!
what kind of paint did you use?
It is just regular acrylic paint. 🙂
Can you tell me the actual color of the paints? Do you think it would be ok to cut foam sheets in place of the card board or would I loose the thickness? Last question I have adhesive letters I bought from the dollar tree but I am not clear what 3-d is as far as letters.
Absolutely! The colors I used were from Folk Art and called Wrought Iron and Medium Gray.
I think the foam sheets will work fine. They will provide the same 3D effect as the cardboard. For the letters, you want something similar to your foam sheets as far as thickness goes. Flat alphabet stickers will not show up under the aluminum foil.
Last questions I hope.... Which color did you put down first and did you spray a dealer on them when done? My party is not until April but being my 1st DIY project I want to get this down right.
Start with the lighter gray and cover all over the manhole. Then go back with the darker color and fill in the deeper areas. No need for a sealer. We made these a year and a half ago and they still look great! You may want to put them up out of reach so no one can accidentally puncture the foil. Good luck!!! 🙂
This is so stinkin' awesome!! I can't believe how creative this is. I love it!! Fabulous job with the paint and distressing. I had no idea that was foil!!
Very very impressed! Love that you made this so cheaply and it turned out awesome! Nice job.
Very very impressed! Love that you made this so cheaply and it turned out awesome! Nice job.
Wow! This is PERFECT! Our family of 4 is going as TMNT for Halloween and we were trying to figure out a way to make a sewer grate- this is so much cooler than what we came up with!
Thank you!